 LOOM
LOOMAn instrument track plays one of LOOM's own instruments from a MIDI controller and records what you play as MIDI notes rather than audio. It loops the notes the way an audio track loops a take, and it has the same ring, fader, STOP, UNDO, REDO and CLEAR.
The instrument tracks sit beside the audio tracks and do not replace any of them. Each one plays one instrument, chosen with KIND: SYNTH, DRUMS or SAMPLER. In a new song, every instrument track is a synth that listens to any MIDI device on channel 1.
LOOM loops the notes, not the sound. If you change the instrument or its settings while the loop plays, the loop plays on with the new sound.
To keep the sound as audio, tick the track's INST row in Record setup. RECORD on the transport then writes it to its own file, Instrument 1.wav for INST 1, beside the loop tracks' files. An instrument track can also go in a PLAYBACK group; see Groups: the ROUTING page.
Where the instrument tracks are
The looper shows the instrument tracks in one of two layouts. Choose one with LAYOUT, at the right end of the globals row.
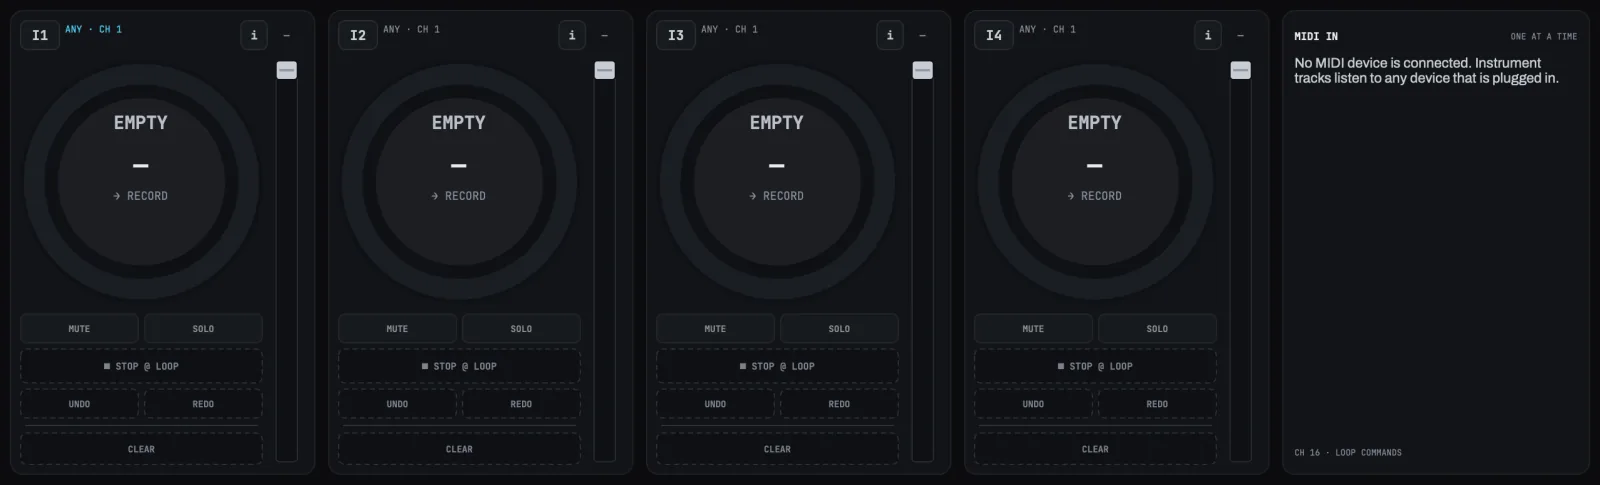
ROWSshows every track at once: the audio tracks in the top row and the instrument tracks in the row under it. The last slot of the instrument row holds theMIDI INcard.BANKSshows full-size strips, one bank at a time. TheAUDIOandINSTtabs besideLAYOUTswitch banks. Each tab carries a dot for every track in its bank, in the colour of that track's ring, so you can see a recording or playing track in the bank that is not showing. An empty track's dot is hollow.
LOOM remembers the layout on this Mac. A song does not carry it.
← and → walk through the audio tracks and then the instrument tracks. In ROWS, ↑ and ↓ move between the rows. See Keyboard shortcuts.
The instrument strip
An instrument strip has the same controls as an audio strip, in the same places. The globals row and the track strips describes them. What is different:
- The header reads
I1,I2and so on. Its second line shows the track's MIDI input, such asANY · CH 1, orNO INPUTwhen the input isNONE. The line is cyan while the track hears its input. It is grey while another track holds that input, and while the input isNONE. See One input, one track at a time. - The
ibutton opens the side panel'sINSTtab on this track. MUTEsilences the track everywhere, including its cue send. An audio track'sMUTEleaves the cue send alone. The loop keeps playing in time while the track is muted.- The strip's
MUTE, itsPANand its level on each fader axis can be automated from the arrange view, as an audio strip's can. See Channel controls.
The MIDI IN card
The card lists each MIDI device that is plugged in. Under each device's name it shows which instrument tracks hear that device now, such as → INST 1, and the channel they listen on, such as CH 1. A device that a track names but that is not plugged in is listed struck through, marked missing. The top right of the card reads ONE AT A TIME; see One input, one track at a time. The bottom line names LOOM's command channel, such as CH 16 · LOOP COMMANDS.
The card is a readout. To change what a track listens to, use the INST tab.
The INST tab
While an instrument track has focus, the side panel's middle tab reads INST 1, INST 2 and so on, and shows that track's settings. Open it with the strip's i button or the tab itself.
INSTRUMENT
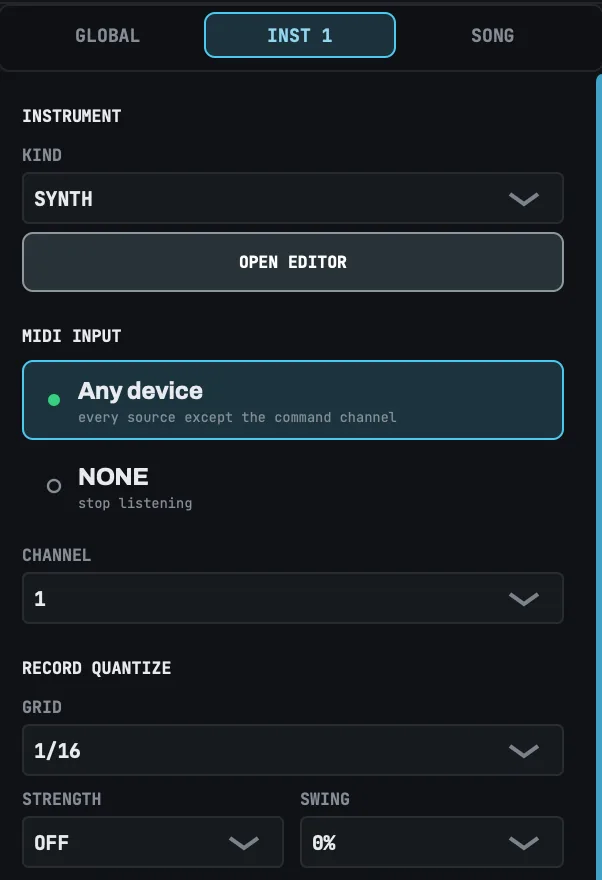
KIND chooses what the track plays: SYNTH, DRUMS or SAMPLER. Changing it ends the notes the track is holding and starts the new instrument at its default sound. The loop keeps its notes and plays them on the new instrument.
OPEN EDITOR opens the editor dock at the bottom of the looper on this track. If you press it in the mixer or the arrange view, LOOM switches to the looper first, and if the editor is pinned to another track, the pin moves to this track. In the looper, a pinned editor stays on its track; press PIN to release it first. See The editor dock, The synth editor, The drum editor and The sampler editor.
MIDI INPUT
The list chooses which MIDI device the track listens to:
| Row | What the track listens to |
|---|---|
Any device |
Every MIDI device on this Mac. |
| A device, by name | That device only. Each device that is plugged in has a row. |
| A device struck through | A device this track names that is not plugged in. It stays chosen, and the track listens to it again when you plug it in. |
NONE |
Nothing. The track still plays its loop, but you cannot record on it. |
CHANNEL chooses the channel: ANY or 1 to 16. The command channel, where LOOM listens for its own commands, is greyed and marked LOOP COMMANDS, and ANY leaves it out. To play an instrument on that channel, move the command channel first with MIDI CH in the GLOBAL panel. See MIDI mapping.
While the input is NONE, CHANNEL reads NONE and has nothing to choose.
The input is saved with the song. If you open the song on a rig that does not have the device, the track keeps the device's name and shows it as missing rather than switching to Any device.
RECORD QUANTIZE
GRID, STRENGTH and SWING move the notes you record toward a grid. See Record quantize.
TIMING, RECORDING and RESPONDS TO GLOBALS
These rows set when this track launches and stops, where its loop starts when it launches, when it closes a take, and whether the ALL START and ALL STOP buttons take it. They are the rows of an audio track's TRACK panel, with the same values, and they do the same things. See The side panel.
| Section | Control | Values |
|---|---|---|
TIMING |
LAUNCH QUANTIZE |
IMMEDIATE, NEXT BEAT, NEXT BAR, NEXT CYCLE |
TIMING |
STOP QUANTIZE |
IMMEDIATE, END OF BEAT, END OF BAR, END OF LOOP |
TIMING |
ON LAUNCH |
KEEP PHASE, FROM THE TOP |
RECORDING |
REC COUNT-IN |
OFF, 1 BAR … 4 BARS |
RECORDING |
LENGTH |
FREE, 1 BAR, 2 BARS, 4 BARS, 8 BARS, 16 BARS, 32 BARS |
RECORDING |
REC ACTION |
PLAY, OVERDUB, STOP |
RESPONDS TO GLOBALS |
FOLLOWS ALL START |
OFF, ON |
RESPONDS TO GLOBALS |
FOLLOWS ALL STOP |
OFF, ON |
Until you change one of these rows, the track follows the song's defaults in the GLOBAL panel. When you change one, the track keeps its own value for every row on this tab, and a later change in the GLOBAL panel no longer moves it. The settings are saved with the song.
ON LAUNCH sets where the loop starts when you launch the track, as it does on an audio track. FROM THE TOP starts the loop at its beginning. KEEP PHASE starts it at the point it would have reached if it had kept playing since it last started. A loop that has not played since you opened the song starts at its beginning with either value. ON LAUNCH starts at FROM THE TOP.
The audio track's DUB MODE is not on this tab. An overdub on an instrument track always adds its notes to the loop.
ALL START does not start an instrument track that has no loop yet, whatever FOLLOWS ALL START says.
The strip's STOP face shows this track's stop quantize, with * when it differs from the song's default.
STATE
OVERRIDES names the settings on this tab that differ from the song's default, such as launch, rec count-in, or reads none — inherits global.
The tab scrolls when its rows do not fit. Tabbing to a row below the fold scrolls it into view.
One input, one track at a time
In a new song every instrument track listens to the same input, so LOOM has to decide which track hears your keyboard. When instrument tracks listen to inputs that overlap, only one of them hears the input at a time. Tracks whose inputs do not overlap are not affected: pads on channel 10 can play one track while a keyboard on channel 1 plays another.
The track that holds a shared input is the one you most recently focused, or most recently pressed record or overdub on. Pressing record on a track from a MIDI controller claims its input even though it does not move the focus. Focusing an audio track leaves every input where it is, so you can move to an audio track and keep playing the instrument that holds your keyboard.
If you press record on an instrument track while another track on the same input is recording or overdubbing, the input moves to the new track at the press. The other track closes its take as if you had pressed its ring, and loops. A note you are holding when the input moves ends on the track that started it.
The header of each instrument strip and the MIDI IN card show which track holds each input.
Recording on an instrument track
The ring works the way it does on an audio track. Press it on an empty track to record, press it again to close the loop, and press it on a playing track to overdub. If the transport is stopped, the first press starts it. See The ring.
When a take launches, stops and closes is set by the track's LAUNCH QUANTIZE, STOP QUANTIZE, REC COUNT-IN, LENGTH and REC ACTION on the INST tab. Until you change them, they follow the GLOBAL panel. See TIMING, RECORDING and RESPONDS TO GLOBALS.
LOOM refuses to record on a track whose input is NONE, and the notice line says why. Choose an input on the INST tab first.
What LOOM does at the edges of a take:
- A note played just early. A note you play up to about 40 milliseconds before the take starts is recorded on the take's first beat.
- A late close. When the close waits for a bar line and you press a little after one, LOOM closes the loop on the bar line you just passed rather than the next one. A note you played between that bar line and your press is kept, and it plays on beat 1 of the loop.
- A note held over the close. A note you are still holding when a take or an overdub closes ends there. On the next pass it plays again from its start.
Overdub, undo and redo
Each overdub adds a pass of notes on top of the loop. UNDO removes the last pass, and you can press it again to remove the pass before that, back to the first take. The first take stays. REDO puts back the last pass you removed. If you record a new overdub after an undo, the passes you removed are discarded and REDO cannot bring them back.
STOP and CLEAR
STOP stops the loop at the moment STOP QUANTIZE sets and ends every note the track is playing. The loop is kept, and a press on the ring plays it again.
CLEAR deletes the loop's notes. Hold it for one second, as on an audio track. The instrument, its sound and the track's settings stay as they are.
Record quantize
Record quantize moves each note you record toward a grid. It is set on the INST tab, per track, and saved with the song.
| Setting | Values | What it does |
|---|---|---|
GRID |
1/1 to 1/64, each straight, TRIPLET or DOTTED |
The grid the notes move toward. The grid counts from the bar line, so it works in every time signature. |
STRENGTH |
OFF, 25%, 50%, 75%, 100% |
How far each note moves toward its grid step. 100% puts it on the step. OFF leaves the take as you played it. |
SWING |
0% to 100%, in steps of 10% |
How late every second grid step sits. 0% is straight. |
A new track has GRID at 1/16, STRENGTH at OFF and SWING at 0%.
A note keeps its length when it moves. A note that moves onto the end of the loop plays at the loop's start. The notes you overdub are quantized in the same way as the first take.
The hits of a drum pattern, and the hits you add on the drum grid, are placed exactly, so GRID and STRENGTH do not move them. SWING does: a hit on every second grid step plays late by the same amount as a recorded note on that step, even when STRENGTH is OFF.
Record quantize acts on the loop that is playing, not only while you record. LOOM keeps each take as you played it and quantizes from that, so you can change the settings at any time:
- To tighten a take after you record it, raise
STRENGTHwhile the loop plays. - To hear the take exactly as you played it again, set
STRENGTHtoOFF.
The ring on an instrument track
The ring on an instrument track shows where its loop is, the same way an audio track's ring does. While the loop plays, the arc fills clockwise from the top, and the number counts down the bars and beats to the loop point. While you record the first pass, the number counts up the seconds you have recorded. A stopped track shows a dash.
The editor dock
OPEN EDITOR on the INST tab opens the editor dock across the bottom of the looper. The dock shows the editor for the instrument the track plays: the synth editor, the drum editor or the sampler editor.
The dock's header names the track and its instrument, such as INST 1 · SYNTH. It shows the loaded preset and holds SAVE, the ··· button, PIN and CLOSE. See Synth presets.
The dock follows the focus: focus another instrument track and the dock edits that one. Focusing an audio track leaves the dock where it is. Press PIN to keep the dock on its track while you focus others, and press it again to let it follow the focus. CLOSE closes the dock.
The track strips while the dock is open
The dock is as tall as its editor needs, and the track strips take the rest of the height. While the dock is open, every track, audio and instrument, sits in one row above it. LAYOUT has nothing to choose until you close the dock.
A strip in that row shows all of its controls when it has room: the fader, MUTE, SOLO, UNDO, REDO, STOP and CLEAR. When it does not, the strip shows only its header, its ring, STOP and CLEAR. The ring then draws no number. It shows its state word, such as PLAY, REC or EMPTY, inside it when the word fits, and otherwise its colour and arc show the state. A muted track shows a thin amber bar between its ring and STOP. The header shows the track's input only when the input fits beside the number. A screen reader reads the input in the strip's description either way.
How the editors fit the window
Each editor changes its layout to fit the dock. In a small window it shows fewer controls at once, and you choose what to show with a list or with tabs in the dock's header. In a wider window it adds pictures of the sound, and in a large window it shows every control on one page. Hide the side panel to give the dock more width. Each editor's section describes its layouts.
How many notes an instrument plays
Each instrument plays a limited number of notes at once:
| Instrument | Notes at once |
|---|---|
| Synth | 8 |
| Drum machine | 12 |
| Sampler | 8 |
When every voice is sounding and another note starts, the instrument gives the new note a voice in this order:
- A voice that is silent.
- A voice that is releasing after its key went up, oldest note first. On the drum machine, a part cut off by its choke group counts as releasing.
- A note the track's loop is playing, oldest first.
- A note you are holding, oldest first. On the synth, a key the sustain pedal holds counts as held.
With MODE at MONO or LEGATO, the synth plays one note at a time, and the last key you press wins. A note you play takes over from a note the loop is playing. When you release it, the synth returns to the last key you are still holding.
With VOICE at MONO, the sampler plays one sound at a time: each new note or slice stops the one that is sounding. See AMP · VOICE.
The synth editor
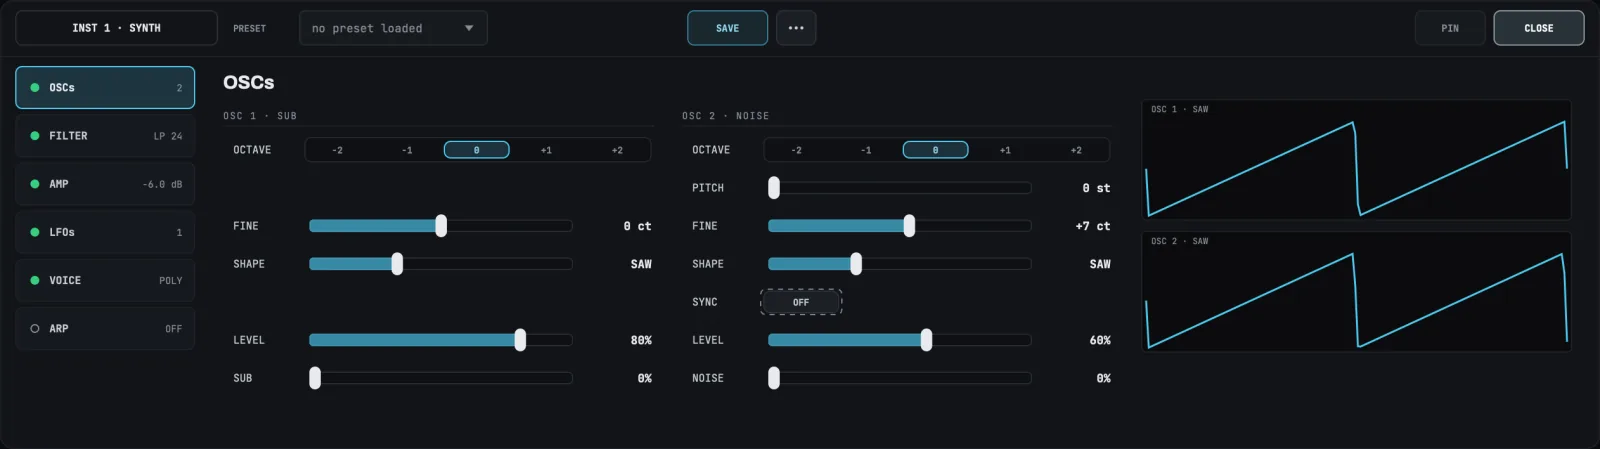
The synth editor opens in the editor dock when you press OPEN EDITOR on a synth track's INST tab.
Sections
The editor's layout depends on the size of the window. In a smaller window it shows one section at a time. In a wider window it also shows that section's displays in a column on the right. When the window is large enough, such as full screen on a 16-inch MacBook Pro with the side panel open, the editor shows every section on one page in four columns, with a display above every block of controls except VOICE. The page has no section list, and the track strips above the dock fold to a row of rings to make room for it. A window that fills the screen without being full screen is not tall enough for every display, so it shows one section at a time with its displays in the column on the right.
The list on the left of the editor names the synth's sections: OSCs, FILTER, AMP, LFOs, VOICE and ARP. Click a section to show its page. Each page has a left column and a right column. A row in the left column sits level with the same row in the right column, so a control that only one column has leaves a space in the other.
Each section button shows a short summary of its settings and a light:
- A filled green light means the section is in the signal path.
- An amber light inside a ring means the section is modulating the sound now.
- A hollow ring means the section is off.
| Section | Summary | Light |
|---|---|---|
OSCs |
The number of oscillators with a LEVEL above 0, followed by + SUB and + NOISE when those levels are above 0. |
Off when every level on the page is 0. |
FILTER |
The filter type. | Always in the signal path. |
AMP |
The output LEVEL. |
Always in the signal path. |
LFOs |
The number of LFOs with a DEPTH above 0, or OFF. |
Amber while an LFO modulates the sound with the mod wheel at rest. Green when only the mod wheel can bring LFO 1 in. Off when both depths are 0. |
VOICE |
The voice mode, followed by x2 or x4 while UNISON is on. |
Always in the signal path. |
ARP |
The arpeggiator's MODE while ARP is on, or OFF. |
In the signal path while ARP is on. Off while it is off. |
The editor reads the lights from the track's settings. It cannot see the mod wheel's position, so the LFOs light assumes the wheel is at rest.
Each display draws the settings you are editing in cyan. The oscillators, the LFOs and the two envelopes each come in a pair. When only one display of a pair is on screen, it also draws the other set of the pair in grey behind its own, and its label names the grey set. When both displays of a pair are on screen, each draws only its own set.
- The
OSC 1andOSC 2displays draw the oscillators over the same time. - The
LFO 1andLFO 2displays draw two cycles of each LFO, so you can compare their shapes. Each label names its LFO's rate. - The
FILTER ENVandAMP ENVdisplays draw the envelopes for one held note, released at the same moment. - The
FILTERdisplay draws the filter's response. - The
ARPdisplay previews the arpeggiator's steps for a three-note chord: their order, the octaves, the rate over two beats, and each step's gate as the length of its bar.
Working with the controls
The sliders and the rows of cells work the way an effect's controls do. See The controls in the mixer chapter.
Press Tab to move through the section list, then down the left column, then down the right column. On the full-screen page, Tab moves through the OSCs and LFOs switches first, then through the blocks in the order of the section list.
OSCs
The left column is OSC 1 · SUB and the right column is OSC 2 · NOISE.
OCTAVEmoves the oscillator in whole octaves, from-2to+2.PITCH(OSC 2 only) raises OSC 2 by up to a fifth, from 0 to +7 semitones. It moves smoothly between semitones, so you can sweep it while you play. It adds toOCTAVEandFINE.FINEtunes the oscillator in cents.SHAPEmorphs the oscillator's waveform.SYNC(OSC 2 only) restarts OSC 2 each time OSC 1 starts a cycle.LEVELsets how loud the oscillator is in the mix.SUBsets the level of the sub-oscillator, andNOISEthe level of the noise source.
On the full-screen page, OSC 1 and OSC 2 share one block. The OSC 1 | OSC 2 switch at the right of the block's title chooses which oscillator's controls you see. Both oscillators always sound, and the switch changes only the view. OSC 1 has no PITCH or SYNC, so those rows are empty while OSC 1 shows, and the controls below them stay in place when you switch. The editor remembers each track's choice while LOOM is open. Presets and songs do not store it.
FILTER
The left column is FILTER and the right column is FILTER ENV, the filter's envelope.
TYPEchooses the filter:LP 12,LP 24,HPorBP.CUTOFF,RESandDRIVEset the cutoff frequency, the resonance and the drive.KEY TRKsets how far the cutoff follows the notes you play.ENV AMTsets how far the filter envelope moves the cutoff. Negative values move it down.ATTACK,DECAY,SUSTAINandRELEASEshape the filter envelope, andCURVEbends all of its segments.VELOCITYsets how much the velocity of each note scales the envelope.-
LOOPrepeats the filter envelope while you hold a key:- The envelope rises through the attack and falls through the decay to the sustain level.
- Instead of holding at the sustain level, it falls to 0 at the release time.
- It starts the attack again from 0.
With
DECAYat its lowest setting, the envelope falls from the top of the attack. WithRELEASEat its lowest setting, the attack starts again as soon as the decay ends. When you release the key, the envelope releases from wherever it is, as it does withLOOPoff. -
TO OSC 2bends OSC 2's pitch with the filter envelope, by up to 24 semitones up or down. At 0 it does nothing. With OSC 2'sSYNCon, this gives each note a sweep at its start.
AMP
The left column is AMP ENV, the amp envelope: ATTACK, DECAY, SUSTAIN, RELEASE and CURVE. The right column is RESPONSE:
VELOCITYsets how much the velocity of each note changes its volume.LEVELsets the synth's output level.
On the full-screen page, VELOCITY and LEVEL sit under the amp envelope's controls, in the AMP ENV block.
LFOs
The left column is LFO 1 and the right column is LFO 2. They have the same controls.
SHAPEchooses the waveform:TRIANGLE,SAW,SQUAREorS&H.SYNCchooses whether the LFO runs at its own rate (FREE) or follows the tempo (SYNC).RATEsets the speed. WithSYNCatFREE, it is a slider in hertz. WithSYNCatSYNC, it is a set of cells, one for each note value from4/1down to1/32, whereDmeans dotted andTmeans triplet. The cells wrap onto several lines;↑and↓move to the cell above and below.DESTchooses what the LFO moves.PITCH 1+2moves both oscillators.PITCH 2moves OSC 2 alone, which sweeps the sync timbre when OSC 2'sSYNCis on.CUTOFF,MORPHandAMPmove the cutoff, the oscillator shape and the volume.DEPTHsets how far the LFO moves its destination.
On the full-screen page, LFO 1 and LFO 2 share one block, with an LFO 1 | LFO 2 switch at the right of its title. It works the way the OSC 1 | OSC 2 switch does: both LFOs always run, and the switch changes only which one's controls you see.
VOICE
The left column is VOICE:
MODEchoosesPOLY,MONOorLEGATO.POLYplays chords.MONOplays one note at a time and restarts the envelopes on each note.LEGATOplays one note at a time and restarts the envelopes only when no other key is held.GLIDEsets how long a note takes to slide to the next pitch.GLIDE LEGchooses whenGLIDEacts. It is a different setting fromMODE'sLEGATO. With itON, a note you play glides only while you still hold another key, and a note you play after every key is up starts at its own pitch. The loop's notes follow the same rule among themselves: a loop note glides only while another loop note is held. With the arpeggiator on, the first step of a new chord starts at its own pitch and the steps after it glide.BENDsets the pitch bend range, in semitones.WHEELchooses what the mod wheel does.LFO 1scales LFO 1's depth,CUTopens the cutoff andOFFdoes nothing.WHL DEPTHsets how far the mod wheel reaches at the destinationWHEELchooses.AT CUTOFFsets how far aftertouch opens the cutoff.
The right column is UNISON. It stacks several voices on every note you play, tuned slightly apart and spread across the stereo field, for a thicker sound:
UNISONchooses how many voices play each note:OFF,2or4. WithOFF, each note plays one voice in the centre, andDETUNEandSPREADhave no effect.DETUNEsets how far apart the stacked voices are tuned. At 0 they play in tune. At 100 % the outermost voices are 50 cents above and below the note. The control has more resolution near the bottom of its travel, where small amounts thicken the sound without making it sound out of tune: at 50 % the outermost voices are 12.5 cents from the note.SPREADsets how wide the stacked voices are panned. At 0 every voice is in the centre. At 100 % the outermost voices are hard left and hard right.
The synth has eight voices, and each stacked voice uses one of them. With UNISON at 2 the synth plays four notes at a time, and at 4 it plays two. When you play more notes than that, the oldest note stops to make room, as it does when you play more than eight notes with UNISON off. Each stacked voice starts its oscillators at a different point in their cycle, so the voices do not add up to one louder wave. The synth lowers the level of a stack so that turning UNISON on keeps the sound at about the same volume.
UNISON works in every MODE, with GLIDE and with the arpeggiator. In MONO and LEGATO, the whole stack moves to each new note and glides together. A note that is already sounding keeps its stack when you change UNISON; the change applies from the next note.
On the full-screen page, UNISON, DETUNE and SPREAD sit under the other voice controls, in the VOICE block.
ARP
The ARP section has the arpeggiator's controls:
ARPturns the arpeggiator on and off.MODEchooses the order of the notes:UP,DOWN,UP DOWN,RANDOMorAS PLAYED.RATEchooses the note value of each step, from the same set as an LFO'sRATE.OCTAVESsets how many octaves the arpeggio spans, from1to4.GATEsets how long each step sounds, as a share of the step.
While the transport rolls, every arpeggiator step starts on a grid step of RATE. A chord you press between grid steps waits for the next one, and a chord you press and release before then still sounds that step once.
Synth presets
The preset row in the dock's header shows the preset you last loaded or saved on this track, or no preset loaded. The words beside the name are the ones the effect presets use: FACTORY for a preset that ships with LOOM, and EDITED once a control has moved since you loaded or saved it. See Racks and presets.
A song keeps the name of the preset each track was last loaded from or saved as. When you open the song, or when LOOM starts with it, the row shows that name again. It shows EDITED if the track's settings differ from the preset as it is saved now, which happens when you changed a control before saving the song or saved the preset again since. The row reads no preset loaded when the song names no preset, when the preset has been deleted, and after you start a new song or choose a different instrument for the track. This applies to the synth, the drum machine's kits and the sampler.
Click the name to open the list of synth presets. The presets that ship with LOOM are listed under FACTORY and yours under USER. Press LOAD beside a row, or Return on it, to load it onto the track.
| Factory preset | What it is |
|---|---|
Pad |
Slow saws that open and close with the notes |
Bass |
One note at a time, an octave down, with a sub |
Lead |
One note at a time with glide; the mod wheel adds vibrato |
Pluck |
A short note that closes quickly |
Arp |
Held notes play upward in sixteenths over two octaves |
SAVE opens the save sheet, where you name the preset and give it a description. With one of your own presets loaded, the sheet opens with its name and description filled in. If you keep the name, LOOM asks before it replaces the saved preset. While a factory preset is loaded, SAVE is unavailable.
The ··· button beside SAVE opens the menu the effect presets use: SAVE AS…, GET INFO…, DELETE, REVEAL IN FINDER and REVERT TO SAVED. Each item does what it does for an effect preset, and the same items are unavailable on a factory preset. See Racks and presets. On an instrument track:
GET INFO…renames the preset's file, and every track that shows the preset shows the new name.- After
DELETE, the row goes on showing the name and the track keeps its sound. REVERT TO SAVEDputs back the settings you loaded or last saved, including afterDELETE. It is not added to the history, so⌘Zdoes not take it back.
Synth presets are saved in ~/Music/LOOM/Presets/Synth. The song saves the synth's settings with the track, so the track sounds the same when you open the song again.
The drum editor
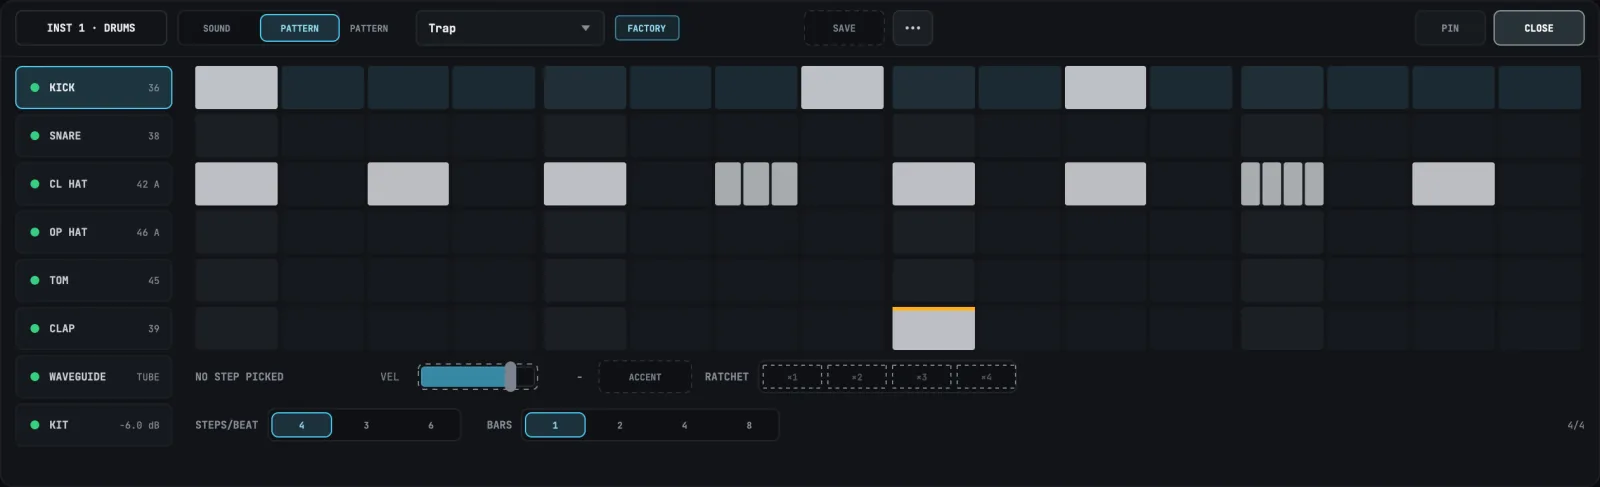
The drum editor opens in the editor dock when you press OPEN EDITOR on a drum track's INST tab. The dock's header names the track, such as INST 2 · DRUMS, and holds the SOUND and PATTERN tabs, the preset row, PIN and CLOSE. In a large window the tabs are replaced by one page. See The drum editor in each window size.
Parts
Each part plays on its own note, from the General MIDI drum map. The track ignores every other note.
| Part | Note |
|---|---|
KICK |
36 |
SNARE |
38 |
CL HAT |
42 |
OP HAT |
46 |
TOM |
45 |
CLAP |
39 |
A hit always plays its whole sound. Releasing the key or pad does not shorten it. Each layer's DECAY sets how long that layer lasts.
A part rings over its own earlier hits unless it is in a choke group. When a part in a choke group plays, it cuts every sound in its group, including its own earlier hits. In the default kit, CL HAT and OP HAT are both in group A, so a closed hat cuts an open hat.
The part list
The list on the left names each part, then WAVEGUIDE and KIT. A part's entry shows the note that plays it and, when the part is in a choke group, the group's letter, such as 42 A. WAVEGUIDE shows its TYPE, and KIT shows the kit's LEVEL.
A filled green light means the entry is in the signal path, and a hollow ring means it is not:
- A part is in the signal path while layer 1's
LEVELis above its lowest setting, or while layer 2 has aSOURCEand itsLEVELis above its lowest setting. WAVEGUIDEis in the signal path while any part'sSENDis above 0 and the waveguide'sLEVELis above its lowest setting.KITis in the signal path while itsLEVELis above its lowest setting.
SOUND
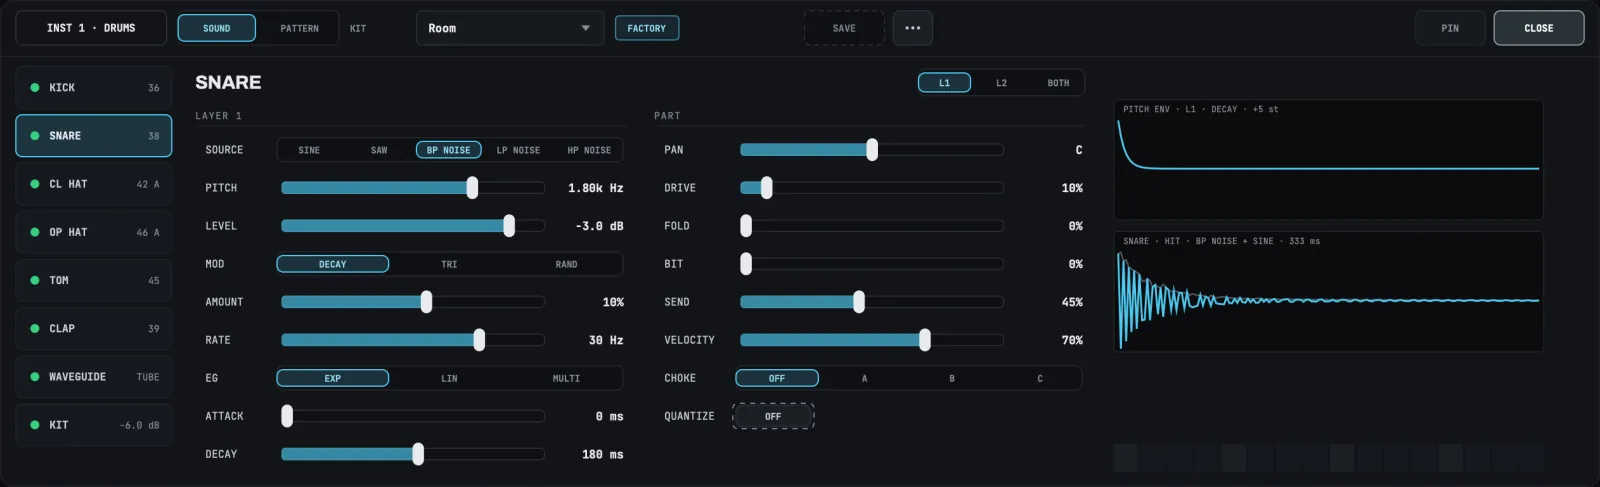
Select SOUND, then click an entry in the list to show its page.
A part is made of layer 1 and layer 2, which play together on every hit. Use them to build a sound from parts: a snare from a tone and a burst of noise, or a kick from a low sine and a short click. The part's page has a left column for one layer and a right column, PART, for what the part does with both.
The switch at the right of the part's name chooses what the left column shows:
L1shows layer 1, and the column is headedLAYER 1.L2shows layer 2, and the column is headedLAYER 2.BOTHshows layer 1's settings, and the column is headedLAYERS 1 + 2. A control you change sets both layers to the new value.
The switch changes only what you see. Both layers keep playing whichever one is shown.
Each layer has these controls:
SOURCEchooses what the layer plays:SINE,SAW, or noise through a filter.BP NOISEkeeps a band of noise aroundPITCH,LP NOISEkeeps the noise belowPITCH, andHP NOISEkeeps the noise above it. Layer 2 also hasOFF, which silences it.PITCHsets the pitch of a tone, or where the noise filter cuts.LEVELsets the layer's volume.MODchooses how the pitch moves during the hit:DECAY,TRIorRAND.AMOUNTsets how far the pitch moves and in which direction, andRATEsets how fast. WithDECAY, the pitch startsAMOUNTaway and returns toPITCH, and a higherRATEreturns it sooner, so the fall is shorter. Most of the audible change is in the lower part of theRATErange.EGchooses the shape of the layer's volume.EXPrises overATTACKand fades away overDECAY.LINrises overATTACKand falls in a straight line to silence at the end ofDECAY.MULTIstrikes in quick repeated bursts before it fades overDECAY, the way a hand clap does.ATTACKandDECAYset how long the layer takes to rise and to fade.
PART has these controls:
PANsets the part's place in the stereo field.DRIVEsets how hard each layer drives the saturator.FOLDfolds each layer's wave back on itself for a brighter, harder tone. At0%it does nothing.BITlowers the part's resolution for a grainy, lo-fi sound. At0%it does nothing.SENDsets how much of the part goes to the waveguide.VELOCITYsets how much a hit's velocity changes its volume. At0%every hit plays at the same volume.CHOKEputs the part in groupA,BorC. AtOFFthe part is in no group.QUANTIZEatONmoves both layers'PITCHto the nearest semitone, so a tuned part plays in key.
A kit saved before layer 2 existed opens with layer 2 set to OFF, so it sounds as it did.
WAVEGUIDE is the kit's resonator, and every part's SEND feeds it. Its left column, WAVEGUIDE, has TYPE (TUBE or STRING), TUNE, DECAY and BODY. Its right column, RETURN, has LEVEL, which sets how loud the waveguide is in the kit.
KIT has ACCENT, which sets how much louder an accented hit plays, and the kit's LEVEL. Only a step marked ACCENT plays accented. A hit you play on a key or pad is never accented, however hard you play it.
The controls work the way the synth editor's do. See Working with the controls.
Kits
On SOUND, the preset row in the dock's header is KIT. It shows the kit you last loaded or saved on this track, or no kit. Click the name to open the drum kits and load one. SAVE stores the current sound as a kit. FACTORY and EDITED mean what they mean for a synth preset, and the ··· menu works as it does there. See Synth presets.
The pattern grid
Select PATTERN to see the track's loop as steps. The grid and the loop are the same notes: a hit you play on a pad appears in the grid, and a step you add plays in the loop. Each part has a row beside its entry in the list, each cell is one step, and the steps are grouped by beat.
- A filled cell holds a hit. A brighter fill is a louder hit.
- An amber band along the top of a hit means the hit is accented.
- A cell split into narrow bars is a ratchet. The step plays once for each bar.
- A hit that plays between steps is drawn as a thin bar where it plays, in the nearest step's cell, and that cell has a dashed outline.
- While the loop plays, the column of the step it is playing is lit green and outlined.
- The picked part's row is tinted, and the picked step has a cyan outline.
On an empty drum track the grid shows one bar in the song's meter, or as many bars as you choose in BARS. The first step you click creates a loop of that length. The meter is shown at the right end of the line under the grid, such as 4/4.
Changing steps
- To add a hit to a step, click the empty cell. The hit has a velocity of 100.
- To empty a step, click it. This removes every hit in the step, including hits between steps.
- To pick a step without changing it, Shift-click it.
- With the grid focused,
←and→move between steps, and↑and↓move between parts. Moving past the last step goes back to the first.SpaceorReturnadds a hit to the picked step or empties it.
The notice line says what each change did, such as Step 13 on SNARE is in the loop.
Press Tab to move from the list and the page to the grid, then to VEL, ACCENT, RATCHET, STEPS/BEAT, BARS, ‹ and ›.
STEPS/BEAT and bars
STEPS/BEAT sets how many steps divide a quarter note: 4 for sixteenths, 3 for eighth-note triplets and 6 for sixteenth-note triplets. It changes how the grid reads the loop, not the loop's notes. A hit that does not fall on a step at the new setting is drawn between steps. You cannot choose a setting that does not divide the loop's bar into whole steps. Loading a pattern sets STEPS/BEAT to the pattern's own setting.
BARS sets the length of the loop: 1, 2, 4 or 8 bars of the loop's meter. The lit cell is the loop's length. A loop of another length, such as a three-bar loop you recorded, lights no cell, and the line under the grid shows its length, such as BAR 1 OF 3.
- A longer loop repeats the bars it has from the top. From one bar to four, each new bar is a copy of bar 1. From three bars to four, bar 4 is a copy of bar 1. Each copied hit keeps its velocity, accent, ratchet and place between steps.
- A shorter loop drops its later bars. With the drum editor focused, press
⌘Zto bring them back as they were, and⇧⌘Zto drop them again. Changes you make to the bars that stay are kept. - On an empty track,
BARSsets how many blank bars the grid shows. It does not create a loop. - On a playing track, the loop keeps playing and takes the new length at the next bar line. It plays on from where it is, so a longer loop sounds the same until you change its new bars, and a shorter loop continues from the bar it had reached. If the loop's turns do not start on a bar line, it takes the new length from its top when the loop comes round. The notice line says which. Until then, the grid shows the new length with no playing column.
- On a stopped track, the loop takes the new length at once.
Changing the length rewrites the whole loop as one pass, as loading a pattern does, so UNDO can no longer remove the passes you overdubbed. LOOM refuses to change the length while the track is recording, overdubbing or waiting on a press. You cannot choose a length whose notes do not fit in a loop.
For a loop longer than one bar, the line under the grid shows which bar you are viewing, such as BAR 2 OF 4. ‹ and › show the previous and next bar. Moving the picked step into another bar with the arrow keys also shows that bar. The grid does not follow the playhead to another bar, and it shows the playing column only while you view the bar that is playing.
Editing while the loop plays
You can change steps while the track plays, overdubs or is stopped. The loop keeps playing in time, and a change sounds the next time the playhead reaches that step. A hit you add just behind the playhead first plays on the next pass. The grid shows the change as soon as you make it.
A step edit is not an undo step. UNDO and REDO go on removing and restoring the passes you overdubbed:
- A hit you add on the grid goes into the loop's first pass, so
UNDOdoes not remove it. - Choosing a new
RATCHETwrites the step's hits again, into the first pass. - Changing
VELorACCENTleaves each hit in the pass it was recorded in.
If an edit no longer fits the loop by the time it reaches it, the notice line says so, such as Step 5 on KICK did not reach instrument track 1's loop., and the grid shows the loop without the edit.
The step inspector
The line under the grid names the picked step, such as STEP 13 · SNARE. With no step picked, it reads NO STEP PICKED. Its controls set the picked step:
VELsets the velocity of every hit in the step, from 1 to 127.ACCENTmarks every hit in the step as accented. The kit'sACCENTsets how much louder an accented hit plays. PressACCENTagain to remove the mark.RATCHETplays the step more than once, evenly spaced inside its length.×1is a single hit, and×2,×3and×4split the step into that many hits. When the step's hits sit between steps, noRATCHETcell is lit, and choosing one puts the hits back on the step as an even ratchet.
These controls are available only when the picked step holds a hit.
When a step cannot be changed
LOOM refuses a step edit, and says why in the notice line, in these cases:
- No audio device is open.
- The track is recording a take, or is about to record a take over its loop.
- A pattern is on its way into the track while the track plays.
Patterns
On PATTERN, the preset row in the dock's header is PATTERN. It shows the pattern you last loaded or saved on this track, or no pattern, and it shows EDITED once you change a step. A song does not keep the pattern's name or the grid's STEPS/BEAT setting, so when you open a song the row reads no pattern and the grid shows four steps to the beat until you load a pattern or save one. Click the name to open the drum patterns. Factory patterns are listed first, then yours, and in each the patterns in the song's meter come before the others. Each row shows the pattern's meter and its description. SAVE and the ··· menu work as they do for a kit: use SAVE AS… to save a loaded pattern under a new name, GET INFO… to rename your pattern or change its description, and DELETE to remove it from your library. See Synth presets.
Loading a pattern replaces the whole loop, including the passes you overdubbed. The pattern keeps its own length and meter.
- On a stopped or empty track, the pattern replaces the loop at once.
- On a playing track, the old loop keeps playing and the pattern starts at the track's
LAUNCH QUANTIZE. The notice line says when, such asIt plays from its top at the next bar.Until the pattern starts, the grid shows the new pattern with no playing column. - LOOM refuses to load a pattern while the track is recording, overdubbing or waiting on a press.
SAVE stores the loop as a pattern at the current STEPS/BEAT. Each hit is saved where it sounds, including hits between steps, with its velocity and its accent, so loading the pattern plays every hit where you played it. SAVE asks for a name. If you type the name of one of your own patterns, LOOM asks before it replaces it. Saving never changes a factory pattern: a pattern you save under a factory name is saved as your own. A track with no loop has nothing to save, and the notice line says so.
The drum editor in each window size
- Small. The part list is on the left, and
SOUNDandPATTERNare in the dock's header. OnSOUND, the picked entry's page shows its left column and its right column. OnPATTERN, the grid is beside the list, and the step inspector,STEPS/BEAT,BARSand the bar controls are under the grid. - Medium.
SOUNDadds a column of pictures on the right. For a part, it shows the layer's pitch envelope, labelledPITCH ENVwith the layer shown, itsMODand its largest pitch change in semitones. Under that is the part's hit, both layers together, labelled with the part's name,HIT, each layer'sSOURCEand the length of the hit in milliseconds. At the foot of the column are the part's steps in the bar the grid shows. ForWAVEGUIDE, the picture shows the waveguide ringing after a hit of the part you picked last. If that part sends nothing to the waveguide, the picture is flat and its label ends with that part's name andSENDS NOTHING.KIThas no picture.PATTERNlooks as it does in a small window. - Large. The tabs go away and one page, headed
PATTERN, shows everything. The grid runs across the top, and its row labels are the part list: click a label to show that part's controls below the grid. Below the grid are the part's controls in two blocks, thenWAVEGUIDE,RETURN,KITand the step inspector. The left block is the layer'sSOURCE,PITCH,LEVELand pitch modulation, with the layer switch at the right of its title. The right block has its own switch:ENVshows the layer'sEG,ATTACKandDECAYwith the part'sVELOCITY, andPARTshowsPAN,DRIVE,FOLD,BIT,SEND,CHOKEandQUANTIZE. When there is room, each block has its picture above it. The header shows theKITrow and thePATTERNrow side by side, so you can load or save either one.
The pictures show the sound your current settings make, and they change when you move a control.
The sampler editor
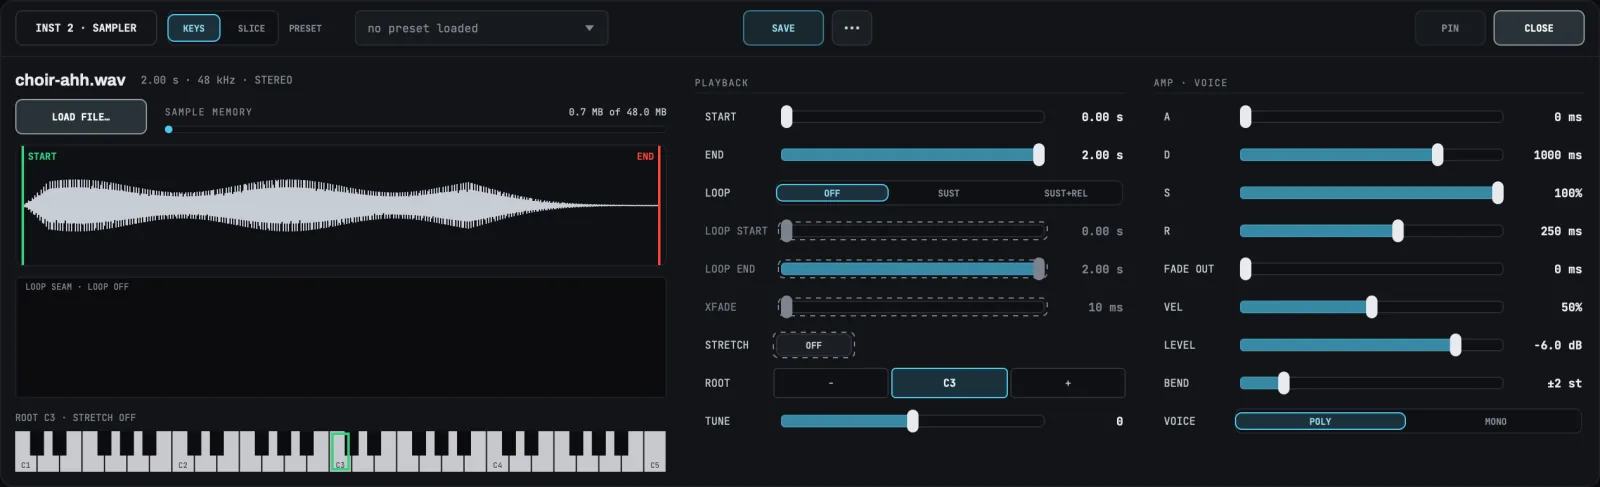
Press OPEN EDITOR on a sampler track's INST tab to open the sampler editor in the dock. The dock's header names the track, such as INST 3 · SAMPLER. A sampler track plays one sample. Beside the name is the KEYS | SLICE switch, which chooses how the keys play it: KEYS plays the whole sample pitched across the keyboard, and SLICE cuts it into slices and plays one slice on each key from ROOT, at the sample's own pitch. This section describes KEYS mode. For SLICE, see The sampler's SLICE mode. The header also holds the preset row, SAVE, the ··· button, PIN and CLOSE, which work as they do for the synth.
Loading a sample
Press LOAD FILE… and choose an audio file. The sampler plays mono and stereo files. LOOM copies the file into the song's folder, so the song does not depend on the original file. A song you have not saved yet has a folder of its own, and when you save it, the sample goes with it. A new sample plays from the start of the file to its end with LOOP at OFF, and it keeps the track's STRETCH setting. The notice line says Loaded and the file's name, or says why the file was refused.
Above the waveform, the editor shows the file's name, then its length in seconds, its sample rate and MONO or STEREO. Before you load a sample, it shows No sample.
SAMPLE MEMORY shows how much of the sampler's memory is in use, such as 12.4 MB of 48.0 MB. Every sampler track shares this memory. If a file does not fit, LOOM refuses it, and the notice line gives how much the file needs and how much is free.
The waveform
The waveform shows the whole file. A green line marks START and a red line marks END, and the audio outside them is dimmed because it does not play. While LOOP is SUST or SUST+REL, the loop is shaded between two dashed lines and labelled with its LOOP setting. In KEYS mode you move the markers with the rows under PLAYBACK; the waveform shows them but does not respond to clicks.
PLAYBACK
STARTandENDset the part of the sample that plays, in seconds. If you moveSTARTorENDpast a loop marker, that marker moves with it.LOOPchooses what happens while you hold a key:OFFplays the sample once, fromSTARTtoEND. The note stops atENDeven if you still hold the key, and it stops earlier if its release ends first.SUSTrepeats the section betweenLOOP STARTandLOOP ENDwhile you hold the key. When you release the key, the rest of the sample plays under the amp release. LOOM shortens the release if it needs to, so the note ends byEND.SUST+RELkeeps repeating the loop after you release the key, until the amp release ends the note.
LOOP STARTandLOOP ENDset the loop. When you move one of them, it moves to a nearby point where the waveform crosses zero, so the loop joins without a step.LOOP STARTmust come beforeLOOP END, and both must sit betweenSTARTandEND. If you setLOOPtoSUSTorSUST+RELwhile the loop has no length, the loop becomes the whole section fromSTARTtoEND.XFADEblends the end of the loop with the audio just beforeLOOP START, so each repeat joins without a click. At 0 the loop jumps fromLOOP ENDtoLOOP STARTwith no blend. The blend cannot be longer than the loop or than the audio betweenSTARTandLOOP START, so a loop that begins atSTARTis not blended.STRETCHset toONkeeps the sample the same length on every key within one octave ofROOT. LOOM renders those keys in the background. Keys further fromROOTplay the nearest rendered key, repitched. While the render runs, the keys play the sample repitched. See The keys.ROOTis the key that plays the sample at the pitch it was recorded at. It is shown as a note name, andC3is MIDI note 60. Click−or+to move it a semitone. WithROOTfocused, the arrow keys move it a semitone, andPage UpandPage Downmove it an octave.TUNEraises or lowers every key, in cents.
START, END, LOOP and STRETCH are dimmed until you load a sample. LOOP START, LOOP END and XFADE are dimmed while LOOP is OFF. If you use a dimmed control, the notice line says what to change.
AMP · VOICE
A,D,SandRare the amp envelope's attack, decay, sustain and release.FADE OUTworks only whileLOOPisOFF. It fades each note to silence over the time you set, so the note reaches silence atEND. WhileLOOPisSUSTorSUST+REL,FADE OUTis dimmed.VELsets how much the velocity of each note changes its volume. At0%every note plays at full volume, whatever its velocity. At100%the volume follows the velocity. The default is50%. It is the same setting asVELOCITYin SLICE mode.LEVELis the sampler's output level.BENDsets how far the pitch bend wheel moves the pitch, in semitones.VOICEchooses how many sounds the sampler plays at once. It is one setting forKEYSandSLICEmode.POLYlets every note and slice play on to its own end or release. A song or preset saved beforeVOICEexisted opens inPOLY.MONOplays one sound at a time. A new note or slice stops the one that is sounding, with a short fade so that the cut does not click. UseMONOfor vocal chops, where each slice ends as the next one starts. A note from the track's loop and a note you play stop each other.
A note that reaches END fades out over its last few milliseconds, so the sample does not end with a click. This happens at every FADE OUT setting, including 0.
The keys
The strip of keys shows two octaves on each side of ROOT. ROOT has a green outline, and each C is named where there is room. The line above the keys reads ROOT, the root's note name, and the state of STRETCH:
STRETCH OFF: every key plays the sample repitched.STRETCH ±1 OCT: the renders are ready, and the keys that hold the sample's length are tinted.RENDERING: the render is running. Those keys are hatched, and until the render finishes they play the sample repitched. A line over the waveform says so.STRETCH NOT RENDERED: the render did not finish, and a line over the waveform says why. For example, if the renders do not fit in the sample memory, the line says how much they need and how much is free. Shorten the part betweenSTARTandEND, or setSTRETCHtoOFF.
While LOOM reads a new file, the line shows READING THE FILE.
The LOOP SEAM and START zooms
LOOP SEAMshows 12 ms on each side of the point where the loop jumps fromLOOP ENDback toLOOP START. The cyan trace is what the sampler plays across the jump, includingXFADE. The grey trace is the sample aroundLOOP START. A dashed line marks the jump. A step in the cyan trace at the dashed line is a click you will hear. To remove it, move the loop markers or raiseXFADE. WhileLOOPisOFF, the zoom readsLOOP SEAM · LOOP OFFand shows no trace.STARTshows the first 40 ms from theSTARTmarker. The cyan trace is what a note plays, including the amp envelope. The grey trace is the sample. Use it to trim the silence before a sound without cutting into its attack.AMP ENVdraws the amp envelope and its length in seconds. It appears only in the largest layout.
The sampler editor in each window size
- Small. The dock's header has two tabs,
SAMPLEandKEYS.SAMPLEshows the file's name,LOAD FILE…, the sample memory, the waveform, theLOOP SEAMzoom and the controls.KEYSshows the strip of keys across the dock. - Medium. The tabs go away. The file's name, the waveform, the
LOOP SEAMzoom and the keys stand beside the controls. - Large. The waveform runs across the top with the
LOOP SEAMandSTARTzooms beside it. The keys sit under the waveform, and the controls sit under the zooms, withAMP ENVoverAMP · VOICEwhen there is room.
Press Tab to move from LOAD FILE… down the PLAYBACK column, then down the AMP · VOICE column.
Sampler presets
A sampler preset saves ROOT, TUNE, XFADE, the amp envelope, FADE OUT, VEL, LEVEL, BEND and VOICE, and SLICE mode's settings: the mode, the chops, PLAY, SENS and SNAP. It does not save the sample, its markers, LOOP or STRETCH. Those belong to the track, and the song saves them. Loading a preset changes how the track's sample plays but not which sample it plays, and applies the chops that the preset holds. On a track with no sample, a preset sets the controls and nothing sounds. The factory preset Default plays the sample as it was recorded while a key is held. Sampler presets are saved in ~/Music/LOOM/Presets/Sampler.
The sampler's SLICE mode
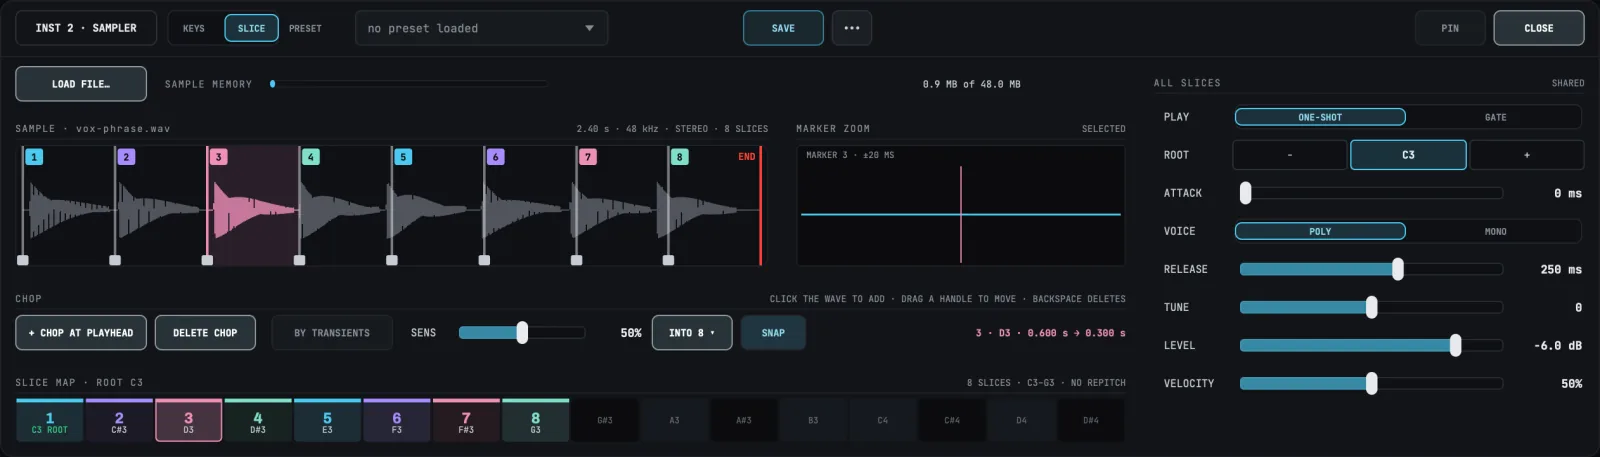
SLICE mode cuts one sample into slices and plays each slice on its own key. Use it to play the parts of a vocal phrase, a drum loop or any other recording from a keyboard or pads.
To turn it on, choose SLICE in the KEYS | SLICE switch in the dock's header. KEYS returns to playing the whole sample across the keys. SLICE mode uses the same sample as KEYS mode, and LOAD FILE… and SAMPLE MEMORY work the same way.
SLICE mode shows only its own controls. START, END, the sustain loop, STRETCH, D, S, FADE OUT and BEND are not shown. To move END, switch to KEYS.
The song and a sampler preset keep the mode, the chops, PLAY, SENS and SNAP. A preset does not keep the sample: it stores each chop as a position within the sample. The selected slice is not saved.
When you switch a track to SLICE and its sample has no chops, LOOM chops it by transients at the current SENS. If the sample already has chops, the switch keeps them. When you load a sample with LOAD FILE…, LOOM removes every chop from the sample it replaces, including the chops you placed by hand. In SLICE mode it then chops the new sample by transients at the current SENS.
How slices map to keys
Slice 1 starts at START and plays on ROOT. Each chop starts the next slice, and each slice plays on the key one semitone above the slice before it. A slice ends where the next one starts, and the last slice ends at END. Each key plays its slice at the pitch it was recorded at. Keys below ROOT and keys above the last slice play nothing.
While the sample has no chops, the whole sample from START to END is slice 1 on ROOT, and it plays straight away. The waveform reads CLICK THE WAVEFORM TO ADD A CHOP.
A slice is a note. Recording, record quantize, overdubs and loops work the same way as in KEYS mode.
The slice map
The SLICE MAP shows one cell for each key from ROOT up. Its title shows the root key, such as SLICE MAP · ROOT C3, and the slices, such as 8 SLICES · C3–G3 · NO REPITCH.
- A cell with a slice shows the slice's number in the slice's colour and the key's name below it.
- The
ROOTcell's key name is green. When the cell is wide enough, it readsROOTafter the key name. - A key with no slice shows only its name, dimmed.
- White-key and black-key cells have different backgrounds, so an octave reads like a keyboard.
- The cell of the slice you played last is brighter and glows, and its number is white. It stays lit until you play another slice.
- The selected slice's cell is outlined in its colour.
Click a cell to select its slice. The map shows 16 cells, or 24 in the largest layout. When there are more slices than cells, the last cell reads + and the number of slices that do not fit, such as +9.
Slices take cyan, violet, rose and mint in turn. The colour only keeps neighbouring slices apart. The number identifies the slice.
Adding, moving and deleting chops
- Add a chop: click the waveform where you want the new slice to start. A chop must be between
STARTandEND. The new slice is selected. - Move a chop: drag its handle at the foot of the waveform. A chop cannot pass the chop before or after it, so dragging never renumbers the slices. Dragging slice 1's handle moves
START. - Select a slice: click its number at the top of the waveform, its marker, or its cell in the map. Pressing a number or a cell also plays the slice; see Hearing a slice or a drum part from the editor. When the waveform or the map has the keyboard,
←and→select the slice before or after. With no slice selected,→selects slice 1 and←selects the last slice. - Nudge a chop: with a slice selected, press
⌥←or⌥→to move its marker 25 ms. On slice 1 this movesSTART. - Delete a chop: select the slice and press
BackspaceorDelete, or pressDELETE CHOP. The slice joins the slice before it, and every later slice moves down one key. Slice 1 starts atSTARTand has no chop to delete.
While a slice is selected, the other slices turn grey and a band in the selected slice's colour marks its length. The CHOP bar shows the slice's number, key, start and length.
Markers placed by BY TRANSIENTS are dashed. Markers you placed or dragged, and markers placed by INTO, are solid. If you move START or END past a chop, that chop turns grey and starts no slice until START or END moves back.
A sample has at most 64 slices.
The CHOP bar
+ CHOP AT PLAYHEADadds a chop where the audition playhead is, while a slice you pressed is playing. Otherwise it cuts the selected slice in two at its middle, or the last slice when none is selected.DELETE CHOPdeletes the chop that starts the selected slice.BY TRANSIENTSplaces a chop wherever the sample's level jumps. See Chopping by transients.SENSsets how far the level has to rise forBY TRANSIENTSto place a chop, from 0% to 100%. A higherSENSfinds more transients. At the default of50%, LOOM finds syllables that start after a breath or a pause. To find syllables that are sung together without a break, raiseSENStowards100%.INTOopens a list of slice counts, fromINTO 2toINTO 32. Choosing one replaces every chop, including the ones you placed, with that many equal slices fromSTARTtoEND. The button shows the last count you chose.SNAPmoves each new chop to the nearest point, within 10 ms, where the waveform crosses zero, so the slice starts without a click. This applies to chops you add, drag or nudge and to chops thatBY TRANSIENTSandINTOplace.SNAPis on by default.
The right end of the bar shows the selected slice's details, such as 3 · D3 · 0.612 s → 0.300 s. With no slice selected, it shows the number of slices and their keys, such as 8 SLICES · C3–G3, or 1 SLICE · THE WHOLE SAMPLE ON C3 before you chop. It reads NO SAMPLE when no sample is loaded.
Chopping by transients
Press BY TRANSIENTS to place a chop at each point where the level jumps. The bar reads FINDING TRANSIENTS… while LOOM reads the sample, and BY TRANSIENTS cannot be pressed until the reading finishes.
While BY TRANSIENTS is lit, moving SENS or turning SNAP on or off chops the sample again at once, so you can sweep SENS and hear the result. Chopping again replaces only the dashed markers. Chops you added or dragged stay where they are, and a dashed marker you drag becomes solid.
If BY TRANSIENTS places no chops, the notice line says so, for example No transients found at SENS 50%. Raise SENS, or use INTO.
INTO turns BY TRANSIENTS off. A song or preset saved with dashed markers opens with BY TRANSIENTS lit.
The marker zoom
In the medium and large layouts, the MARKER ZOOM shows 20 ms either side of a marker, such as MARKER 3 · ±20 MS. It shows the selected slice's marker. With no slice selected, it shows the marker you last added or dragged, or START. Use it to place a chop on the start of a sound.
ALL SLICES
These controls apply to every slice:
PLAY:ONE-SHOTplays a slice to its end even after you release the key.GATEstarts the release when you release the key.ROOT: the key slice 1 plays on. It works as it does inKEYSmode.ATTACK: the fade-in at the start of each slice.VOICE:POLYorMONO, the same setting as inKEYSmode.RELEASE: the fade-out after you release the key whenPLAYisGATE.TUNE: the pitch of every slice, in cents.LEVEL: the sampler's output level.VELOCITY: how much the velocity of each note changes its volume, the same setting asVELinKEYSmode.
SLICE mode in each window size
- Small. The slice map sits across the top, and the
CHOPandSOUNDtabs in the dock's header choose what shows below it.CHOPshows the waveform and theCHOPbar.SOUNDshowsALL SLICES. - Medium. Everything is on one page, with the
MARKER ZOOMbeside the waveform. - Large. The map shows 24 cells, and a
SLICEblock beside the zoom shows the selected slice'sSLICE,KEY,STARTandLENGTH. You read this block and cannot edit it.
Hearing a slice or a drum part from the editor
You can play a sound from the editor with the mouse, without a MIDI keyboard. The note plays on the track the dock is showing and is never recorded into the track's loop, even while the track records or overdubs.
The sampler in SLICE mode. Press a slice's number at the top of the waveform, or its cell in the SLICE MAP, to select the slice and play it. The slice plays in its PLAY mode: under ONE-SHOT it plays to its end, and under GATE it plays until you release the mouse button. Pressing the rest of the waveform still adds a chop where you click.
While the slice plays, a white line with a glow moves across the waveform: the audition playhead. The line goes when the slice stops. Press + CHOP AT PLAYHEAD while the slice plays to add a chop where the playhead is, so you can cut at the moment you hear the point you want. With SNAP on, the chop moves to the nearest zero crossing. While no slice you pressed is playing, + CHOP AT PLAYHEAD cuts the selected slice in two at its middle, or the last slice when none is selected.
The drum editor. Press a part in the part list to hear it. The part list is also the pattern grid's row labels, so this works on the PATTERN tab too. The press also picks the part, as a click always does. Picking a part with the keyboard plays nothing.
While an audio track that records this instrument is recording or overdubbing, the editor does not play the note, and the notice says which track is recording. A note played just before the recording starts can still ring into it.
Playing instrument tracks from the command map
Each instrument track has its own octave in LOOM's MIDI command map, from note 72, with the same controls at the same offsets as an audio track: the ring button, overdub, undo, redo, stop, clear and play. Clear is held for one second. MIDI mapping has the table.
These notes act only in the 1.x layout. The 1.0 layout has no instrument octaves.
An instrument octave does nothing while its track's input is NONE and the track holds no loop.
The command channel and the instrument inputs are separate. LOOM's commands listen only on the command channel, and no instrument track listens on it. Put the pads that drive LOOM on the command channel and the keys you play on another channel.