 LOOM
LOOMThe arrange view is where you draw what the song does before you play it. You place regions on a track's lane. Each region carries a verb (record, overdub or play), and the verb fires on the bar where the region starts. PERFORM FROM TOP plays the whole thing.
Open it with ⌘2, View ▸ Arrange, or the ARRANGE cell of the VIEW switcher at the right end of the top bar. The top bar and both bottom rails stay in place, and only the body of the window changes.
This page names keys where you need them. Keyboard shortcuts lists every key LOOM responds to, including the two tables for this view.
What is on the surface
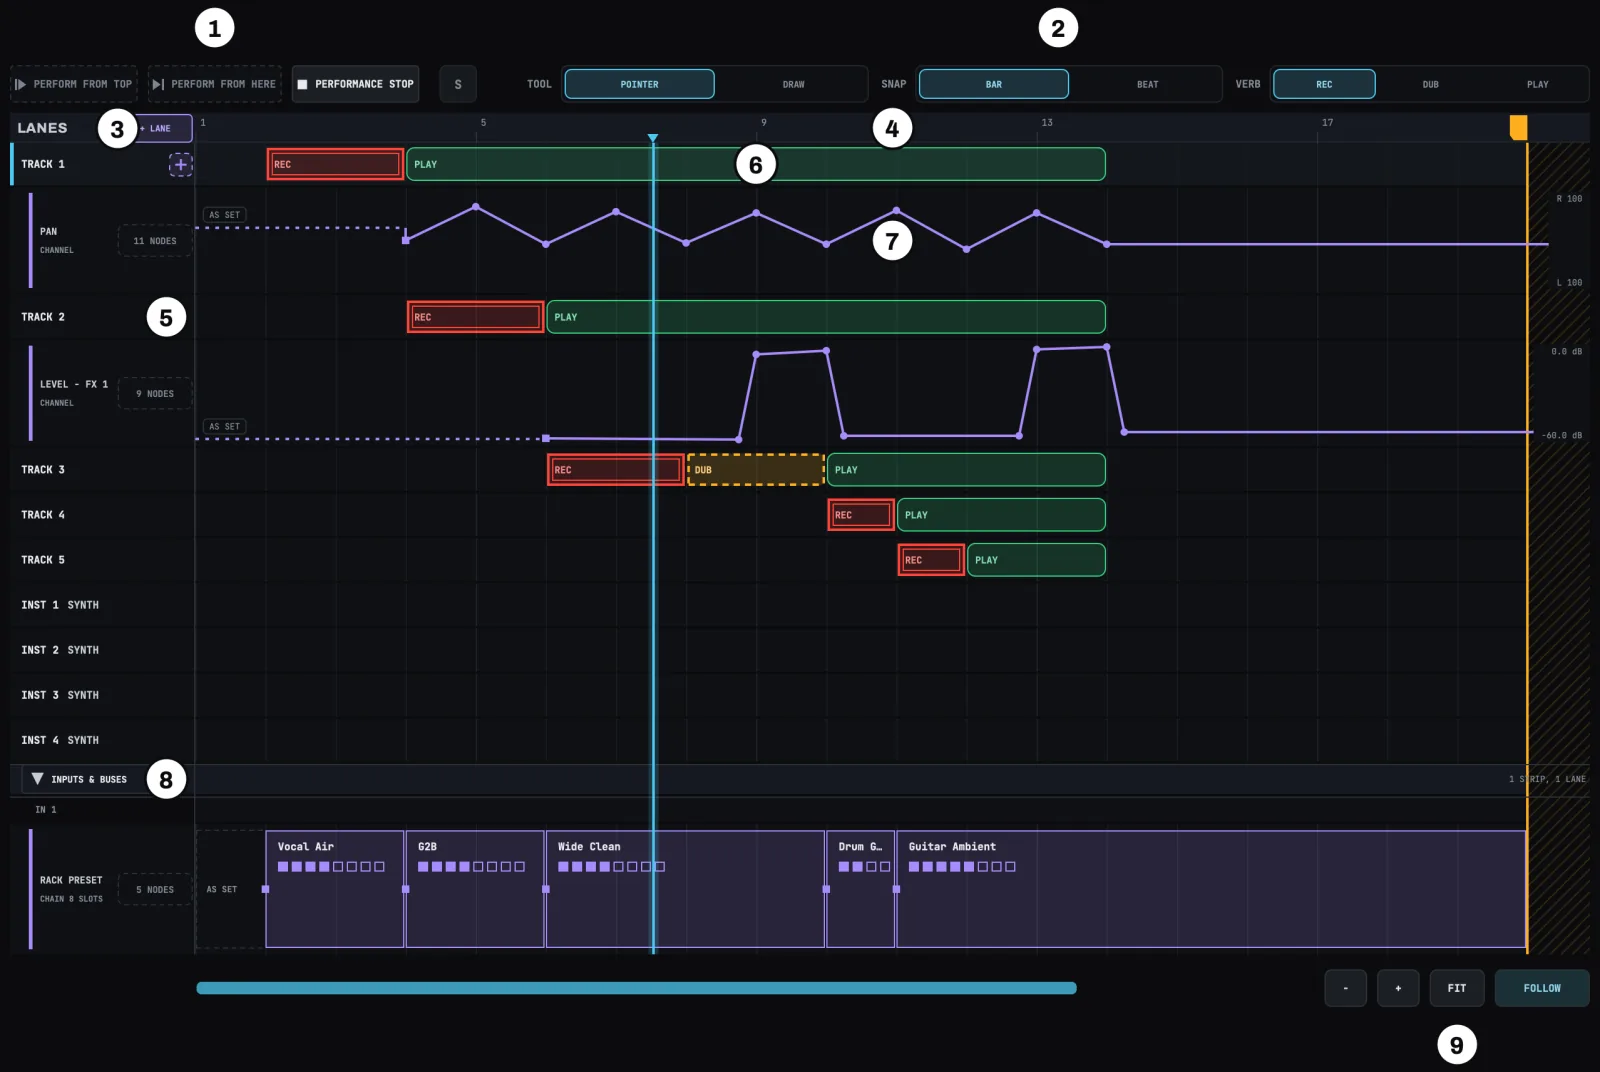
| Number | What it marks |
|---|---|
| 1 | The PERFORM buttons: PERFORM FROM TOP, PERFORM FROM HERE and PERFORMANCE STOP |
| 2 | TOOL, SNAP and VERB |
| 3 | + LANE |
| 4 | The bar ruler |
| 5 | A track's row in the lane list |
| 6 | A region |
| 7 | An automation lane |
| 8 | The INPUTS & BUSES row |
| 9 | FIT, in the scroll strip |
The vertical line crossing the lanes is the playhead.
Top to bottom:
- The header row. The PERFORM buttons at the left, then the
Sbutton that clears every solo, thenTOOL,SNAPandVERB. They are anchored to the left edge and do not move. If the window is too narrow to hold the three setting rows beside them, they move to a full-width second row. To keep them on the first row, widen the window or collapse the side panel. The side panel gives the widths. - The lane list, headed
LANES, in a 148-pixel column down the left. It has one row per track, namedTRACK 1,TRACK 2and so on, then one row per instrument track, namedINST 1,INST 2and so on. An instrument track's row shows its instrument and preset to the right of its name. Any automation lanes you add are nested under the track or strip they belong to.+ LANEsits at the right-hand end of the heading. - The bar ruler, level with that heading, across the rest of the width. It prints a bar number every few bars and carries the song end marker and the head of the playhead.
- The lanes, one per track, each level with its own row. Regions are drawn in them, and an automation lane draws its line and nodes.
- The scroll strip, twelve pixels under the last lane: the timeline scrollbar,
-,+,FITandFOLLOW. When the rows do not all fit, the strip stays at the bottom of the lane area instead of following the last row. - The row scrollbar, down the right-hand edge of the lanes, when there are more rows than the window can draw. It moves the track list and the lanes together; the bar ruler stays where it is.
The PERFORM buttons are a labelled set, like the top bar's MOVE set. A screen reader announces "Perform the arrangement - writes to tracks" before it reaches any of them, so you hear the consequence before you press anything. When a performance starts, PERFORM FROM TOP and PERFORM FROM HERE go dead where they are, and at the same moment PERFORMANCE STOP comes live without moving. No button moves while you are reaching for it. Playing the arrangement below describes what each one does.
Every control on this surface
| Control | What it is | Faces |
|---|---|---|
PERFORM FROM TOP |
Plays the arrangement from bar 1. Its shape is a bar with a triangle playing away from it, ❙▶. |
PERFORM FROM TOP live; NO ARRANGEMENT behind a dashed border when the song has no regions; the same word behind that dashed border while a performance is running. |
PERFORM FROM HERE |
Plays the arrangement from wherever the playhead is. Its shape is the mirror image: a triangle with the bar on the right, ▶❙. |
PERFORM FROM HERE live; NO ARRANGEMENT behind a dashed border when the song has no regions; the same word behind that dashed border while a performance is running. |
PERFORMANCE STOP |
Releases the arrangement and leaves the song playing. Its shape is a filled square, ■. |
PERFORMANCE STOP in both states: live while a performance is running, behind a dashed border at every other time. |
S |
Clears every solo, on loop tracks, instrument tracks and effect buses alike. The same button is in the looper view's globals row and the mixer's header. | Solid amber while anything is soloed; behind a dashed border when nothing is. |
TOOL |
What a drag on an empty part of a lane does. | POINTER (the default), DRAW. |
SNAP |
What a gesture rounds to. | BAR (the default), BEAT. |
VERB |
What the next region you make will fire. | REC, DUB, PLAY. |
| A track row | One per track. Pressing it makes that track the focused track. It is drawn as a flat band across the track column, not as a button, because it names a track and does not perform an action. | TRACK 1 … |
| An instrument track row | One per instrument track. Pressing it makes that track the focused track. It is drawn like a track row, in the same type, with the instrument and its preset to the right of the name. If the column is too narrow for the preset as well, the row shows the instrument alone. | INST 1 DRUMS · Room |
| An automation lane row | One per automation lane you have added. A lane for a loop track's own effect, or for any control of an instrument track, is indented under that track; every other lane is indented under its strip's sub-header in the INPUTS & BUSES group. A violet rule down its indented edge marks it as an automation lane. Pressing it focuses the lane and opens it; pressing it again closes it. |
Two lines. On top, the control it switches: ON / OFF, MUTE, LEVEL - CUE. Under it, dimmer, the part of the strip that control belongs to: CHANNEL, or the effect and its slot, REVERB SLOT 2, or, for an instrument's control, the instrument, SYNTH. The instrument is struck through while the track holds a different one. The row it is indented under names the track or the strip, so neither line repeats it. |
The INPUTS & BUSES row |
One, shown only when the song has a lane on a strip that is not a loop track or an instrument track. Pressing it folds every lane inside it away, and pressing it again brings them back. It reports what is inside it at the right-hand end of its row, folded or not. | INPUTS & BUSES, with a triangle before it. The triangle points down when the lanes are showing and right when they are folded. |
| A strip sub-header | One per strip that has a lane in the INPUTS & BUSES group. A label, not a control: it names the strip its lanes sit under. |
IN 9, BUS 1, MASTER. |
| A lane row's count cell | One per automation lane. Reports how many nodes the lane holds, and offers the two steps that take the lane away. Its width does not change with its face. | 3 NODES on a lane you are not working on; CLEAR on the lane you have selected; REMOVE once the lane is empty. |
+ LANE |
One, in the LANES heading at the top of the column. Opens the card you choose a control to automate on, with nothing chosen. It does not scroll with the list, so it stays in the same place however far down you are. |
One face. |
A row's + |
One on every track, group header and strip sub-header. Opens the same card with that row's track, strip or group already chosen. It appears when you point at its row or when its row has keyboard focus. Its space is reserved even while it is hidden, so the row does not shift when it appears. | One face. |
| The playhead | The line through the lanes, with its head in the bar ruler. Click or drag the ruler to place it, or focus it and use the arrows. | One face. |
| The song end marker | The flag in the bar ruler. Drag it, or focus it and use the arrows. | One face. |
| A lane | One per row. On a track's row it is what you stand on to make the first region on an empty track. On an automation lane's row it is where you press to add a point at that bar. | No face. It is the empty ground of a row, with the two ends of its range at the right-hand end. |
| A region | One per region in the song. | REC, DUB, PLAY, or the verb's own name in capitals when this build does not draw a face for it. A ~ after the word marks an advisory region. |
| The timeline scrollbar | Moves the view along the song. Shown only when the song is wider than the window. | One face. |
| The row scrollbar | Moves the track list and the lanes up and down together. Shown only when there are more rows than the window can draw. | One face. |
- |
Zooms out one step. | One face. |
+ |
Zooms in one step. | One face. |
FIT |
The largest zoom at which the whole song fits, scrolled back to bar 1. | One face. |
FOLLOW |
Whether the view moves itself while the arrangement rolls. Starts on. | Latched on or off; the name says which. |
Several of those repeat: a track row per track, an automation lane row and its count cell per lane you have added, and a lane and a region for each. Every one of them is on screen in every state. Controls change their faces in place; nothing on this surface appears or disappears with a state change.
+ LANE is always there, whether you have any automation lanes or not. A track with no lanes looks the same as it did before automation existed and takes no extra height.
VoiceOver: the bar ruler carries two controls, the playhead and the song end marker. Its bar numbers are painted, so a screen reader does not read them out one by one. Instead it reads the view's own sentence, which says how many tracks there are, instrument tracks included, and which bars are on screen: "The song's arrangement. 9 tracks and 2 automation lanes, each nested under what it switches, in track order. One row adds an automation lane. The timeline shows bars 1 to 25 of 96."
Instrument tracks in the arrangement
An instrument track's row takes REC, DUB and PLAY regions the same way a loop track's row does. A PLAY region on an instrument track draws a short mark for each note in the track's loop, repeated from the start of the region, so you can see that the loop holds notes. A REC or DUB region draws none. Lanes for an instrument track, including lanes for its effects, appear indented under that track's row. See Instrument tracks for the tracks themselves.
Lane height
An automation lane is taller than a track row, because it draws a line between two levels and a track row draws a strip of regions.
A lane has two heights. It opens at the shorter one. Press the lane's row to open it to the taller one, and press the same row again to close it. Opening a lane closes any other open lane, so only one lane is tall at a time. Pressing a track row closes the open lane as well.
Pressing a lane's row also moves the keyboard focus to the lane, the same as pressing the lane itself. See The lane you are on.
The taller height makes room for a label on every node, not only on the node you are on. It does not fit more labels side by side. See Reading a node's value below.
Nothing moves sideways when a lane opens or closes. The track names stay in the same column at the same width, and the bars stay in the same place, so a bar you were looking at is still under the same part of the ruler. Only the height of that lane and the position of the rows below it change.
Your first arrangement, from the keyboard
You can do every step here without a mouse.
- Go to the arrange view.
⌘2. - Reach the surface.
Tabenters the window in reading order: the view switcher, the panel toggle,S,TOOL,SNAP,VERB, and thenPERFORM FROM TOP, the seventh stop in either panel mode. - Choose what the region will fire.
TOOL,SNAPandVERBare setting rows:←and→move inside one. LeaveSNAPonBARfor now. SetVERBtoRECto record,DUBto overdub, orPLAYto start a track that already holds a loop. - Reach a lane. Keep pressing
Tab: afterPERFORM FROM TOPcomesPERFORM FROM HERE, then+ LANE, then the playhead, then the song end marker, then every track row in turn, each followed by its+, then the lanes. An automation lane row is followed by its own count cell before the next row. While a performance is running,PERFORMANCE STOPsits betweenPERFORM FROM HEREand the playhead. At every other time it is dead andTabpasses over it.↑and↓move between lanes once you are on one. Once there are regions, each lane is followed by its own regions before the next lane. See Editing regions from the keyboard below. - Make a region. Press
Return. A one-bar region appears after the last region on that track (at bar 1 if the track is empty) and takes the keyboard focus. LOOM says what it made: "REC region on track 3 at bar 1, 1 bar." - Put it where you want it.
⇧←and⇧→move it a bar at a time.⇧↑and⇧↓make it a bar longer or shorter from its end.Page UpandPage Downmove its start edge and leave its end alone. Each of these announces the result. - Make the next one. Press
Returnagain on the region you are on to put a new region straight after it.Vcycles what a new region fires (REC,DUB,PLAY) and announces the new verb. TheVERBrow follows. - Play it. Press
⇧Tabto go back toPERFORM FROM TOPand pressReturn, or press the button. You can also skip the navigation: from anywhere in this view,Shift-Returnplays it from bar 1 andShift-Spaceplays it from wherever the playhead is. See Keyboard shortcuts.
⌘Z undoes the last arrangement edit and ⇧⌘Z redoes it. Both work anywhere in this view.
The three verbs
VERB and the V key choose from the same three verbs, and these are the only verbs you can place:
| Face | Verb | What it does on its bar |
|---|---|---|
REC |
Record | Starts recording the track. |
DUB |
Overdub | Starts an overdub pass over what the track already holds. |
PLAY |
Play | Starts the track playing what it already holds. |
VERB and the V key choose what the next region will fire. Neither changes a region you already have. Both set the same value: press V and the VERB row follows, and press a cell in the VERB row and V continues from there. The notice line says which verb is set.
To change a region you already have, use ⇧V or the region's own menu:
⇧Vcycles the region you are standing on through the three verbs.- The region's menu offers the three, with the region's current verb ticked. Right-click a region to open it, or hold
Controland click. Pick a verb and the region changes.
Both follow the same rule as every other gesture on this surface. If you are standing inside a selection of more than one region, they change the whole selection. Otherwise they change the region you are standing on. When you open the menu inside a selection, its first line says how many regions are in it, so you know before you choose.
Changing a region's verb keeps the region. It stays in the same place at the same length, and anything you recorded into it stays with it. One ⌘Z puts the verb back.
A gap means stopped. There is no stop region to draw. LOOM stops a track at the end of each of its regions, so the track is silent in the space between two regions. A track with no regions at all plays nothing for the whole song.
An overdub you start by hand begins at the press. A DUB region, like every other region, begins at the tick the region starts on. See SNAP, and what one grid step is for where a region can be placed.
A REC region on a track that already holds a loop re-records it. There is no separate re-record verb: a REC region over an occupied track is how you replace what is on it. The whole old take is replaced, and the new one is the region's length. A 2-bar REC region over a 4-bar loop leaves you a 2-bar loop, not the 4-bar loop with its first two bars overwritten. The track then holds the new take. To leave a track silent for a stretch of the song, give it no regions there.
The replacement is permanent.
UNDOcannot bring back the take aRECregion replaced. It accepts the press, the track keeps playing the new take, and nothing changes. Opening the song again brings back the new take too.Nothing is replaced until the region actually fires, through
PERFORM FROM TOPorPERFORM FROM HERE. Until then the region is an arrangement edit like any other: move it, delete it, or change its verb toDUB, and the track keeps the take it holds.⌘Zreaches those edits. Once the region has fired, the replacement has happened.The new recording is an ordinary take. Overdub onto it and
UNDOtakes that layer off the way it always does. Only the take the region replaced is out of reach.
A DUB region adds a layer you can undo. It lays a layer over what the track already holds, and UNDO takes that layer off just as it does a layer you played by hand.
Two DUB regions in a row make two layers. Each region is its own pass, so two back to back give you two layers and two undo steps, where one region of the same total length gives you one. The track keeps sounding across the join, and you do not hear the boundary.
A region is the only thing that replaces a take in one action. Recording onto a track that already holds a loop is refused from the strip, and the notice line tells you to overdub it, play it, stop it, or CLEAR it and then record. CLEAR cannot be undone either. See UNDO, REDO and CLEAR.
Every region you make in this window fires REC, DUB or PLAY, but a song can reach the timeline holding a region whose verb is none of the three. That region is drawn as itself: the verb's own name in capitals, square corners, one hairline border. Either perform button names those regions when it refuses to start. You can fix such a region without losing it: press ⇧V on it, or right-click it and pick a verb from its menu, and it takes one of the three. Its menu has nothing ticked, because its verb is none of the three.
No state on this surface is carried by colour alone
Every region shows what it is with a word and a shape, and the shapes stay distinct with the colour taken away:
| What it is | The word | Corners | Border |
|---|---|---|---|
| Record | REC |
Square | Two concentric strokes |
| Overdub | DUB |
Rounded | Dashed |
| Play | PLAY |
Rounded | One plain stroke |
| A verb this build does not draw | The verb's own name, in capitals | Square | One hairline |
| Advisory | ~ after the word |
— | — |
| The region you are on | (unchanged) | Four corner brackets | — |
| A region being drawn by a drag | (none yet) | — | Dashed, in the verb it will fire |
The rest of the surface follows the same rule:
| What it is | The shape |
|---|---|
| The focused row: the focused track's, or the automation lane that has the keyboard focus | A 3-pixel rule down the row's leading edge, at the left edge of the track column |
| An automation lane | A 3-pixel violet rule down its indented edge, one step in from the focused row's rule |
| The lane you are on | A 3-pixel rule down its leading edge, and a dashed line above and below |
| The playhead | A downward triangle in the ruler and a line through the lanes; dimmed when the transport is parked, full strength while it rolls |
| The song end marker | A flag with its bottom-left corner notched away, unlike the playhead's triangle |
| Past the end of the song | Diagonal hatching over the lanes |
| A control that cannot act | A different word and a dashed border |
Rolling and parked are also shown elsewhere: the top bar's POSITION field, the beat LEDs and ROLL. The dimmed playhead is a second signal, not the only one.
TOOL, and what a drag on an empty lane does
TOOL decides what a press or a drag does on an empty part of a lane.
TOOL |
Press an empty part of a track's lane | Drag across a track's lane | Press an empty part of an automation lane | Drag across an automation lane |
|---|---|---|---|---|
POINTER |
Clears the selection | Draws a rectangle and selects every region and node it crosses | Adds a node when you let go | Draws a rectangle and selects every region and node it crosses |
DRAW |
Makes a region one grid step long | Makes a region of the length you dragged | Adds a node as you press | Adds a node as you press, and the drag does nothing more |
In POINTER a press on an automation lane waits until you let go before it adds the node, because until then it could still become a rectangle. The node goes where you pressed, not where you let go.
Everything else on this surface behaves the same in both tools: the keyboard, a press or a drag on a region or a node, SNAP, VERB, the bar ruler, the song end marker and the scroll strip.
POINTER is the default. LOOM remembers the tool for this machine, alongside your MIDI channel and latency calibration, so the next session opens in the tool you last used, whatever song you load.
To make your first region in POINTER, press a lane and press Return. This works in either tool and on an empty track, and it is what the hint under the lanes suggests when a song has no regions yet.
Changing TOOL announces the new setting: "dragging an empty lane selects regions and nodes" or "dragging an empty lane makes a region".
Selecting more than one thing
A selection is the set of things the next edit acts on. It can hold regions and automation nodes together, so one gesture can take in a region on a track and the nodes on a lane below it. Selection works the same in both tools: every key below works in POINTER and in DRAW.
With the mouse, in POINTER:
| Gesture | What happens |
|---|---|
| Drag across empty lanes | Selects every region and every automation node the rectangle crosses, across as many lanes as it covers |
| Start the drag on any lane | A track's lane or an automation lane. On an automation lane the band starts once you move; a press that does not move still adds a node |
Hold ⇧ and drag |
Adds what the rectangle crosses to what is already selected |
| Press a region | Selects that region alone |
| Press a node | Selects that node alone |
Hold ⇧ and press a region or a node |
Adds it to the selection, or removes it if it is already in one |
| Press an empty part of a track's lane | Clears the selection |
With the keyboard, in either tool:
| Key | What happens |
|---|---|
S |
Adds the region or node you are on to the selection, or removes it |
⇧Home ⇧End |
On a region, extends the selection to the first or last region on that track. On an automation lane, extends it to the lane's first or last node. Either way you move to that end |
⌘A |
Selects everything in the arrangement, regions and nodes together; press it again to clear |
Esc |
Clears the selection |
Once you have a selection, drag any selected region and the other selected regions move with it, keeping their spacing. If the selection holds nodes as well, drag any selected region or any selected node on a lane that holds a level, and the whole selection moves in time, regions and nodes together. That drag ignores up and down movement, so no node changes value. To move nodes in value, select only nodes. Outlines show where each node will land, and the move is one edit. ⇧← and ⇧→ move the whole selection one grid step in time, across every track and every lane it reaches into. Delete or Backspace removes it, from wherever you are standing in the arrange view. Each of those is one edit, so one ⌘Z takes the whole thing back, whether you moved two things or twenty.
⇧↑ and ⇧↓ move nodes in value, on every lane the selection reaches into. They work only when every member of the selection is a node on a lane that holds a level. If the selection includes a region, or a node on a lane whose control is a switch, nothing moves and the notice line says why.
A selection stops at bar 1 as a whole. Move it left past bar 1 and it slides until its earliest member reaches bar 1, then stops, keeping its spacing. The move is never refused.
Some keys act on one region however much is selected: T and ⇧T move a region between tracks, D copies one, ⇧↑ and ⇧↓ on a region resize it, and Page Up and Page Down move its start edge. ⇧V changes one region's verb when that region is not part of the selection. If a larger selection is held, they still act on the region you are on, and the notice line says so after describing what the key did.
Selected regions are drawn with a bullet before the verb, • REC, and a rule down their left edge, so the state does not depend on colour. Every change to the selection is reported on the notice line in one sentence: "4 regions selected, track 2 bar 9 to track 3 bar 17". When the selection holds nodes as well, the sentence names both.
A selection survives scrolling and zooming, including regions that scroll out of the window. It does not survive loading a different song.
Automation lanes
An automation lane moves one control while the arrangement performs. You draw nodes on it the way you draw regions on a track, and the song changes the control for one passage and changes it back for the next without anyone touching the machine.
The kind of lane follows the control:
- Switch lanes hold one of two states: an effect slot's bypass, on any input, loop track, bus or the master chain, a channel's mute, and an effect control with two settings, such as the delay's
SYNCor an EQ band'sON, and an instrument control with two settings. - Range lanes hold a value anywhere between two ends: a strip's
LEVELon any of its four fader axes, itsPAN, an effect control such as the reverb'sWETor an EQ band'sGAIN, and an instrument control such as the synth'sCUTOFF. - Step lanes move between named settings in order and never slide between them, such as the delay's
DIVISION, the reverb'sSIZEand the synth'sOCTAVE. You cannot add one. The card leaves those controls out, and a song that already holds such a lane keeps it and plays it. See An effect's controls below. - Select lanes load a saved preset into one slot or a saved rack into a whole chain, or set an instrument track's input, preset or drum pattern. See Preset and rack lanes and Input, preset and pattern lanes below.
Channel controls and An effect's controls below list what every strip offers.
Only a performance moves a lane. A transport that is rolling without a performance fires nothing. Outside a performance every control sits where you last left it, and a lane-driven control reads the value the chain is actually holding.
When a performance ends, every lane-driven control stays where the lane left it. STOP, PERFORMANCE STOP and the end-of-song marker all end a performance, and none of them resets a control, because a footswitch that reset every effect you were hearing would be worse than one that left them alone. Change anything you want changed by hand, or perform again and the lanes set their opening values as the playhead reaches them. Saving after a performance saves what the lanes left.
Muting an input channel from the arrangement
An input channel's mute takes that channel out of the main mix and out of every send, including the cue. Automating it lets the song drop a live source for one passage and bring it back for the next.
A typical case: you record a drum take with a vocal mic open beside you. The mic picks up the drums, so you want it down for the take and up again before you sing. Put a lane on that input, draw a node where the take starts and another where you need to sing, and both hands stay on the sticks.
Muting an input changes nothing about what is recorded. The mute is the monitor switch: it decides what you and the room hear. A track recording from that input records the same samples whether the input is muted or not, so it is safe to mute a channel in the middle of a take.
Muting an input does not move its fader. The level you set by hand is still there when the arrangement unmutes the channel.
Adding a lane
There are three ways to open the card, and they all open the same one:
+ LANE, in theLANESheading at the top of the column. It opens the card with nothing chosen. The heading does not scroll, so this button stays in the same place however far down the list you are.- The
+on a row, on any track, group header or strip sub-header. It opens the card with that row's track, strip or group already chosen, so you start on the middle column. The+appears when you point at its row or when the row has keyboard focus. Its space is reserved even while it is hidden, so nothing else on the row moves when it appears. L, which does what the+on the focused row does, or what+ LANEdoes when no row has focus.
Choosing a row does not hide anything. A card opened from a track still lists every other strip in its first column, so you can change your mind without starting again.
The card has three columns. Read left to right, they give the address of the control you are automating: which strip, which part of that strip, and which control.
| Column | What it holds |
|---|---|
STRIP |
The strips of your mixer, under their bank headings and in the mixer's own order: loop tracks, instruments, inputs, the output strips, then the buses. The number at the right of each row is how many controls you can reach under that strip. |
MIXER |
The parts of the strip you chose. CHANNEL is the strip itself, and RACK is its whole effect chain. The rest are its insert slots, each marked with its number, such as SLOT 2, and named by the effect in it. A slot with no effect in it is not listed. |
PARAMETER |
The controls that part of the strip offers. A control that writes one of a strip's fader axes names the axis, as in LEVEL - CUE. Under RACK it offers RACK PRESET, which loads a whole saved rack; under a slot it offers PRESET, which loads a saved preset into that slot, above the slot's own controls. Press ADD to give the arrangement a lane for one. |
Choosing a strip fills the middle column and leaves the left one as it was. Choosing a part of the strip fills the right column and changes nothing else.
Effects live inside the mixer, because an insert slot belongs to a strip. You reach a slot's control the same way you reach a fader: pick the strip first.
Which inputs the list offers
The SHOW row above the strip column reads ASSIGNED or ALL, and it is the same setting the mixer's input rack uses. ASSIGNED offers the inputs that some track records; ALL offers every input your device has. Loop tracks, instrument tracks, buses and the output strips appear either way. The card opens on whichever the mixer is set to, and you can change it here without changing the mixer.
The list holds a row for each input your interface actually offers, not for every input LOOM can address.
Slots with no effect in them
A lane on an empty slot switches nothing and changes no sound, so empty slots are left out until you ask for them. The heading over the card gives both counts: how many places are shown and how many there are in total.
Channel controls
Besides the effect slots, the list offers a strip's own controls.
| Strip | What you can automate |
|---|---|
| Loop track | LEVEL - MAIN, LEVEL - CUE, LEVEL - FX 1, LEVEL - FX 2, PAN, MUTE |
| Instrument track | INPUT, PRESET, PATTERN on a drum track, the instrument's own controls, and after them LEVEL - MAIN, LEVEL - CUE, LEVEL - FX 1, LEVEL - FX 2, PAN, MUTE. See Instrument track controls. |
| Input | LEVEL - MAIN, LEVEL - CUE, LEVEL - FX 1, LEVEL - FX 2, PAN, MUTE |
| Bus, including the cue | LEVEL - MAIN, MUTE |
| Master | LEVEL - MAIN |
A strip's levels are separate controls. The mixer's FADERS row points a strip's fader at MAIN, CUE, FX 1 or FX 2, and those are independent values. The PARAMETER column names the axis on the row you press, so you can tell the send from the fader before you add the lane, and the lane names the one it writes, such as TRACK 2 > LEVEL - CUE. It writes that axis whatever the FADERS row shows while the song plays. Automating a track's cue send leaves its level in the house alone.
SOLO is deliberately not automatable. Solo is a monitoring convenience, not a mix decision, and a solo fired by the arrangement in the middle of a set sounds like a fault: it is one control, and it spans every track and bus at once. Use MUTE on the strips you want down.
The cue's OUTPUT is not automatable either. It chooses which pair of sockets the cue leaves by, which is a property of tonight's rig rather than of the song.
An input's PAN is the one control in this list that changes what you record. A LOOM track always records two channels, and an input's pan is applied before the recorder, so a lane that moves it during a recording pass is heard in the take as well as in the room. Every other control here reaches the room and leaves your takes alone.
Show empty slots sits beside the search field, and Tab reaches it from there. Switch it on and every slot of the strip you are on appears, greyed, with the reason: put an effect in that slot so the lane has something to switch. Use it when you want the lane in place before you add the effect. It is a view option, not part of the song. It is not saved, and the next time you open the card the empty slots are left out again.
Instrument track controls
Each instrument track is a strip under INSTRUMENTS, named INST 1, INST 2 and so on, as in the mixer. Its CHANNEL offers INPUT and PRESET, and on a drum track PATTERN. Every control of the instrument the track holds is listed there too, by its full name, such as AFTERTOUCH TO CUTOFF, except a control with more than two settings, such as the synth's octave. A control of a different instrument is not listed. After them come the strip's levels, PAN and MUTE, as on a loop track. The track's effect slots and RACK are listed as on any other strip.
If you change a track's instrument, a lane you already drew for the old one stays in the arrangement, is drawn unavailable, and writes nothing until that instrument is back.
Instrument tracks exist only while an audio device is open, so the card lists none without one.
An effect's controls
Every control of an effect you have put in a slot can be automated, except a control with more than two settings, such as the delay's DIVISION. The card does not list those. Open the card on the strip the effect is on, choose the slot from the middle column, and the right-hand column lists that effect's controls by the names the effect editor shows: WET, DECAY, FEEDBACK, LOW MID GAIN.
The slot is part of the lane. A reverb in SLOT 2 and a reverb in SLOT 3 each offer their own WET, and a lane on one leaves the other alone. You can automate both at once.
A lane belongs to the effect it was drawn on. If you take that effect out of the slot, or put a different one in, the lane stays in the arrangement, is drawn unavailable, and writes nothing while the slot holds something else. Put the effect back and the lane plays again from the next node, with nothing to reset. Nothing is deleted, so a rack you swap out for one song and back for the next keeps its automation.
A control the effect refuses still refuses. An effect's controls have limits, and a lane that asks for a value outside them is refused, just as the value would be if you typed it by hand. The notice line names the refusal once per performance. LOOM never substitutes a value you did not ask for.
A song that already has a lane on one of those controls keeps it. The lane plays, and the card lists its control as HAS LANE. A lane on a delay's DIVISION moves the delay's time. While SYNC is on, the delay's time is worked out from the division and the song's tempo, so a lane that steps from 1/4 to 1/8 shortens the delay. The change is not instant: the delay slides to its new time, the same sound you hear when you press a division by hand.
If a division is longer than the delay line can hold at the current tempo, the delay keeps the time it was already playing, the notice line says so once for that performance, and the node stays where it is. Bring the tempo back and it plays again.
Searching
Type in the search field to narrow all three columns at once. The text matches what you see on screen, so typing IN 3, SLOT 2, ON / OFF, LEVEL, PAN or MUTE all work. A strip with nothing left in it after the search drops out of the left column.
Controls you already automate
A control the arrangement already has a lane for reads HAS LANE where the others read ADD. The row is dimmer, and pressing it does nothing: you already have the lane. Find it in the track list to draw nodes on it or to remove it. If the lane is folded away inside INPUTS & BUSES, press that row to show it.
The row stays in the list, and you can still reach it with Tab. It reads out the control and says that it already has a lane, so you learn the state without going to look.
Where the lane appears
Press ADD to add the lane. Lanes for a loop track's own effects, and every lane on an instrument track, appear indented under that track.
Every other lane appears in the INPUTS & BUSES group below the +, under a sub-header naming the strip it is on. See Folding the input and bus lanes away.
The new lane takes the keyboard focus. Its row lights as the focused row and scrolls into view, so the next key you press acts on the lane: Return adds its first node at the playhead.
If you add an input, bus or master lane while the INPUTS & BUSES group is folded, the group opens so that you can see the new lane. Adding a lane on a loop track or an instrument track leaves the group as it is.
The lane you are on
The keyboard focus moves to a lane when you add it, press it, press its row in the track list, move onto it with ↑ or ↓, or reach it with Tab. Each way lights the lane's row as the focused row. The focus stays on the lane until you choose a track or move the keyboard to another lane or a region.
Folding the input and bus lanes away
An input, bus or master lane has no track to sit under, so LOOM gives it one: the INPUTS & BUSES row. Every lane on a strip that is not a loop track or an instrument track appears below that row, under a sub-header naming its strip.
The row appears only when the song has such a lane, and it reports what is inside it at the right-hand end of its own row: how many strips, and how many lanes across them. The report is the same whether the lanes are showing or folded away, so you can tell what you have put away.
Press the row to fold every lane inside it away. Press it again to bring them back. Use it when you want the arrangement on screen without the lanes you are not editing: one press puts them all away, however many there are.
Folded lanes still perform. Folding changes what you see and nothing else. Every node on a folded lane still fires while the arrangement plays.
A folded lane is also out of the keyboard order, so Tab goes from the INPUTS & BUSES row to whatever follows the group. The row itself stays reachable and reads out the state and the count.
The fold lasts for the session. Opening a song does not fold or unfold anything, and saving a song does not record it.
Drawing nodes
Press a lane at a bar to add a node there. A new node snaps to SNAP, the same as a region, and the press works in either TOOL.
On a switch lane, the height you press at does not matter. The node takes the opposite of what the lane is doing at that moment, so one press is one change and you do not have to choose between on and off.
On a range lane, the height you press at is the value. The bottom of the row is the bottom of that control's range and the top is the top, so pressing near the top of a LEVEL lane draws a node near unity and pressing near the bottom draws one near silence. The two ends at the lane's right-hand end tell you what you are pressing between.
A node you draw on a range lane is a ramp. The lane slopes into it from the node before it, so two presses on a LEVEL lane give you a fade rather than a step. Press N on a node to make it a jump instead. On a switch lane every node is a jump, because there is nothing between the two states to slide through. Jumps and ramps below covers both.
Pressing a node you can see acts on that node, whatever SNAP is set to. Snap decides where a new node lands, not which existing node you are pointing at. So two nodes a beat apart stay separately reachable after you set SNAP to BAR. On a switch lane the press flips that node. On a range lane the press takes hold of the node: see Dragging a node below.
Dragging a node
On a range lane, press a node and drag it. Sideways moves it in time by whole grid steps, keeping whatever offset from the grid it already had. Up and down moves it in value. A drag can do both at once: the node lands at the new time and the new value together. An outline shows where the node will land, and the move is made when you let go.
A drag is one edit, whichever axes it moved. Press ⌘Z once to take the whole drag back, in both time and value together.
Pressing a node and releasing it without moving changes nothing. It puts the node cursor on that node, which is what the keyboard then acts on.
Dragging keeps a node's shape: a node you made a jump is still a jump afterwards.
A drag is for shaping a curve roughly. At the working lane height a LEVEL lane fits its whole 60 dB into a band a few nodes tall, so one pixel is a large change. Open the lane for more room, and use ⇧↑ and ⇧↓ (hold Option for the fine step) when you want a particular value.
If you drag a single node onto a grid position that already holds one, it carries on to the next free one, the same as the keyboard nudge; the outline shows you where it is actually going. A selection dragged onto other nodes replaces them, and the notice line says how many.
A drag moves the selected nodes on the lane you pressed. If the selection also holds regions, the drag moves the whole selection in time instead, regions and nodes on every lane, and up and down movement is ignored.
On a switch lane there is nothing to drag a node to, and a press flips it.
Telling a lane from the playhead
An automation lane draws its line and its nodes in violet, the colour LOOM uses for effects and for commands. The playhead draws in cyan and crosses every row at once, so a lane and the playhead never wear the same colour.
Colour is not the only difference. A lane's line runs left to right along its own row and carries nodes. The playhead runs top to bottom through every row and has a head in the bar ruler. The direction tells them apart whatever your screen does to the two colours.
Jumps and ramps
A point's shape says how the lane gets to it.
| Shape | What the stretch before the point does |
|---|---|
| Square | The value jumps at the point. |
| Round | The value ramps in from the point before it. |
The shape describes the stretch arriving at the point, so you can read a curve without selecting anything: a round point is the far end of a ramp, and everything up to it slopes.
N changes the node at the cursor from one to the other. Move the cursor to the node with ← and →, or press the node with the mouse, then press N. The notice line says which of the two the node is now, along with its reading and its bar, so you can work without looking at the marker.
A switch cannot ramp. There is nothing between bypassed and on to be halfway through, so every point on a bypass lane or a mute lane is a square. If you ask for a ramp there, the notice line says so instead of quietly drawing a square.
The first point on any lane is a square, because there is no point before it to ramp from.
So N on the first node of a lane does nothing, and the notice line says why. Draw a node before it and it is no longer first, and you can then set its shape.
The node cursor
A lane holds one cursor: the node the next key will act on. It is drawn as an outline around that node's marker while the lane has the keyboard focus, and the outline takes the marker's own shape: square around a jump, round around a ramp. So you can still read what the node does while you are on it.
When you Tab to the lane, the cursor goes to its first node. ← and → move it from node to node; Home and End take the first and the last. Pressing a node with the mouse moves the cursor there too, so the mouse and the keyboard always agree about which node you are on.
Return adds a node at the cursor. On a switch lane it switches the control there, as a press does. On a range lane the keyboard gives a bar but no height, so the node takes the value the lane is already drawn at. To choose the value, press the lane at the height you want instead. The node is a ramp, the same as a node you press. N makes it a jump. Backspace removes the node at the cursor. If the lane holds no nodes at all, Return adds the first one at the playhead, and Backspace says in the notice line that there was nothing to remove, naming the bar it looked at.
The lane's spoken sentence includes the cursor: where it is, what the control does from there, and how many nodes the lane holds. It uses the lane's own words: a lane on an effect slot says the slot is on or off, and a lane on a channel's mute says the channel is muted or unmuted. A lane that holds no nodes yet says what its control is doing anyway: a switch lane says the word, and a range lane says the reading, -6.0 dB.
Selecting and moving nodes
⇧← and ⇧→ move the node at the cursor one grid step earlier or later. On a range lane, ⇧↑ and ⇧↓ move it up and down in value. Hold Option as well and all four move by a much smaller step, which is how you place an exact value on a lane whose whole range is a few nodes tall.
On a switch lane there are only two states, so ⇧↑ and ⇧↓ have nothing to move between and the notice line says so.
A node on a RACK PRESET or PRESET lane is selected, moved and removed the same way: S, a press on its square marker, ⇧ and a press, the rubber band, ⇧← and ⇧→, and Delete all work on it, and it can be in one selection with regions and other nodes. It has no value, so ⇧↑ and ⇧↓ move nothing and the notice line says so. Dragging its square marker moves it in time. E opens the list for the node at the cursor so you can pick a different entry.
To work on more than one at a time, ⌘A selects everything in the arrangement, regions and nodes together, and a second press clears. To take every node on one lane, put the cursor on its first node and press ⇧End. S adds the node at the cursor to the selection or takes it out again, which is the same key a region uses; to select only one node, press Esc and then S. Pressing a node with the mouse also makes it the selection, and ⇧ and a press adds it or takes it out. Esc clears the selection from anywhere in the view.
A rubber band selects nodes as well, and it selects regions on any track lane it crosses at the same time, so one drag can take in both. Set TOOL to POINTER and start it on any lane, a track's or an automation lane. On an automation lane the band starts once you move the pointer; a press that does not move still adds a node.
A selected node is drawn hollow: its marker keeps the shape that tells you whether the node is a ramp or a jump, and its middle is open. The selected state does not depend on colour, and the selection survives scrolling and zooming, including nodes that scroll out of the window.
With the node cursor on a selected node, ⇧← and ⇧→ move the whole selection together, keeping the spacing between its members, and Backspace or Delete removes all of it. ⇧↑ and ⇧↓ move every selected node on every lane, keeping the shape between them on each lane. Each of those is one edit, so one ⌘Z takes the whole thing back.
A selection moved in value stops at the end of each lane's range, and each lane stops on its own. If the highest selected node on a lane is already at the top, ⇧↑ leaves that lane where it is and moves the selected nodes on the other lanes, and the notice line names the lane that stayed put. The shape you drew on a lane is never flattened against an end.
What happens when a node lands on another
A single node steps past. If the grid position it is moving to already holds a node, it carries on to the next free one and the node that was there is left alone. So one press can move it two steps. This is deliberate: a press that silently did nothing would seem broken.
A selection does not step past. It lands where you sent it, and any node it lands on that is not part of the selection is replaced. This keeps the shape of what you are moving: if one member stepped past and the rest did not, the curve would change shape. The notice line says how many nodes were replaced, because a selection moved to the right can replace nodes beyond the edge of the window, where you would not see them go.
A node selection stops at bar 1 as a whole, the way a region selection does. Move it left past bar 1 and it slides until its earliest node reaches bar 1, keeping its spacing. The move is never refused.
A single node stops at bar 1 too. If moving it left would take it past bar 1, including by stepping over a node in its way, it stays where it is instead of landing on top of anything.
The line and its axis
On a switch lane (a bypass, a mute, or a control inside an effect that has two settings), the line has two levels, with a marker at each point. The lane's right-hand end shows which of the two settings is drawn high.
On a range lane the line has a full travel instead: the bottom of the row is the bottom of that control's range and the top is the top, and a point sits wherever its value falls between them. A level runs from silence to unity; a pan runs hard left to hard right. Switch and range lanes read the same way: a switch lane is a travel that uses only its two ends.
The ends come from the control the lane holds, and are shown at the lane's right-hand end.
A switch lane names its two states in words. A lane on an effect slot reads ON over OFF, a lane on a channel's mute reads OPEN over MUTED, and a lane on a control inside an effect reads that control's own settings: an EQ band's lane reads ON over OFF, and so does a delay's PING PONG lane.
A range lane gives you the two ends as values instead, in the same units the mixer and the effect editors use: a LEVEL lane reads 0.0 dB over -60.0 dB, and a PAN lane reads R 100 over L 100. The numbers tell you how much of the travel a node has used.

The line goes down to the quiet state. A slot that is switched off and a muted channel are both drawn at the bottom of the lane. A mute lane therefore runs downward to mute, which is the way round you want it when a level lane is on the row above: down is less sound on both.
A control inside an effect is drawn in its own order, and the words at the right-hand end tell you which way. The setting named at the top of the lane is the one drawn at the top: an EQ band that is on sits beside ON, and a node that switches it off drops to OFF. A control with more than two settings, in a song that already carries a lane on one, spreads its settings over the same travel in the order the effect editor offers them, the first at the bottom and the last at the top.
Before the first node the line is dashed and reads AS SET. The song asks for nothing in that stretch, so the value you set by hand applies there, and the lane draws it at that height. The dashes set that stretch apart from the part the arrangement drives, which begins at the first node. If you move that control by hand with the arrange view open (switch the slot, mute the channel, pull the fader down), the dashed line moves with it. Nothing is written to the song: no node is made, and the arrangement still switches nothing before its first node.
If there is no room for the words between the left edge and the first node, the dashes are drawn without them so that they do not cover a node's value.
On a switch lane the first press you make on that stretch does the opposite of what the control is doing, so it always changes something you can hear. Press the mute lane of a channel you have already muted and you get a node that opens it.
A lane you have added and not drawn on yet is dashed end to end, at that same height, because nothing on it is authored.
Each node is one edit, so one ⌘Z takes it back.
Reading a node's value
Nodes carry their values on the lane. A label is a small plate beside the node, and it reads what the control is set to there: -12.0 dB on a level, L 40 on a pan, MUTED on a mute lane, and the setting's own name on a control inside an effect: ON, OFF, 1/8D.
The node the cursor is on states its bar as well as its value, as in BAR 16.4 - -10.0 dB, and its plate is drawn in the same colour as the ring around the node, so you can see at a glance which node you are about to act on.
A lane shows the cursor's node while it has the focus, and every node it can fit while it is open. At the shorter height only the node you are on is labelled, which keeps a list of lanes quiet. Open the lane and every node is offered a label.
Labels are left out rather than drawn on top of each other. A label is placed only if it clears the one before it, and the cursor's node is placed first and always keeps its label. Where a run of two or more nodes goes unlabelled, the lane draws a count instead, such as x4, so you can see that the values exist and are hidden, not missing.
Zoom makes room for labels; height does not. A label is about sixty pixels wide, and at the default zoom a beat is under twenty, so five nodes a beat apart have room for one label whichever height the lane is at. Opening the lane offers every node a label; it does not make the lane any wider. Zoom in with + or ⌘= and the nodes move apart, and the labels come back one at a time.
Typing a node's value
Press E on an automation lane whose value is a number, and LOOM opens a field on the node the cursor is on. The field holds the value the node has, selected, so the first character you type replaces it. Press Return to set the value, or Esc to leave the node as it is. Clicking away from the field sets the value as well.
The field opens in the half of the lane the node is not in, so it never covers the node you are editing. It covers other nodes for as long as it is open. Which side it opens on tells you which half of the lane your node is in.
Type the value the way the lane prints it, and leave the unit off if you like. On a level lane, -24 and -24.0 dB both set the same value. On a pan lane the value is a side and a distance, so type L 40, R 100 or C; the side is part of the value rather than a unit, so a distance on its own is refused.
A value the lane does not accept is refused rather than rounded into range. The notice line names the values at the two ends of the lane, and the node keeps the value it had. Typing is how you name a value exactly, so LOOM tells you when it cannot take the one you named instead of setting a different one.
Typing a value does not move the node in time, and it does not change whether the node ramps or jumps. Use ⇧← and ⇧→ to move it, and N to change its shape.
On a lane whose value is a word, there is nothing between the two states to type, and the notice line says so. On a lane where the cursor is on no node, the notice line says that too.
Preset and rack lanes
A preset lane loads a saved preset into one slot. A rack lane loads a saved rack into a whole chain. Both let the song change a sound between passages without you reaching for the drawer.
Add one the way you add any other lane. In the card's middle column, pick RACK for the whole chain and the right column offers RACK PRESET; pick a slot and the right column offers PRESET above that slot's own controls.
A change is a node, not a stretch
A preset or rack change is a node, drawn at the bar you put it on. The band that follows it carries the name of the preset in force, so a lane reads as a row of named passages.
The band is not a length. The preset holds until the next change on that lane, or until the end of the song. There is no handle to drag on its right-hand edge. To change where a preset stops, move the change that follows it.
A node on one of these lanes takes the same keys and gestures as any other node: select it, move it in time, and delete it, along with everything else in the selection, in one edit. See Keyboard for the keys.
Choosing what a node loads
Press a band's name to open the browser for that change. Click an empty part of the lane to add a change there, which opens the browser for the new one. Either way the browser lists your saved entries and LOOM's factory ones, and marks the entry the node already holds.
A lane holds values, not a reference
When you pick an entry for a node, the node takes a copy of that entry's settings. Editing that preset in your library afterwards does not change your song. A song you performed last month sounds the way it sounded, whatever you have done to your library since.
To take a preset's new settings into a song, open the node and pick the entry again.
What happens when several lanes address one chain
A chain can carry a rack lane, preset lanes on its slots, and parameter lanes on its controls, all at once. They apply in that order: the rack first, then the presets, then the individual parameters. So a lane on the reverb's WET keeps sweeping across a preset change rather than being reset by it.
When a lane cannot do what it says
A lane whose effect you have removed, or replaced with an effect of another kind, does nothing. Its row shows the effect it was drawn for struck through, and the lane stays in the song so that putting that effect back starts it working again.
A rack or preset change that replaces the kind of effect in a slot is heard as a short dip. See The mixer, Replacing an effect while the chain is running, for why, and for where to place the change.
A lane for an instrument's control is named with the instrument editor's short name for it, such as AT CUTOFF, with the instrument under it. The instrument is struck through while the track holds a different instrument, because the lane does nothing then. A PATTERN lane names DRUMS the same way.
Input, preset and pattern lanes
An instrument track can have an INPUT lane, a PRESET lane and, on a drum track, a PATTERN lane. To add one, press the + on the track's row, choose CHANNEL in the middle column, choose the lane in the right-hand column, and press ADD. A new lane has no nodes. Click an empty part of the lane to place one, which opens the list for the new node. Press a band's name to change the node it starts with, as on a preset lane.
The input list. Pressing an INPUT lane opens the input list for a node at that bar. Under SOURCE, choose NONE, ANY DEVICE, or a connected MIDI device. If the track names a device that this rig does not have, that device is listed struck through. Under CHANNEL, choose ALL or a channel from 1 to 16. The command channel is greyed and cannot be chosen, and the CHANNEL heading names it, as in CH 16 · LOOP COMMANDS. NONE listens on no channel, so the channel cells are greyed while it is chosen. WRITES, beside PICK, shows what the node will say. Press PICK to write the node. Choosing a source or a channel writes nothing until you do. Escape, Close or a click outside the list leaves the lane as it was.
Each node holds from its bar until the next node on the lane, and the lane draws its words across that span, such as ANY · CH 1 or NONE. A NONE node hands the keyboard off, so another track's INPUT lane can take it at the same bar. See One input, one track at a time.
Presets and patterns. Pressing a PRESET lane opens the presets of the instrument the track holds. On a drum track these are its kits. The SYNTH, DRUMS and SAMPLER cells at the top list another instrument's presets instead. Picking one of those puts that instrument on the track from the node on. Pressing a PATTERN lane opens the drum patterns. Both lists work as they do for a rack or preset lane: the node's own entry reads AT THIS NODE, and an entry another node on the lane uses names that node's bar. ⌘Z takes back a pick.
Clearing and removing a lane
Each automation lane row carries a count cell at its right-hand end. It shows one of three faces and keeps the same size in all three, so the row never shifts under your hand.
| Face | When you see it | What pressing it does |
|---|---|---|
3 NODES |
The lane holds nodes and you are not working on it. | Nothing. It is a readout of how much the lane holds. |
CLEAR |
The lane holds nodes and you have selected it. | Takes every node off the lane in one step. The lane stays. |
REMOVE |
The lane holds no nodes. | Takes the lane out of the arrangement. |
Select a lane by pressing its row, the same press that opens it to the taller height. That gives you the lane at full height before you are offered a control that empties it.
Tab reaches the count cell in all three faces. It sits directly after the lane's own row and reads out its face. On the readout face, pressing it does nothing: it is a label you can land on, not a control that refuses you. So the number of stops in the list stays the same whatever your lanes hold, and drawing a node on a lane never removes a stop from under your hand.
Taking a lane away is two steps. Clear it, then remove it. A lane that still holds nodes never offers REMOVE, so there is no single press that empties a lane and deletes it.
CLEAR is one edit however many nodes the lane holds, so one ⌘Z brings all of them back. The notice line says how many went and that undo returns them.
Removing a lane leaves its control exactly as it is. The arrangement stops switching it, and the sound does not change at the moment you press.
What a lane does while you play
Automation runs only while the arrangement performs. ROLL on its own does not move your effects, levels or mutes. Pressing play on the looper does not play the song.
Between two nodes the lane leaves its control alone. Reach over and switch an effect, or a channel's mute, by hand in the middle of a passage and it stays switched until the lane's next node, which takes it back. The song takes over only at the nodes you drew.
Stopping in the middle of an arrangement leaves everything where the song left it. Nothing snaps back, so what you hear after you stop is what you heard before you did.
A lane whose slot you later empty is kept and drawn unavailable, with the reason on its row. It starts working again when you put an effect back. A lane on an input the current device does not have says so once while the song performs, and the rest of the arrangement keeps playing.
How exact the timing is
A node lands within about 50 milliseconds of the bar you drew it on. LOOM applies automation on the same timer that redraws the window, which is fast enough for a switch to land on the beat, though not sample-exact. For switching an effect on and off, that is all there is to it.
A ramp is applied on that same timer, so the lane's value is updated about every 33 milliseconds rather than sample by sample. What you hear between two updates depends on what the lane controls:
- An effect control that changes smoothly, such as a wet or dry level, a feedback amount or an EQ band's gain, moves in a straight line from one update to the next. A ramp is heard as a continuous sweep.
- A level or a pan on a track, an input, a bus or the master is smoothed as each update arrives, the same way it is when you move a fader by hand. A ramp of a bar or longer is heard as a fade.
A ramp drawn across a fraction of a beat is better done as a jump: press N on the node at its far end.
Effects on an input record into your loops. A lane that switches an input effect off for a passage is heard in what you record during that passage, not only in what you monitor.
SNAP, and what one grid step is
SNAP decides what a gesture rounds to. It also sets how long a new region is and how far one keyboard step moves.
SNAP |
A gesture rounds to | A new region is | One keyboard step is |
|---|---|---|---|
BAR |
The nearest bar | A bar | A bar |
BEAT |
The nearest beat | A beat | A beat |
A beat is a beat of the meter you are in. In 6/8 there are six to the bar, not four.
A region keeps the position you gave it, and both perform buttons play it there. With SNAP on BEAT a region starts on a beat and the arrangement fires it on that beat.
Changing SNAP announces the new setting: "gestures snap to the bar" or "gestures snap to the beat".
Making and editing regions with the mouse
Apart from the buttons in the header row and the scroll strip, this table lists every mouse gesture on this surface, plus one thing a held drag does on its own. Rows that name a tool depend on TOOL. The rest behave the same in either tool.
| Gesture | What happens |
|---|---|
| Press a track row | That track becomes the focused track. |
| Press a region | The region takes the keyboard, its track becomes the focused track, and it becomes the selection. |
Hold ⇧ and press a region |
Adds it to the selection, or removes it if it is already in one. |
Right-click a region, or hold Control and press one |
Opens the region's menu, which offers the three verbs with the region's current verb ticked. Pressing a region you have not selected makes it the selection first; pressing one inside a selection leaves the selection as it is, and the menu's first line says how many regions your choice will change. Esc or a click away closes it and changes nothing. |
| Press a node | The node becomes the selection, and the node cursor moves there. |
Hold ⇧ and press a node |
Adds it to the selection, or removes it if it is already in one. |
Press an empty part of a track's lane, in DRAW |
A region one grid step long is created there — a bar at BAR, a beat at BEAT. |
Press an empty part of a track's lane, in POINTER |
Clears the selection. |
Press an empty part of an automation lane, in DRAW |
Adds a node there as you press. |
Press an empty part of an automation lane, in POINTER |
Adds a node there when you let go without moving. |
Drag across a lane, in DRAW |
A region of the length you dragged. A dashed outline shows exactly what will be made while the button is down. |
Drag across empty lanes, in POINTER |
Selects every region and every node the rectangle crosses. A dashed rectangle shows what it is catching while the button is down. The drag can start on any lane. |
Hold ⇧ and drag across empty lanes, in POINTER |
Adds what the rectangle crosses to what is already selected. |
| Drag a region's body | Moves it along the timeline, and to another track if you drag it onto one. A selection moves with it, along its own tracks. A selection that also holds nodes moves with it in time only. |
Hold ⌥ and drag a region |
Makes a copy where you let go. The original stays where it was. |
| Drag a region's left edge | Moves its start, leaving its end where it is. |
| Drag a region's right edge | Makes it longer or shorter from the end. |
| Press the bar ruler | Puts the playhead there, snapped to SNAP. Nothing starts. |
| Drag along the bar ruler | Scrubs the playhead along, snapping as it goes. |
| Drag the song end marker | Sets where the song ends. |
| Drag the scrollbar | Moves the view along the song. |
| Turn the wheel, or swipe two fingers | Scrolls the view. A sideways swipe moves along the song. An up-or-down wheel or swipe moves the rows when there are more rows than fit, and moves along the song when they all fit. A swipe moves the rows as far as your fingers move; a wheel notch moves one row. |
| Drag the row scrollbar | Moves the rows up and down, following the drag. |
Hold ⌘ and turn the wheel |
Zooms one step, about the point under the pointer. |
| Pinch | Zooms one step, about the point under the pointer. |
| (Hold a drag past the left or right edge) | The view scrolls under it, faster the further past the edge you hold. One pixel past is a crawl for placing an edge exactly. Dragging past the end of the song is how you make the song longer. |
The edges are the outer 6 pixels. A region narrower than 18 pixels has no edge zones at all: the whole rectangle moves, so a press meant to move it never trims it instead. Over an edge the pointer becomes a left-right resize cursor.
A drag is one edit. Nothing is written until you let go, so the rectangle under your hand is a preview and one ⌘Z takes the whole gesture back. If the region you drag lands on top of its neighbours, the region you dragged wins and its neighbours yield, within the same edit. That holds for a selection too: dragging twenty regions is one edit and one ⌘Z, and regions inside the selection never yield to each other. Only regions outside it give way.
A drag can move a region to another track, and it stays the same region. Drag it onto another lane and it lands there, keeping everything recorded into it, in one edit that one ⌘Z takes back. Regions already on that lane yield to it exactly as they do on its own track.
A ⌥-drag makes a copy, and a copy is a new region. Nothing you have recorded into the original follows it: the recording belongs to the region it was played into. The copy fires the same verb and is the same length.
A selection does not cross tracks. Drag a selection of two or more and it moves along the tracks its regions are already on. To move one region to another track, drag it on its own, or use T and ⇧T.
A drag never makes a region shorter than one beat. A beat is also the smallest grid step SNAP offers, so a drag is already a whole number of beats or bars before that floor is reached.
Editing regions from the keyboard
Every gesture above has a keyboard route. The zoom and scroll keys are in Moving the view below; the rest are here.
Where you stand. Tab reaches every lane and every region, in reading order: lane 1, then lane 1's regions in time order, then lane 2, and so on. Once you are on the surface, the arrow keys move around it without leaving.
Moving around. ← and → move to the previous and next region on the same track, and at the ends they put you on the track's own lane. ↑ and ↓ move to the region above or below at the same point in the song, or to that track's lane if it has no region there. Home and End go to the first and last region on the track.
Editing. ⇧← and ⇧→ move the region one grid step. ⇧↑ and ⇧↓ make it one grid step longer or shorter from its end. Page Up and Page Down move its start edge and leave its end alone. Delete or Backspace removes it. Return makes a new region straight after it, and D makes a copy of it straight after it.
Changing what a region is. ⇧V cycles what the region you are on fires (REC to DUB to PLAY and back), and with a selection of two or more it changes all of them in one edit. T moves the region to the track below and ⇧T to the track above. All three keep the region, so anything recorded into it stays with it and one ⌘Z puts the change back.
Selecting. S adds the region or node you are on to the selection or removes it, ⇧Home and ⇧End extend the selection along the track or the lane you are on, ⌘A takes everything in the arrangement and Esc clears. Standing inside the selection, ⇧←, ⇧→, Delete and Backspace act on all of it in one edit. See Selecting more than one thing above.
On a lane. Return creates a region after the last one on that track. ← and Home go to the first region on the track, → and End to the last, and ↑ and ↓ to the lane above or below.
Anywhere on the surface. V cycles what a new region will fire and says the new verb out loud; the VERB row follows it. It leaves the regions you already have alone. V and ⇧V are the same letter because ⇧ means "apply it to what is selected" everywhere on this surface, and ⇧V is the keyboard's route to changing a region you already have.
A region never shortens to nothing: one grid step is the shortest a keyboard resize makes it, and shortening a one-step region does nothing. A region never moves before bar 1, and moving the start edge stops one grid step short of the end.
The full tables are in Keyboard shortcuts, under A region on the arrange timeline and A lane on the arrange timeline.
VoiceOver: every lane is a focus stop, so a track with no regions on it is still somewhere you can stand.
Returnon a lane creates a region there, and on an empty track that region starts at bar 1. The lane's description says how many regions the track holds and where they are, up to six of them by name, and it names the keys you can use there.Every region's name carries what its colour carries: "Record region, track 3, bar 5, 1 bar." Its description adds what it will do and, for an advisory region, why its boundary is advisory.
The view follows the focus. Moving onto a region that is off screen scrolls the view to it. The region announces itself, and the scroll is not announced separately. The same applies down the list: moving onto a track row, a count cell or a lane that is below the bottom of the window brings that row into view.
Moving the view: zoom, scroll and FOLLOW
Zoom has eleven steps, from 8 pixels per bar to 224, starting at 56.
-, or ⌘- |
Out one step |
+, or ⌘=, ⌘+, ⇧⌘= |
In one step |
FIT, or ⌘0 |
The largest step at which the whole song fits, scrolled back to bar 1 |
A zoom says the new range: "zoomed in - showing bars 5 to 30."
Each zoom holds one point still. A ⌘-wheel or a pinch holds the point under the pointer. A key or a button has no pointer on the timeline, so it holds the region you are on, or else the playhead if it is on screen, or else the leftmost bar you can see. That point stays at exactly the same pixel.
Scroll with the wheel, a two-finger swipe, or the scrollbar. The scrollbar appears only when the song is wider than the window. Focus it with Tab and its own keys work: ← and ↑ move back a bar, → and ↓ move forward a bar, Page Up and Page Down move a screen, and Home and End go to the two ends. Its description says where you are in bars rather than in pixels: "showing bars 23 to 47 of 96."
Scrolling the rows
Once you add enough automation lanes, the rows outgrow the window and a second scrollbar appears down the right-hand edge of the lanes. Drag it, or turn the wheel, or swipe two fingers up or down over the lanes. The track list and the lanes move together, so a name always stays level with its lane. The bar ruler does not move, and neither does the scroll strip.
A two-finger swipe moves the rows as far as your fingers move, so the list follows the gesture and a row can sit half-drawn at the top or bottom of the window. A wheel notch moves one row, because a notch is a click rather than a distance.
Dragging the scrollbar moves the rows the same way the swipe does. Its keys always land on a row boundary: ↑ and ↓ move one row, Page Up and Page Down move a screenful, and Home and End go to the two ends.
Focus the row scrollbar with Tab to use those keys. Its description says which rows you are on: "showing rows 1 to 6 of 14." The count is the rows drawn in full, so it does not change while a part-drawn row slides through the edge of the window.
You do not have to scroll to reach a row. Move the keyboard focus to a row, a lane or a region and LOOM brings it into view for you, and pressing an automation lane's name to open it brings the lane back into view if opening it pushed it off the bottom. Everything in the list stays reachable from the keyboard whether or not it is drawn.
A region you can already see does not move the view. If any part of the region you land on is on screen, the view stays exactly where you put it. This matters on a region longer than the window: zoomed in on its right end, selecting it or grabbing its right edge leaves you where you were instead of jumping back to where the region starts. A region with none of it on screen is still brought in, from whichever end is nearer.
When not everything fits, the view's own description says what is on screen: "The row list is showing rows 1 to 6 of 14."
FOLLOW starts on. While the arrangement rolls it flips a page rather than sliding: the picture stays still and the playhead crosses it, and when the playhead reaches the right-hand edge the view jumps to the next screenful, which starts an eighth of a window before the playhead.
Scrolling while it rolls turns FOLLOW off, and says so once: "FOLLOW off - the view stays where you put it." Pressing PERFORM FROM TOP or PERFORM FROM HERE turns it back on. Pressing ROLL does not.
Where the song ends
Every song is 96 bars long until you say otherwise. The end is the flag in the bar ruler, with a line down the lanes and hatching past it.
Drag it, or focus it with Tab and use the arrow keys: ← and → move it a bar, hold ⇧ for four. Its position is announced when you land on it and again when it moves: "The song ends at bar 64."
The end marker does not get in your way. Draw or drag a region past the end and the end moves out of the way in the same edit as the region, so one ⌘Z takes both back. The end only ever moves outward on its own, so a marker you dragged out yourself stays where you put it when you later place a region before it.
The end cannot move before the end of your last region, and the refusal starts with what to do: "Move or shorten track 3's last region, the Record running to bar 40. The arrangement cannot end at bar 32 while a region runs past it. Nothing was changed."
Playing the arrangement — the PERFORM buttons
PERFORM FROM TOP, PERFORM FROM HERE and PERFORMANCE STOP are at the left end of the header row, grouped under one spoken sentence: "Perform the arrangement - writes to tracks". The first two are the only place in LOOM where the arrangement plays itself and writes to your tracks, and the third is how you get back out. The MOVE set in the top bar never writes to a track: see The top bar.
Both fire each region's command on the region's own tick, to the sample. A REC region on bar 5 starts recording on bar 5; a DUB region on beat 3 of bar 7 starts an overdub pass on beat 3 of bar 7; a PLAY region on bar 9 starts that track on bar 9. A region fires where you drew it, not on the nearest bar line. You do not press anything else.
PERFORM FROM TOP starts at bar 1, always. PERFORM FROM HERE starts wherever the playhead is: place it first (see The playhead, and getting back to the start below), then press this one to hear what the arrangement says should be sounding from that instant on. It is refused while the transport is already rolling, because there is nothing to start "from" until you halt and place the playhead again.
Neither is the same as ROLL. ROLL in the top bar starts the transport from wherever it is and fires nothing, which is still the way to audition a loop with no arrangement driving it. Both perform buttons start the arrangement itself.
PERFORM FROM TOP is also on a MIDI note, and PERFORM FROM HERE is not. Note 125 (101 in the 1.0 layout) performs from bar 1 exactly as this button does, from any view. See MIDI mapping. There is no pad for PERFORM FROM HERE, because that button means "from where I put the playhead" and placing the playhead is a gesture with no pad either.
With no arrangement in the song both perform buttons go dead and say NO ARRANGEMENT behind a dashed border. Draw a region on a lane and they come back. PERFORMANCE STOP keeps its own word in every state. It is live only while a performance is running.
Either one plays the song once, to the end marker, and stops there. Neither loops and neither wraps. You can seek while a performance runs: click a bar in the ruler and the song arrives there on the next bar line, with the arrangement following you (see Jumping while it plays below). What you cannot do is change where the next performance starts from without pressing STOP first. Both perform buttons read the playhead at the moment you press them.
While a performance is running
Both perform buttons stay where they are and go dead. Nothing appears, disappears or moves. They change state in place, as a DAW's transport buttons do. A second press cannot re-trigger a performance, because a dead button ignores every press, whether from the mouse, the keyboard or a screen reader.
PERFORMANCE STOP comes live in the same place it occupies when it is dead. It is the third control in the group and the only one that does anything while a performance runs. See Leaving a performance and keeping the song below.
STOP in the top bar ends the song. There is only one stop of that kind. It is in the MOVE set, and it stops whatever is running: a plain rolling transport, a performance, or both. LOOM does not draw a second transport stop over the arrange view.
If the keyboard was on PERFORM FROM TOP or PERFORM FROM HERE when you pressed it, it moves to that STOP. Those two go dead when a performance starts, so LOOM moves the focus to a live control instead of leaving it nowhere. To reach PERFORMANCE STOP from there, press ⇧⌘P, which works from any control and any view.
TO TOP and ROLL go dead for as long as a performance runs. This is the only time either is disabled. Normally they respond to every press, even one the engine will refuse. During a performance, LOOM disables the two seek controls so that a stray press cannot move the playhead under your hands. STOP beside them is unaffected.
Leaving a performance and keeping the song
PERFORMANCE STOP releases the arrangement and leaves everything else running. The transport keeps rolling, every loop keeps playing exactly as it is, and LOOM stops firing the regions you wrote. From that press on, you are driving the song by hand.
Use it when a performance gives you an idea. You started the song from bar 1, four loops are playing, and you want to overdub something the arrangement does not contain. Press PERFORMANCE STOP and the song carries on while you work the looper by hand.
It is the third of the PERFORM buttons, beside PERFORM FROM TOP and PERFORM FROM HERE, and ⇧⌘P presses it from any view. It is live only while a performance is running. At every other time it is drawn in the same place behind a dashed border and does nothing.
To get back into the arrangement afterwards, press STOP and then PERFORM FROM HERE. See Picking the arrangement back up below.
What it changes, and what it leaves alone
Nothing you can hear changes at the press. A track that was playing keeps playing. A track that was stopped stays stopped. A take that was recording goes on recording. The arrangement stops sending commands to your tracks, but it does not undo any it has already sent.
The transport does not stop, pause or move. The playhead carries on from the sample it was on.
Your track settings are restored. While an arrangement performs, LOOM holds three of each track's settings so a region can decide them: LENGTH, COUNT-IN and what a take does when it closes. Releasing the arrangement hands those three back to the values you set. Nothing else about the song is rewritten, and settings you changed during the performance stand.
Regions stop firing from that instant. A region the playhead is standing inside does not fire its end when you leave it, so the track it started keeps playing.
Once the arrangement is released, the song end marker stops nothing. Stopping the song at the end marker is part of performing the arrangement, and you have just released it. Press STOP in the top bar when you want the song to end.
FOLLOW is untouched. The view goes on doing whatever it was doing.
Picking the arrangement back up
Press STOP in the top bar, then PERFORM FROM HERE. The arrangement re-arms from wherever the playhead was left, and the regions from that point on fire as written.
PERFORM FROM HERE will not arm while the transport is rolling, and a released performance leaves it rolling. Press it without halting first and LOOM refuses, with a line telling you to press STOP. The playhead stays where it is across the halt, so PERFORM FROM HERE after it resumes from the bar you improvised up to and not from bar 1.
PERFORM FROM TOP also works, and it does what it always does: it halts the transport, returns to bar 1 and starts the whole song again.
If the keyboard was on PERFORMANCE STOP when you pressed it, it moves to STOP in the top bar, because the control under your finger has just gone dead. That is also the first step back in: press it, then PERFORM FROM HERE.
A new song empties the arrangement
⌘N clears the arrangement with everything else it clears. The regions go, the end marker returns to 96 bars, and the undo history goes with them. A new song has no arrangement, so both perform buttons read NO ARRANGEMENT until you draw a region.
Pressing it during a performance ends the performance. The arrangement is released in the same gesture: PERFORM FROM TOP and PERFORM FROM HERE come back live in the new song, and PERFORMANCE STOP goes back to being dead. ⌘N does not stop the transport. Press STOP in the top bar when you want it to stop.
What you saved is untouched. A new song clears what is loaded, not what is on disk. Open the song again and its arrangement comes back as you left it at your last ⌘S.
The playhead, and getting back to the start
The playhead is the vertical line that shows where the transport is. It runs down through the lanes and has a small triangle at the top, in the bar ruler. It is dimmer while the transport is stopped and full strength while it rolls, so a parked line still shows where the next ROLL will start from.
The playhead is not always on screen. It is not drawn before a tempo map is published, and with FOLLOW off you can scroll the view away from it. LOOM then draws nothing, rather than pinning the line to an edge it is not at. With FOLLOW on the view keeps up on its own.
The playhead is also a control. Click the bar ruler to put it there, or press and drag to scrub it along; it snaps to whatever SNAP says. A press on the song end marker's flag goes to the flag, so aim beside it. You can also reach the playhead from the keyboard with Tab: the arrows move it a grid step, Shift makes that four, and Home sends it to bar 1.
TO TOP, in the top bar's MOVE group, sends the playhead back to the start and does nothing else. The transport stays stopped, no track is armed and the arrangement is not started. It is in that group because the two rows mean different things: MOVE never records, and the perform row writes to your tracks. You need it because PERFORM FROM TOP does not just return to bar 1: it launches the song.
Moving the playhead starts nothing. Afterwards, ROLL plays the transport from wherever you left it and fires no regions, which is how you audition a loop over the middle of a song without launching the arrangement. PERFORM FROM HERE is the other thing you can do from a placed playhead: it arms the arrangement and plays it from that instant on, exactly as PERFORM FROM TOP does from bar 1. This is the one way to hear the arrangement from the middle of the song.
TO TOP and PERFORM FROM HERE do not work while the transport is rolling, and LOOM tells you so. Halt first. TO TOP would otherwise yank a rolling performance back to bar 1 with no warning, and PERFORM FROM HERE has nothing to start from until you have halted and placed the playhead again.
Clicking a bar while the song is rolling is the exception. See Jumping while it plays.
Jumping while it plays
Click a bar while the song is rolling and the playhead does not move. A hollow marker appears in the ruler at the bar you clicked. It is an outline where the playhead's head is solid, in a different colour, and it pulses slowly. The transport arrives there on the next bar line, not mid-phrase. The music you are already hearing plays out the bar and the song continues from where you pointed.
JUMP Q in the side panel decides which boundary. NEXT BAR is the default. NEXT BEAT is finer, and IMMEDIATE jumps the instant you click. See The side panel. It is saved with the song.
Two ways out of a jump you have armed:
Escapecancels it, from anywhere in the window and not only from the arrange view: "JUMP cancelled. The playhead stays where it is."- Click the same bar again and it fires at once, without waiting for the boundary. This matches the rest of LOOM, where pressing a function twice skips its quantize.
Clicking a different bar moves the marker instead of queueing a second jump. The last bar you pointed at is the one you get.
Everything a jump does is announced as well as drawn, because a screen reader cannot see a pulsing outline. Arming, arriving, cancelling and every reason a jump did not happen each get one sentence on the notice line:
| What happened | What LOOM says |
|---|---|
| You clicked a bar while rolling | "JUMP armed for bar 17 on the next bar. Escape cancels; click that bar again to jump now." |
| The boundary arrived | "JUMPED to bar 17." |
You pressed Escape |
"JUMP cancelled. The playhead stays where it is." |
You pressed STOP before the boundary |
"JUMP dropped: the transport stopped before the boundary arrived. The playhead is where STOP left it." |
| There is no tempo grid | "JUMP refused: this session has published no tempo grid, so there is no bar line to wait for. Nothing moved." |
A jump works during a performance too. PERFORM FROM TOP and PERFORM FROM HERE go dead while one runs, and TO TOP and ROLL with them, but the ruler does not: nothing moves until a boundary you can see coming, and Escape takes it back. The arrangement follows you to the new position and fires the regions that live there.
When the song is stopped, none of this applies. A click just places the playhead, immediately, and JUMP Q does nothing: there is no bar line to wait for on a grid that is not moving.
What it will not do, and why you find out immediately
Both perform buttons are all or nothing. If any one region in the song cannot be played correctly, nothing starts. LOOM does not play seven of your eight regions and leave the eighth out quietly. ROLL still works, and rolls the transport without the arrangement.
There are nine reasons either button can refuse, in two groups. PERFORM FROM HERE has a tenth of its own: pressed while the transport is already rolling, it refuses, because there is no placed position to start from until you halt and place the playhead again.
Six stop the press outright, and each gives you one sentence:
| Why it refuses | |
|---|---|
| No audio device is open | There is no musical grid to place an arrangement on. Start the session first. |
| This session has published no tempo map | Same reason, one step later: there is no grid to fire an arrangement against. |
| The published grid has no bar in it | Start the audio device first. |
| The arrangement crosses a tempo or meter change | This pass reads one grid and computes every region's bar from the map at the top of the timeline. Keep the arrangement inside one tempo segment. |
| A region names a track this session does not have | You would hear three regions and then silence. |
| A region is on a track that is out of the array for this session | Same. |
Three are about the regions themselves, and those are reported together, one line per region, so a song with three bad regions tells you about all three in one press:
| Why it refuses | |
|---|---|
| A region starts or ends on neither a bar line nor a beat line | A region is played at its own tick, and the tick it is played at is the one it is drawn on. A boundary on neither grid is one you cannot have drawn with SNAP, so it came from a song file or the command line, and playing it would put the region somewhere nobody put it. Snap it to a bar or a beat. |
| An advisory region on a track that is not synced | An unsynced track is addressed in samples and has no ticks at all, and an arrangement plays a region at a tick. Sync the track, or remove the region. |
| A region naming a verb this pass does not fire | It fires Play, Record and Overdub, and makes the stop at a region's end itself. Delete the region, or press ⇧V on it to give it one of the three. |
The reason appears on the notice line at the bottom of the window, with a red rule down its left edge, and it is read out loud as well if ANNOUNCE is on. Nothing in the arrange view moves when a press is refused: the track list stays where it is.
VoiceOver: a refusal longer than the notice line's two lines is cut with an ellipsis on screen. The description carries the whole of it, and so does what LOOM speaks. What you hear is complete even when what is drawn is not.
What the arrangement does that is not on screen
These are not shown on screen, so you would otherwise find them out by playing:
- every region fires on its own tick, to the sample, whatever you drew it on;
- each pass starts where you told it to and never anywhere else:
PERFORM FROM TOPat bar 1,PERFORM FROM HEREat the playhead.STOPleaves the transport where it is andROLLpicks up from there without the arrangement. To seek during a pass, click the ruler; the song jumps on theJUMP Qboundary and takes the arrangement with it; - edits take effect on the next roll. The arrangement that is playing is the one that was in the song when you pressed the button.
A track whose own settings will fight its region gets a WARNING: line on the notice line as well. It is not a refusal and the song still plays; the arrangement drives the track for as long as it rolls, and you get your settings back at the end.
The notice stays until another message replaces it.
How much automation a song can carry
Regions fire on their own tick, to the sample, whatever else the window is doing. Automation values are written on the same pass that draws the screen, so how much is on screen sets how closely they follow their nodes.
Measured on an M1 MacBook Pro, with the arrange view showing:
- An ordinary song (eight lanes, a node a bar) writes each value in well under a millisecond, and the screen redraws about thirty times a second. Values follow their nodes within about 50 ms.
- A deliberately extreme song (sixty-four lanes carrying twenty-four thousand nodes, with the whole song on screen at the most zoomed-out setting) still writes each value in about a millisecond. Drawing that many nodes takes longer, so a value can land up to about 90 ms after its node, which at 120 bpm is under a sixteenth note.
So automation keeps up in normal use, and stays close even at the extreme. If you do write automation that dense and want it as tight as possible, zoom in or work in the mixer while you play: the time goes into drawing the nodes, not playing them. Your loops are unaffected either way, because every region fires on its own tick whatever the screen is doing.
The count-in
There is a count-in before an arrangement: SONG COUNT-IN, on the side panel's SONG tab, default off. Set it and PERFORM FROM TOP locates to negative time and plays forward through zero, so a region recording at bar 1 gets its lead. PERFORM FROM HERE does not count in. It rolls from wherever the playhead already is rather than locating anywhere first, so a count-in before bar 1 does not apply to a start in the middle of the song.
With the count-in off, which is the default, a region recording at bar 1 loses the first few milliseconds to latency, because there is no time before bar 1 to start early in. The notice line says so when that is the case, and leads with the remedy: set a count-in.
When it reaches the end
Every track stops on the end marker's bar and keeps its loop, the transport stops, and your track settings are yours again. ROLL then picks up from where it stopped rather than starting the song over.