 LOOM
LOOMThe looper view's body has three parts: the globals row across the top, the track strips under it, and the side panel down the right edge. The side panel is covered on the next page.
For keys, see Keyboard shortcuts. Every control on both surfaces is a tab stop unless this page says otherwise. Every button responds to Return and declines a modified Return.
The globals row
The globals row sits directly above the strips and spans the strip area only. Its controls act on every track below it.


ALL START
Starts every track's loop at once, on the same sample. A track with nothing recorded on it stays empty. ALL START Q in the side panel sets when it fires, and each track then starts on its own launch quantize at or after that moment.
If the transport is stopped, ALL START starts it, so you do not have to press ROLL first. A ring button on a stopped transport behaves the same way. If the transport is already rolling, ALL START starts the tracks and leaves the playhead where it is. ALL STOP does not stop the transport, so it is not the mirror of this button.
When it cannot act: if no track has anything recorded, the button still reads ALL START but is drawn dead, with a dashed border instead of a solid one and no green fill. If you press it anyway, the notice line says there is nothing to start.
Its accessible name is Start all tracks in both states, and its description says what the button does.
ALL STOP
Stops every track's loop at once, on the same sample, and keeps the recorded material. The transport keeps rolling and the click keeps sounding. ALL STOP Q sets when it fires.
Each track fades out over about two milliseconds instead of cutting off, so a stop is silent whatever quantize it lands on. For more, see STOP on the track strip.
When it cannot act: if nothing is sounding, the button still reads ALL STOP but is drawn dead. If you press it anyway, the notice line says there is nothing to stop.
Its accessible name is Stop all tracks. Its description names the other two stops, so a screen reader user can tell the three apart.
ALL CLEAR
Erases the recorded loop on every track at once. You hold the button to confirm, and the result cannot be undone. Tracks that are playing fade out over about two milliseconds instead of cutting off, the same fade ALL STOP uses. The per-track CLEAR is held the same way and cannot be undone either; ALL CLEAR does every track in one gesture. These are the only two buttons in LOOM you have to hold, and the only two that discard material you cannot get back.
Press and hold the mouse button, or Return with the button focused, for one second. The button fills as it arms and fires when the fill is full. If you release early, nothing happens.
One second is long enough that a stray brush or a bumped trackpad cannot fire it, and short enough that you still see the fill and let go.
When it cannot act: if no track holds anything, the button still reads ALL CLEAR, loses its red border and refuses every gesture, so a hold never starts filling. If you press it, the notice line says there is nothing to clear. Each strip's own CLEAR refuses the hold in the same state and gives the reason on the notice line, but it shows the state with a dashed border.
Its accessible name is Clear all tracks. Its description is written as the confirmation step, not as help text. When you land on the button, before you can press it, you hear what it erases, that it affects every track, and that it cannot be undone. The track count is read from the session.
VoiceOver: the gesture is different here and on each strip's
CLEAR. The accessibility layer cannot express a hold, so a VoiceOver activation firesALL CLEARon a single press, with no hold and no fill. The description you hear when you land on the button is your only confirmation step.
S — clear every solo
A one-character button after ALL START, ALL STOP and ALL CLEAR. It clears every solo in the song, on loop tracks, instrument tracks and effect buses alike, and puts every track back in the main mix.
It is solid amber while anything is soloed, and drawn dead with a dashed border when nothing is. The amber matches the colour SOLO lights, so the button that reports solo mode shares the colour of the button that sets it.
The same button appears in the same place in the arrange view's header and the mixer's header, and does the same thing from whichever surface you are on.
Solo is a mode that changes what every strip means. It stays set while you work in another application, and it is saved with the song. This button makes a solo set in the mixer visible from the looper. Without it, silent tracks can look like a broken audio interface.
Clearing a solo gives you back exactly the mix you had, because solo never writes a mute. Tracks you muted yourself stay muted.
When it cannot act: if nothing is soloed, the button is dead. If you press it anyway, the notice line says nothing is soloed.
Its accessible name is Clear all solos in the looper. The word on its face does not change with its state. The description does: it says whether a solo is in force and what pressing the button will do.
FADERS
A four-cell inline segmented row labelled FADERS, placed after the solo-clear button and before the collapse. It chooses which bus every fader on screen addresses: the track faders here, and the input faders on the mixer's INPUTS bank.
MAIN · CUE · FX 1 · FX 2
MAIN is the level that goes to front of house. CUE is the send that goes to your headphones. FX 1 and FX 2 are the sends into the two effects buses. The mixer covers the buses themselves and the difference between the cue and an effects send.
It is one tab stop, with the accessible name FADERS and one radio-button cell per setting. The arrow keys move the selection, and Home and End jump to the ends. Modified keys are declined.
A change is announced at high priority, because five faders silently changing bus is easy to miss. The announcement names the bus and says whether it is tapped before or after the fader, because the two behave differently the next time you pull a strip down. Like every announcement, it is controlled by the ANNOUNCE switch.
Each fader's accessible name also changes: Track 3 level becomes Track 3 CUE send or Track 3 FX 1 send. This is the only place LOOM puts state in a name. The setting changes what the fader is, so a blind performer who tabs onto track 3 level while it addresses a send would be misled.
This is a view setting, not a routing setting. It changes what the faders show and write, it is never in the signal path, and a MIDI control bound to a track's send moves that send whatever bus is shown here. The setting is not saved, so every session starts on MAIN. The per-track send levels persist; which bus the faders are displaying does not.
What a track records
LOOM has five tracks, and every one of them records in stereo.
Every track is a stereo track
A track always records two channels. There is no mono track and no setting that makes one.
The TRACK input section, which the strip's i button opens, chooses which inputs a track records. The track sums them, and each input arrives at the position set by its own PAN.
A centred input records onto both channels equally. A track fed one microphone at centre records that microphone onto both channels, with nothing spread.
To record a stereo track, pan the inputs apart. On the mixer's INPUTS bank, put one input hard left and another hard right, then arm both onto one track. The track records two different signals, one source on each channel. The input's pan decides this. See The mixer.
Two consequences are worth knowing in advance:
- A take on disk is a two-channel WAV file. Both channels hold the same audio unless you panned the inputs apart. See Your recordings.
PANon the track strip is a balance, not a position. On a track whose inputs are all centred, the two amount to the same thing. On a track recording two hard-panned sources, it sets how much of each channel reaches each side, so panning such a track hard left gives you the left-hand source alone. See The mixer.
If your main mix has one output channel
A track plays its left channel. The right channel is not summed into it, so anything recorded only on the right is not heard.
This is not the usual case. If you run a stereo main mix and take just the left output to a mono PA, LOOM still sends both channels and you are choosing one at the cable. The behaviour above applies only when the main mix itself is set to a single channel.
If every input on the track is centred, both of its channels hold the same audio and this changes nothing you can hear. It is audible on a track whose inputs are panned apart: on a one-channel main mix, the source you panned hard right is not in the output.
The longest loop is four minutes
A single loop can be up to four minutes long. That is longer than any single pass a loop performance normally uses. You can keep overdubbing a loop under about eighty seconds for as long as you like.
The limit comes from the memory LOOM reserves before you play a note, so that recording never has to ask the operating system for anything mid-performance. Five tracks, each with room for three loop-lengths of audio, and a four-minute ceiling are what fit on an 8 GB Mac with the memory locked down. Stereo recording comes out of the same budget.
How long you can go on overdubbing
The undo history lives in the same space as the loop, so a longer loop leaves room for fewer passes over it. Loops under about eighty seconds can be overdubbed indefinitely: LOOM folds the older layers down in the background as you go, and you never reach an edge. Above that, the folding cannot keep up, and an overdub eventually stops partway through its pass. The loop keeps playing. The NOTICE line tells you when that happens.
The track strips
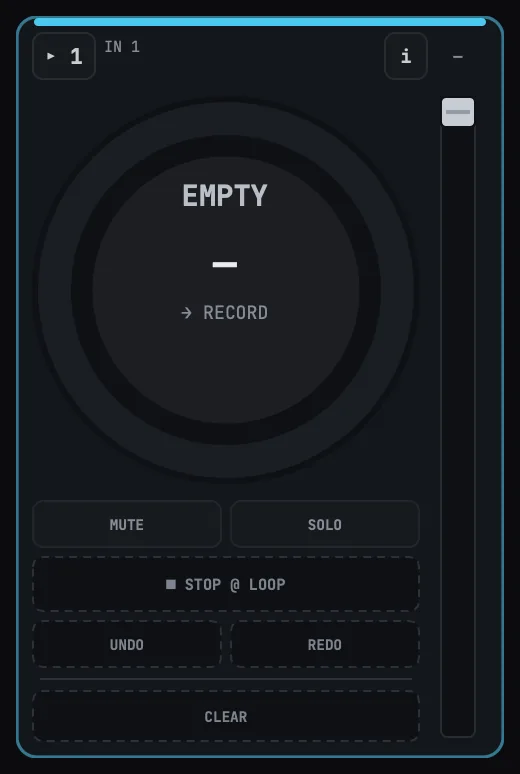
Each track has one vertical strip, and the strips sit side by side in equal columns. An empty strip looks exactly like a full one without the loop: the same header, ring, STOP and i. One press records into it.
A strip has one form for each LAYOUT. See Where the instrument tracks are.
- In
BANKS, from top to bottom, a strip has the header (number andi), the ring, the fader,MUTEandSOLO,STOP, theUNDO/REDOrow, a caption line, a divider, andCLEAR. - In
ROWS, the fader runs the height of the strip on its right side, and its level is printed above it in the header. Down the left side are the ring,MUTEandSOLO,STOP, theUNDO/REDOrow, a divider, andCLEAR. There is no caption line.
The header also names the track's input, such as IN 1. It sits between the number and the i when the strip is wide enough to hold a sampler's SLICE · C3–G3 there. On narrower strips it has a line of its own under the header, and the ring sits below it. The small strips beside the open editor dock never give it a line of its own. See The track strips while the dock is open.
The heights are ordered so that the most-pressed control is the biggest and the destructive one is not. STOP is the tallest button under the ring, and CLEAR is shorter.
Every cell keeps its position regardless of what is available. Availability can change the word on a face but never the layout, and in BANKS the caption line is reserved on every strip in every state, so a hand reaching for REDO's position always lands on REDO.
The strip itself
Press anywhere on a strip's background to focus that track. The keyboard focus goes to that strip's ring. The header number and the i are small, but the whole strip responds, so you can select a track without aiming at either of them.
The background responds on mouse down, so the caret, the cap and the border move under your finger instead of after it.
An unavailable UNDO/REDO row passes its clicks through. It has nothing to act on, so it claims nothing, and pressing it focuses the track instead. ■ STOP and CLEAR do not pass clicks through. They keep their words when they cannot act, so you read and press them as controls, and they answer on the notice line instead of quietly selecting the track under them.
Focus is shown four ways: a filled cap across the top edge (shape), a border that both tints and thickens (colour and width), a caret before the number (text), and the strip's own accessible description (words). Each of the first three still works without colour.
The cap is on the top edge because strips stand side by side. On the left edge it would sit in the gutter between two strips and read as a divider rather than as a mark on one of them.
Its accessible name is Track 3 strip in every state. Its description says whether this is the focused track, that pressing anywhere on it outside its own controls focuses it, and that the left and right arrow keys move focus between strips.
The track number
A small button in the strip header that shows the track number, with a caret in front of it when the track is focused. The header is the select button, so you focus a strip by clicking its name. The header also shows which input the track records, as IN 1. It says nothing about what you hear; for that, see the INPUTS bank on the mixer.
Its accessible name is Select track 3. Its description says that the ring, the undo family and the track verbs act on the focused track only. The input line is painted text, not a component, so a screen reader reaches it through the IN switches in the side panel's SOURCE section instead.
Pressing the number leaves the keyboard focus on the number you just pressed. Pressing the strip's empty background moves the focus to the ring, which is also where the arrow keys put it.
The i button
A small i at the right of the strip header. It opens the side panel's TRACK mode on this track and focuses the track, and it lights while its panel is open.
Pressing it again while its panel is open switches the panel back to GLOBAL, the panel's other mode, rather than closing it. To collapse the panel, use the panel toggle.
Its accessible name is Track 3 info. Its description says it opens the info panel for that track, where you choose its input.
The ring
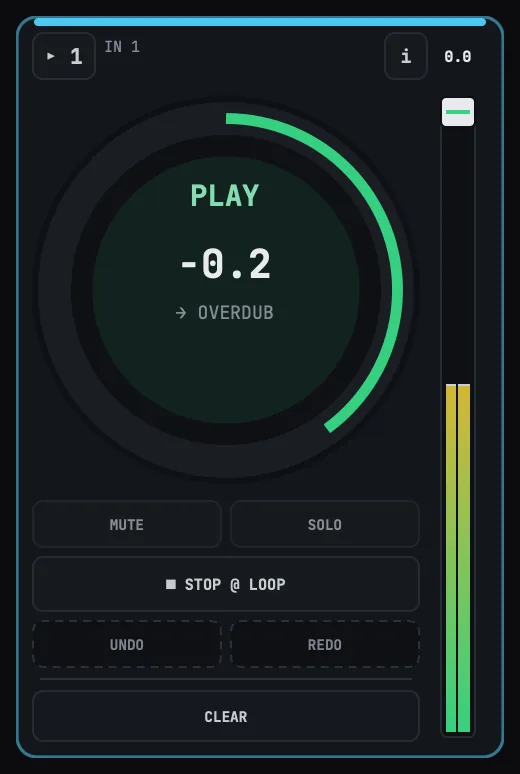
The big round button with the light ring around it, at the top of the strip under the header. It is the control you look at while playing.
The centre of the ring shows three lines: the state word, the countdown below it, and a small arrowed word (→ RECORD, → OVERDUB, → PLAY or → STOP) that says what the next press will do. While a track records its first take, the next press closes the loop, so the arrowed word is what the track does next as set by its REC ACTION: → PLAY, → OVERDUB or → STOP. See RECORDING in the side panel. If the close waits for the next bar, the state word shows where the track is going: WAIT PLAY, WAIT DUB or WAIT STOP. Pressing the ring during the wait closes the loop at once. Pressing a strip's ring also focuses that track first, so a press never lands on a track you did not point at. After you move focus with ← or →, the keyboard lands on the new strip's ring, so ← ← Space is a complete gesture.
The ring's fill angle is the loop position.
The number under the state word counts down to the loop point in bars and beats. -3.1 means three bars and one beat until this loop comes round again. The beats come from the song's time signature, so a bar of 6/8 counts six of them and a bar of 4/4 counts four.
The count is truncated to whole beats: a four-bar loop reads -3.3 one beat in, and -0.1 on its last beat.
While a track is recording, the number counts up in seconds. 12.4 is twelve and four tenths of a second into the take. The direction tells you the unit: counting down is bars and beats, and counting up is seconds. A take has no length until you end it, so there is nothing to count down to.
The ring does not sweep while a track is recording. It starts sweeping once the loop has a length.
An empty or stopped track reads —.
The ring's states are drawn with shape and colour. No state relies on colour alone. Each phase has its own combination of ring stroke and whether a wedge sits at twelve o'clock, so every state is still distinct in greyscale.
| Word | Ring | Wedge | Colour |
|---|---|---|---|
EMPTY |
flat, unlit | — | grey |
ARMED |
flat, unlit | wedge | red |
COUNT IN |
radial ticks | — | cyan |
REC |
thick sweep | — | red |
PLAY |
thin sweep | — | green |
DUB |
two concentric sweeps | — | amber |
STOPPED |
complete ring, dimmed | — | grey |
WAIT REC |
thick sweep | wedge | red |
WAIT PLAY |
thin sweep | wedge | green |
WAIT STOP |
complete ring, dimmed | wedge | grey |
WAIT SWAP |
two concentric dashed sweeps | wedge | violet |
WAIT TOP |
radial ticks | wedge | cyan |
WAIT DUB |
two concentric sweeps | wedge | amber |

WAIT TOP is a playing loop that waits to start again from its top.
A track waiting to play from a stop has not started its loop yet, so its sweep has no length and only the wedge marks it, as on the second ring above.
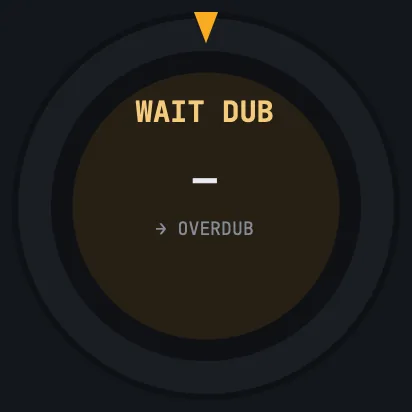
Read the table as a grid. The arc shows what kind of thing is happening (nothing, one layer, a quiet layer, a layer over a layer, held content, a count, or a wait on another track's loop), and the wedge shows whether it has happened yet. WAIT DUB is a take whose close lands in an overdub, so it draws the two sweeps of DUB, as WAIT PLAY draws the sweep of PLAY. A first take has no length until its close lands, so while its close waits, only the wedge marks it, as in the picture.
The wedge is the only visual mark LOOM uses to show that something is scheduled but has not happened yet. While something is scheduled, the ring also breathes: one breath per beat while the transport is rolling on a grid, and one every 1.4 seconds otherwise. A ring with nothing pending does not animate at all.
Its accessible name is Loop button track 3. Its description reads the state word, then change scheduled when something is pending, then the loop's length, then what the next press will do: PLAY, 4 bar loop, press to overdub. The pending clause is spoken because a blink cannot be read aloud. A track with no recorded loop leaves out the length rather than saying zero: EMPTY, press to record.
The description is rebuilt only when the phase, the verb or the loop's length changes, so a breathing ring does not re-announce itself thirty times a second. The description leaves out the countdown, which changes on every beat; a description that followed it would read the metronome aloud over your set. It gives the length instead, which is what the countdown is measured against and which changes only when you record or clear the loop.
A loop that is not a whole number of bars is read in both units, as 2 bar 1 beat loop. A loop shorter than a bar is read in beats alone, as 3 beat loop. The bars come from the song's time signature, so eighteen beats is three bars of 6/8, not four and a half bars of 4/4. The number you hear is the number the ring draws at the top of a turn.
Only the circle responds to a press. The four corners of its square are strip background, and pressing them focuses the track.
Unlike the strip background, the ring acts on mouse up, so dragging off the ring cancels the press. A press can start a take, so it is worth being able to call it off.
The fader and its meter
A vertical level control whose slot is its meter. The handle sits inside the slot, at the slot's width. It sets this track's level on whichever bus the globals row's FADERS setting is showing.
In BANKS the fader fills the strip below the ring. To its left are a caption saying which bus it addresses and, under the caption, its value in decibels. In ROWS the fader runs the height of the strip on its right side, and its value is printed above it, in the header.
Drag the slot or the handle. The handle moves one pixel for every pixel your hand moves, and the drag is measured from where you pressed, so returning your hand to where it started returns the fader to where it started.
Home is unity and End is silence. This reverses the platform's convention for numeric sliders because the fader is vertical and has no boost, so unity is at the top of its travel.
The range runs from silence to unity, with no gain above unity. The bottom of the travel is an exact mute, not just a very quiet level.
In BANKS the caption reads LEVEL on the main mix, and the bus's own name on a send: CUE, FX 1 or FX 2. In ROWS there is no caption on the main mix, and on a send the bus's name is printed above the value. The bus's name is the part of the setting you can read without colour.
Each send also has its own colour. On a send, the slot takes a faint tint and an outline in that bus's colour, and the bus's name and the line across the handle are drawn in it: blue for CUE, violet for FX 1, magenta for FX 2. On the main mix the slot has no tint at all, which tells you at a glance that a fader is setting the level front of house hears. The colour repeats what the bus's name already says in words, so nothing is lost if the three colours look alike to you.
The value shows the level in decibels to one decimal place, or -INF at the floor. On a track that holds nothing, it shows a bare — instead. The readout takes this from the session itself and never infers it from a zero level, because a stopped loop and a cleared track both meter at zero and only one of them has nothing to say.
The handle shows the same thing by its brightness. On a track that holds a loop it is white. On a track that holds nothing it is grey, the same size and in the same place. Use it to see which strips are carrying something without reading each value. The value's dash says the same thing in a character, so you do not need to tell the two shades apart.
The fader has no scale. Read the level from its value.
The meter fills the slot from the bottom and shows what this track is putting into the mix after the fader. It has two bars side by side in the slot: the left channel on the left bar and the right channel on the right one. Every track carries a stereo signal, so both bars are always drawn.
Two bars at different heights mean the track is not centred, either because you moved its PAN or because the material itself sits to one side. Use the meter to check that a take and the overdubs on top of it are landing where you expect.
The meter follows the pan. Pan a track hard left and its right bar falls to the floor, because the track is sending nothing to the right of the mix.
While you are recording, and before there is anything to play back, both bars show the same level. The take is metered as one figure until it plays.
The meter is not a tab stop and is not read out, because a level that changes thirty times a second is out of date by the time it is spoken. The fader's description says the meter has two bars and which is which.
Its accessible name is Track 3 level on the main mix, and Track 3 CUE send, Track 3 FX 1 send or Track 3 FX 2 send on a send, following whichever bus FADERS is on. It has a settable value interface, so a screen reader can set this control as well as read it. It reads out the value it draws, so the two cannot disagree: the number where a number is drawn, and the words no value where the bare — is. It never reads out a level on a track that shows a dash. The description covers the arrow rules, the Home/End rule, that ←/→ move the focused track instead, that there is no gain above unity, that the meter is post-fader, and that it has two bars with the left channel on the left.
Only the slot and the handle respond to a press. The meter is inside the slot, so pressing it moves the fader. The caption and the value are readouts; a press on either passes through and focuses the track. A drag that starts in the slot keeps tracking your hand outside it.
MUTE and SOLO
Two equal buttons side by side, under the fader in BANKS and under the ring in ROWS. They are the same two controls the mixer draws on its track strips, acting on the same track, so a change on either surface shows on the other.
MUTE takes this track out of the main mix and leaves its cue send alone, so a track you mute for the room stays in your headphones. The level ramps rather than jumping, so muting in the middle of a loop does not click. The loop keeps playing and stays in phase, so when you unmute, the track comes back in wherever the loop has reached, not where you left it.
SOLO puts this track in the soloed set. While anything is soloed, only the soloed tracks reach the main mix. Clearing the last solo restores exactly the mix you had, because solo never writes a mute.
A plain press on SOLO clears the other tracks' solos, so one press moves the solo to the track you pressed. To build up a set instead, hold Option while you press. This adds the track to what is already soloed.
Mute wins over solo. A track that is both muted and soloed stays silent.
The buttons show what the engine holds, not what you last pressed. If a press is refused, the button does not change and the notice line says why.
When another track's solo is silencing this one
While anything in the mixer is soloed, every track that is not in the soloed set is silent. On those strips the word MUTE blinks in blue, the meter narrows and turns grey, and the line across the fader's handle turns grey.
The blink does not mean the button is on. The button's fill stays dark because you have not muted the track; something else is keeping it out of the mix. Press SOLO on a blinking strip to bring it into the soloed set, or clear every solo with the S button in the view's second row.
A track you muted yourself does not blink. Its MUTE is lit, which already tells you why it is silent.
The blink runs at one beat while the transport is rolling, and slower when it is stopped.
Other tracks' solos are not the only cause. Soloing an effect bus in the mixer silences every track that does not send to it, and those strips blink for the same reason.
Names and keys
Their accessible names are Mute track 3 in the looper and Solo track 3 in the looper, which tells them apart from the mixer's pair. Each announces itself as a two-state control and reports whether it is on. The descriptions say what each button does to the mix, that mute leaves the cue send alone, and what Option does to a solo press.
With the keyboard focus anywhere in the looper view, M mutes the focused track and S solos it. Option+S solos it additively. The same two keys do the same two things in the mixer.
STOP
The wide button under MUTE and SOLO, with the stop quantize printed on its face. It stops this one track, at the moment its own stop quantize sets.
To stop one track from the keyboard, tab to this button.
| Face | Means |
|---|---|
■ STOP @ LOOP |
Stops at the end of the loop: the pass you are hearing, which begins where you last started the track. |
■ STOP @ BAR |
Stops at the end of the bar. |
■ STOP @ BEAT |
Stops at the end of the beat. |
■ STOP @ IMMED |
Stops on the spot. |
… * |
A trailing asterisk means this track's stop quantize differs from the song's default. |
In a narrow strip, the STOP button leaves out the ■ so that its words fit on one line, for example STOP @ LOOP. If they still do not fit, STOP and the quantize go on two lines.
The quantize is on the face because you need to know when the stop will happen before you press. It stays there, asterisk and all, when the track has nothing to stop, so an empty strip still tells you what the track will do once you record on it.
When it cannot act, the button keeps its whole face and is drawn with a dashed border instead of a solid one. The border shows the state, so it reads the same without colour.
A stop fades out over about two milliseconds instead of cutting the sound off. The fade is far shorter than a note, so you do not hear it, and you do not hear a click either, whatever the stop quantize is and wherever in the waveform the stop lands. A stop that lands exactly on the end of a loop is already silent there and is left alone.
The same fade runs when you CLEAR a track that is playing, so silencing a track does not click whichever button you use.
Its accessible name is Stop track 3 in both states. The description says when the stop takes effect and whether this track is set apart from the song's default, and names the top bar's STOP and ALL STOP so you can tell the three stops apart.
If you press it when the track has nothing to stop, the notice line gives the reason and names the track. It does not select the track: nothing happened, so nothing moves.
UNDO and REDO
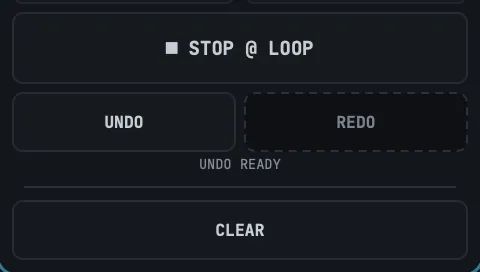
Two equal cells in a row under STOP. In BANKS a caption line sits beneath them. UNDO takes the last layer off this track, from its start; REDO puts back the layer last undone. Both act on this track only, and the other strips keep theirs.
The caption line says what the row can do. In BANKS it appears on every strip in every state. The ROWS strip has no caption line.
| Caption | Means |
|---|---|
NO LAYERS |
Neither verb would move anything. |
UNDO READY |
Undo is available. |
REDO READY |
Redo is available. |
UNDO + REDO |
Both are available. |
Their accessible names are Undo track 3 and Redo track 3 in both states. The descriptions say what is available and what to do about it: an unavailable UNDO says that recording or overdubbing onto the track makes a layer, and an unavailable REDO says to undo first.
The undo depth is one per track, so this caption shows availability, not a stack depth.
UNDODOES NOT REACH A TAKE REPLACED BY ARECREGION. Playing an arrangement whoseRECregion lands on a track that already holds a loop replaces that loop permanently.UNDOaccepts the press and the track goes on playing the new take. Opening the song again brings back the new take too, because a track comes back holding the take it held when you saved. The caption may readUNDO READYfor a layer you have added since, but the replaced take is not behind it.An arrangement is the only thing in LOOM that records onto a track already holding a loop. This strip refuses it; you make that decision where you draw the region. See the PERFORM buttons.
A
DUBregion is different. An overdub region, scored or played by hand, makes an ordinary layer, andUNDOtakes it off.
CLEAR
The last cell on the strip, below a drawn divider, styled as destructive. It clears this track and discards its material. The other strips keep theirs.
CLEAR cannot be undone. Once a track is cleared, neither UNDO nor reopening the song brings its material back. The destructive style and the drawn divider are there to mark this.
Clearing a track that is playing fades it out over about two milliseconds instead of cutting the sound off, the same fade a STOP uses. You can clear a track mid-phrase without hearing a click.
You have to hold it, exactly as you hold ALL CLEAR: press and hold the mouse button, or Return with the button focused, for one second. The button fills as it arms and fires when the fill is full. If you release early, nothing happens.
It is the same gesture, the same second and the same fill as the globals row's button, because it is the same control underneath. A single Return on a focused CLEAR does not clear the track. It starts the hold, and releasing the key ends it. A modified Return is declined outright, and so is Space.
When it cannot act: the button still reads CLEAR, is drawn with a dashed border, and refuses the hold. Pressing it puts the reason on the notice line, naming the track.
Its accessible name is Clear track 3 in both states. As with ALL CLEAR, its description is written as the confirmation step, not as help text. It says what is discarded, that it affects this track and not the others, that it cannot be undone, and how the hold works.
Because of the drawn divider above it, CLEAR is never adjacent to the button you press constantly mid-take.
VoiceOver: as on
ALL CLEAR, the gesture is different here. The accessibility layer cannot express a hold, so a VoiceOver activation clears the track on a single press, with no hold and no fill. The description you hear when you land on the button is your only confirmation step.
The keyboard, and a control that retires
Four controls on this strip can go dead as a result of your own press. CLEAR clears the track, so there is nothing left to clear. STOP stops the loop, so there is nothing left to stop. UNDO and REDO each use up their one layer of history.
When that happens, the keyboard focus moves to this strip's ring instead of being dropped. The ring is the strip's own gesture and is never disabled, and it comes before all four in this strip's tab order, so pressing Tab from there continues down the same list you were already on. It is this strip's ring, not the focused track's: clearing track 3 leaves you on track 3.
A control that retires never drops the keyboard focus. If you see that happen on any control anywhere in LOOM, it is a bug and worth reporting.
If you keep holding Return, nothing else happens. The focus moves while the key is still down, so the ring receives the rest of a press it never saw begin, and it ignores that key. To start a take on the ring, release Return and press it again.
A control in LOOM acts only on a key it saw you press. This applies wherever the keyboard focus moves under a key you are already holding, not only after a clear. ALL CLEAR moves the keyboard focus to the focused track's ring for the same reason.
The same applies on the two transport rows. See the top bar and the arrange view.
VoiceOver: the control you land on announces itself. If the keyboard focus moves and you hear nothing, it has gone somewhere you cannot find, and that is the same defect.