 LOOM
LOOMThe side panel runs down the right edge of the window in the looper, the arrange view and the mixer. It has three modes and shows one at a time: GLOBAL for the song's global settings, TRACK n for the focused track's settings, and SONG for this song's own settings. The panel toggle in the top bar hides the panel and brings it back in the mode you left it in. In the mixer, you reach a track's settings through this panel (see The mixer).
The effect editor is not part of this panel. It is a drawer that opens inside the mixer, beside the strip you tapped, and is described under The effect rack. It never opens as a floating window, so nothing sits on top of the mixer you are performing on.
The panel is 310 px wide in every mode, so the tabs do not move under your pointer when you switch modes. 310 px is the width of the GLOBAL mode's settings column, and GLOBAL is the widest of the three modes.
Below a window width of about 1400 px, the effect drawer and this panel do not both fit. Opening the drawer hides the panel. The panel toggle brings the panel back in the mode you left it in and closes the drawer. Above that width, both stay open and neither moves.
If you resize the window across that width while a drawer is open, the panel hides and returns on its own. Widening past it brings the panel back in the mode you left it in. Narrowing past it hides the panel and leaves the drawer where it is, because the drawer is what you just asked for.
The panel, its three tabs and the way it collapses are the same on every surface, and it always comes back in the mode you left it in.
In ARRANGE, the timeline gives up width to the panel instead of being drawn underneath it. The body is divided before the arrange view lays itself out, so the ruler, the lanes and the end marker all stop at the panel's border. Collapse the panel and the timeline takes the width back. The mixer's rack is divided the same way, so opening the panel narrows every strip instead of covering the strips on the right.
With the panel open, the arrange header wraps when the window is narrower than about 1310 px. TOOL, SNAP and VERB move to a full-width second row and the lanes shift down by 38 px, because at narrower widths those three controls would be squeezed too thin to read. The default 1600 px window is well above this width. With the panel collapsed, the header does not wrap at any width you can drag to: the smallest window LOOM allows is 1180 px wide, and the single row still holds all three controls there.
The panel scrolls vertically when its contents do not fit. Tabbing to a control below the fold scrolls it into view. Nothing else scrolls the panel: not a state change, not the refresh, not moving the panel to another track, and not a drag inside the panel, because every drag in the panel belongs to a control.
Tab and ⇧Tab move between controls. When the scroller itself has focus, Page Up, Page Down, Home and End scroll it.
Every off-screen control stays reachable from the keyboard and stays in the accessibility tree. The scrolling region and both of its scrollbars are named: Song settings scroller, Song settings scrollbar and Song settings horizontal scrollbar on the GLOBAL side, with the matching Track settings names on the TRACK side.
The GLOBAL, TRACK and SONG tabs
Three buttons run across the top of the panel. GLOBAL shows the song's global settings. TRACK n shows the focused track's settings. It does the same thing as a strip's i button, so the two gestures cannot disagree. SONG shows this song's own settings, under an ARRANGEMENT heading.
The TRACK tab always names the focused track. It is never disabled, because there is always a focused track. Focus another strip and the tab names that one. While an instrument track has focus, the tab reads INST 1, INST 2 and so on, and shows that track's settings; see Instrument tracks.
The active tab has a lit face and a 3 px rule under it, so you can tell which mode you are in without relying on colour alone.
The tabs are named Global panel tab, Song panel tab and Track panel tab in every state. The number on the face follows focus, so it could not be part of the name even if the naming rule allowed it. Each tab's description says which tab you are on and what the others would show.
The third tab is SONG rather than ARRANGE because the top bar's VIEW / ARRANGE swaps the whole body of the window, while this tab swaps only the panel. The three tabs are three scopes: GLOBAL is this session and this machine, TRACK is one track, and SONG is this song. The section heading inside the panel is ARRANGEMENT.
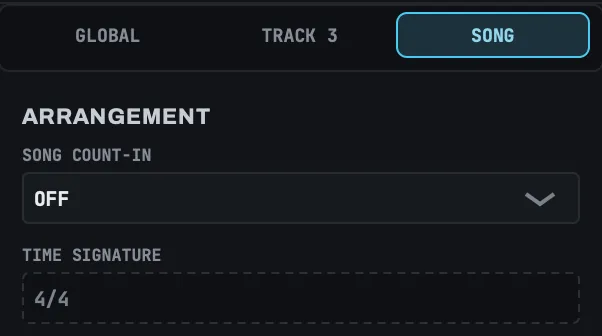
The SONG tab holds SONG COUNT-IN and TIME SIGNATURE. TIME SIGNATURE sets how many beats a bar has and what a beat is. It is saved with the song, and the bar lines, the ring's countdown and a tempo derived from a loop all count against it. It is locked on the same terms as the tempo: while any track holds a loop, or while the transport rolls, its chip is drawn behind a dashed border and refuses a change. Clear every track and stop the transport to change it.
To leave the TRACK panel, use the GLOBAL tab. To hide the panel, use the panel toggle.
The GLOBAL panel
Everything here is the song's global default: the value a track inherits until you change it on that track. Changing a setting here does not overwrite every track. A strip you have set differently in the i panel keeps its own value and shows an asterisk on its STOP face.
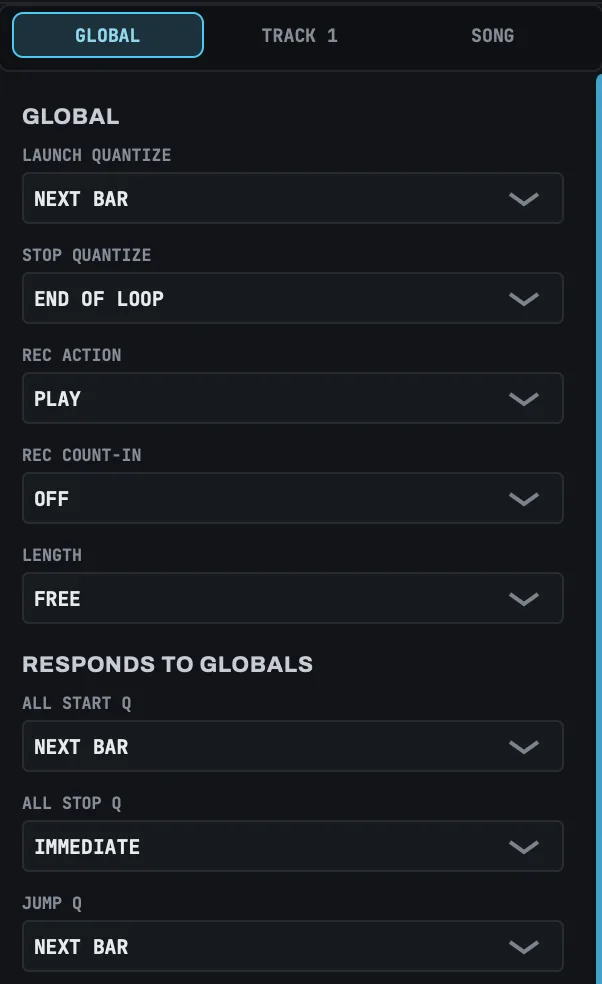
GLOBAL
| Chip | Values | What it sets |
|---|---|---|
LAUNCH QUANTIZE |
IMMEDIATE, NEXT BEAT, NEXT BAR, NEXT CYCLE |
When a launch press on a track takes effect. |
STOP QUANTIZE |
IMMEDIATE, END OF BEAT, END OF BAR, END OF LOOP |
When a track's STOP takes effect. |
REC ACTION |
PLAY, OVERDUB, STOP |
What the second ring press does: close to play, close to overdub, or close and stop. |
REC COUNT-IN |
OFF, 1 BAR … 4 BARS |
How many bars a track waits after a record press before recording starts. |
LENGTH |
FREE, 1, 2, 4, 8, 16, 32 bars |
A pre-set loop length. The recording closes by itself at the end of the last bar, with no second press. |
NEXT CYCLE and END OF LOOP follow the loop you are hearing, not the one you recorded. A track that has been stopped and started again begins its loop at the moment you restarted it, so its cycle boundary moves with it. Press STOP with END OF LOOP on a track you restarted mid-song, and it stops at the end of the pass you are listening to.
There are two count-ins, and they do different jobs. REC COUNT-IN counts forward from a record press on one track, and recording begins on the downbeat at the end of the count. SONG COUNT-IN, on the SONG tab, counts the whole transport in before bar one, in negative time. It applies only to PERFORM FROM TOP. It does not apply to PERFORM FROM HERE, which rolls from wherever the playhead already is without locating first. Each count-in's accessible description says which one it is.
Plain ROLL never counts in, whatever either setting says.
The LENGTH list is a subset. The engine accepts any bar count up to 512, but the chip offers only FREE plus six powers of two. If a song holds a count the chip cannot show, the chip displays the nearest value it can show, and nothing is written back.
RESPONDS TO GLOBALS
| Chip | Values | What it sets |
|---|---|---|
ALL START Q |
IMMEDIATE, NEXT BEAT, NEXT BAR, NEXT CYCLE |
When the ALL START button fires. |
ALL STOP Q |
IMMEDIATE, END OF BEAT, END OF BAR, END OF LOOP |
When the ALL STOP button fires. |
JUMP Q |
IMMEDIATE, NEXT BEAT, NEXT BAR |
When the playhead arrives at a bar you click in the arrange view while the song is rolling. |
These three have their own heading because the chips above set the song's default for a track, while these set when a gesture lands.
You set where the click goes in the mixer, on the click strip in the MASTER bank. See The mixer.
ALL START Q and LAUNCH QUANTIZE answer different questions. LAUNCH QUANTIZE sets when a track acts once it is started. ALL START Q sets when the button fires. After that, each track still waits for its own launch quantize.
ALL START Q starts at NEXT BAR and ALL STOP Q at IMMEDIATE. When the transport is parked there is no grid to wait for, so both buttons fire at once whatever the chips say, and ALL START also starts the transport in the same gesture: everything begins together as time starts. Setting ALL STOP Q to IMMEDIATE does not by itself stop tracks immediately. Each track then resolves on its own stop quantize, which starts at END OF LOOP.
Changing either chip writes a notice that describes what the button will do, which can differ from what you set. Set ALL STOP Q to IMMEDIATE on a song whose tracks are all at END OF LOOP, and the notice reads "ALL STOP fires at each track's loop end", because LOOM uses the later of the two. Three other forms appear:
| Notice | Means |
|---|---|
ALL STOP fires at each track's loop end at the latest |
Your tracks do not all resolve at the same moment. The time given is the last of them. |
ALL STOP fires at once now and at each track's loop end once the transport rolls |
The transport is stopped. The first time is what happens if you press now. The second is what happens once the clock is running. |
ALL STOP takes no tracks |
Every track has FOLLOWS ALL STOP off, or the song has no tracks. The press would be refused. |
ALL START writes the same four forms in its own words. Tracks you have excluded with FOLLOWS ALL START or FOLLOWS ALL STOP are not counted, because the button does not act on them.
JUMP Q starts at NEXT BAR. Of the three, it is the only one that is also a safety setting. Click a bar while the song is rolling and the playhead does not move yet: a hollow marker appears where you clicked, and the transport arrives there on the boundary this chip sets. Set it to IMMEDIATE and the song jumps the instant you click. That is useful when you want it, and it is why LOOM does not ship with that value. Escape cancels a waiting jump, and clicking the same bar again fires it at once, whatever JUMP Q is set to. With the transport parked, this setting does nothing: a click just places the playhead. There is no NEXT CYCLE value, because a cycle belongs to a track and the playhead belongs to the song.
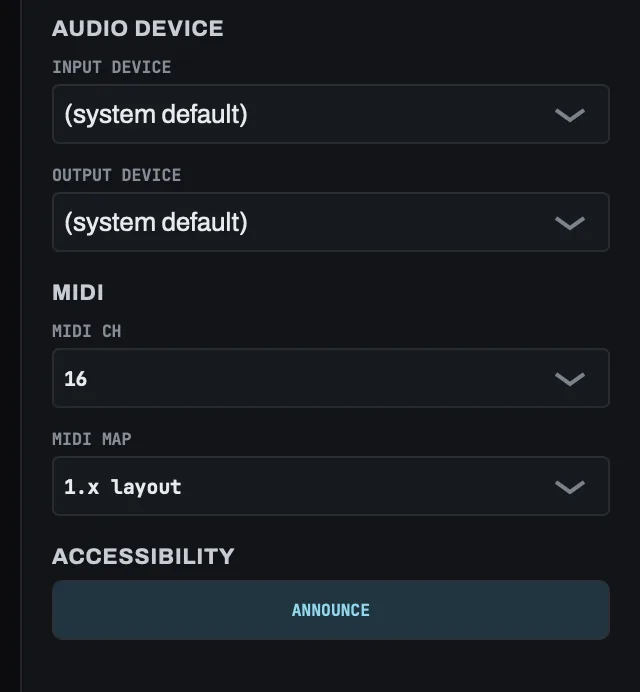
AUDIO DEVICE
| Chip | What it does |
|---|---|
INPUT DEVICE |
Chooses the input interface. Entry 0 is (system default). |
OUTPUT DEVICE |
Chooses the output interface. Entry 0 is (system default). |
Both lists refresh every time you open either dropdown, so an interface you plug in after launch appears without a relaunch. Both chips refresh from the same device scan, whichever one you opened, so a device never appears on the input side while missing from the output side.
If a selected device disappears, it keeps its entry. The chip still names the device the session is configured for, instead of silently falling back to (system default).
Changing either chip destroys every recorded loop, because a new interface means a new audio engine and nothing carries audio between engines. If any track holds something, changing a chip first raises the at-risk warning (see Dialogs). If every track is empty, the change takes one click.
If you cancel the warning, the chip returns to the interface the session is actually using.
MIDI
| Chip | What it does |
|---|---|
MIDI CH |
The channel LOOM listens on for its MIDI bindings. 16 unless you change it. |
MIDI MAP |
Which note layout LOOM answers: 1.x layout, the default, or 1.0 layout, the layout LOOM 1.0 used. The 1.0 layout will be removed in LOOM 1.4. |
They sit here because they answer the same question as the two device chips, for the other cable: what LOOM is connected to, and whether it is listening where you are talking.
Your controller must send its commands on this channel. LOOM's commands ignore every other channel, so you can drive LOOM from the same keyboard you are playing. What you play on another channel goes to the instrument tracks that listen on it, and no instrument track listens on this one.
The change takes effect immediately, with no relaunch: the old channel goes quiet and the new one starts answering. Unlike the device chips, changing it destroys nothing. No engine is rebuilt and no loop is at risk, so no warning appears.
MIDI MAP also takes effect immediately, with no relaunch, and destroys nothing. If you are holding a Clear pad when you switch it, LOOM cancels that hold. MIDI mapping prints both layouts.
The channel and the layout are stored per machine, not in the song. Take a set to another rig and it uses that rig's channel and layout, since the controller there is a different one.
To check the channel, watch the MIDI cell on the bottom rail while you press a pad (see The bottom rails). A message on the wrong channel shows there as received but unmatched, which is the problem this chip fixes.
ACCESSIBILITY
ANNOUNCE is a toggle and the only control in this section. It turns spoken announcements on and off. They help during setup and are worse than silence during a live set.
It is named Announce state changes. Turning it on announces that it is on; turning it off is silent. It silences speech only: every name, role and description stays as it is, and the notice line still shows its text.
The switch is not saved. It starts on at every launch, so if you turned it off last night, turn it off again tonight.
The TRACK panel
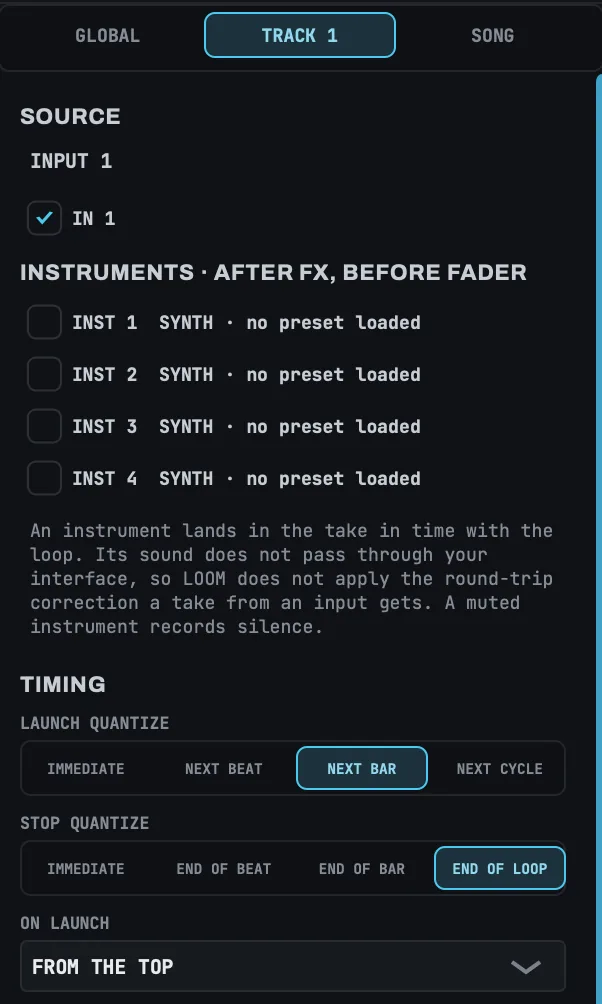
This is a single panel that moves between tracks, rather than one panel per strip, and its controls are editable.
The panel follows the focused track however focus moved: a strip press, an arrow key, or any strip verb, since each one focuses the track first. The tab, the body and the settings the chips write always refer to the same track.
The TRACK panel is the track's settings
This panel holds the focused track's settings and nothing else. The track's effect chain and the editor for each effect are in the effect drawer, which opens inside the mixer along the right edge of the rack and is described under The effect rack. The breadcrumb described there belongs to the drawer.
The settings
There are five sections, in the order you work through them when you set up a track.
SOURCE
| Control | Kind | What it does |
|---|---|---|
IN 1, IN 2, … |
One switch per input | Whether this track records that device input. |
INST 1, INST 2, … |
One switch per instrument track | Whether this track records that instrument track. |
There is one switch for each channel the open audio device offers, and one switch before a device is open. Above the switches, a line reads INPUT 1, INPUTS 1, 3 AND 4, or NO INPUTS.
A track records the sum of every input you switch on. Switch on all four drum microphones and the DRUMS track records all four mixed together. That is what a single track is for on a loop pedal, and it is why this is a row of switches rather than a list you pick one from.
Each input keeps its own trim, cue send and effects. Four microphones summed onto one track are still four inputs on the mixer, each with its own fader and EQ. A Boss loop station cannot do this.
Inputs are summed at full level. Switching on a fifth microphone does not turn the other four down. If four hot microphones together are too loud, lower the preamp gain. The track meter shows the summed signal while you record, so you can see the level.
Each track may record a different set of inputs, and two tracks may record the same input.
Below the inputs, under INSTRUMENTS · AFTER FX, BEFORE FADER, there is one switch for each instrument track, such as INST 1 SYNTH · Pad. Switch one on to record that instrument track on this audio track. The line above the switches then adds it, for example INPUT 1 + INST 1.
LOOM records the instrument after its effects and before its fader and pan, and the take lines up with the loop exactly. LOOM does not apply the latency correction it uses for a device input, because an instrument does not pass through your interface. You hear the instrument from its own strip, not from this track. A muted instrument track records silence, and its switch reads MUTED, for example INST 1 SYNTH · Pad · MUTED.
With no inputs switched on, the line reads NO INPUTS and the track records silence. This is a valid setting, not an error: the track records for its full length, closes normally and plays back silent, and nothing warns you. If a take comes back silent, check this line first.
These switches decide only what the track records. Whether you hear an input is set on the mixer's INPUTS bank (see The mixer), and the two are independent. An input you cannot hear is still recorded, and an input you can hear is audible whether or not any track records it. You never have to arm a track to hear yourself, and pressing record does not make you louder, whether one track is recording or five.
When you open a song on a smaller interface, LOOM drops the inputs it cannot reach and tells you which ones. For example, record a track on inputs 1, 5 and 9 at home, then open the song on a two-input interface at a venue. The track records input 1 tonight, and the notice lists the numbers: "track 2 recorded inputs 1, 5 and 9 … it drops inputs 5 and 9 and records input 1 tonight, and the song still says inputs 1, 5 and 9." The song itself does not change. Plug the larger interface back in and all three inputs come back. If every input a track uses is missing, the track records silence and the notice says so.
Each switch is its own tab stop. A screen reader reads each one as Record input 3, with its on or off state.
TIMING
| Control | Kind | Values |
|---|---|---|
LAUNCH QUANTIZE |
segmented row | IMMEDIATE, NEXT BEAT, NEXT BAR, NEXT CYCLE |
STOP QUANTIZE |
segmented row | IMMEDIATE, END OF BEAT, END OF BAR, END OF LOOP |
ON LAUNCH |
chip | KEEP PHASE, FROM THE TOP |
The two quantizes are segmented rows rather than dropdowns because their four values form an ordered scale (immediate, beat, bar, cycle, each coarser than the last), and a row shows that order by position. At soundcheck, you can compare five tracks with a glance along the rows.
ON LAUNCH sets where a track starts; LAUNCH QUANTIZE sets when. FROM THE TOP starts the track at its own beginning, whatever the rest of the set is doing. KEEP PHASE starts it at the point it would have reached if it had never stopped.
RECORDING
The four chips read from top to bottom in the order of the recording lifecycle.
| Chip | Values | What it does |
|---|---|---|
REC COUNT-IN |
OFF, 1 BAR … 4 BARS |
How many bars this track waits before recording begins. |
LENGTH |
FREE, 1–32 bars |
This track's pre-set loop length. |
REC ACTION |
PLAY, OVERDUB, STOP |
What this track does when its recording ends. |
DUB MODE |
SUM, REPLACE |
What an overdub pass does to the audio already there. |
SUM keeps every layer, as loopers always have. REPLACE overwrites what is under the pass. In both modes the loop and its length stay the same, so UNDO takes back the whole pass.
DUB MODE goes dead while an overdub pass is running on this track. The face reads LOCKED: DUBBING and the box still shows SUM or REPLACE. The pass keeps the mode it started with. End the pass with the track's ring, and you can change the chip again.
RESPONDS TO GLOBALS
| Control | Kind | Values |
|---|---|---|
FOLLOWS ALL START |
inline segmented row | OFF, ON |
FOLLOWS ALL STOP |
inline segmented row | OFF, ON |
These set whether the ALL START and ALL STOP buttons act on this track. OFF leaves the strip exactly as it is when the button is pressed, which suits a drone or a bed under the set. Neither setting affects this strip's own ring, and neither is the transport STOP.
FOLLOWS ALL START = OFF does not take the strip out of the transport. ALL START starts a stopped transport, and time then runs under every track, whether or not the button started it.
Both start at ON, so if you never open this panel, every strip follows both buttons.
They sit side by side because you compare them: a track you never want the button to start is often one you do want it to stop.
STATE
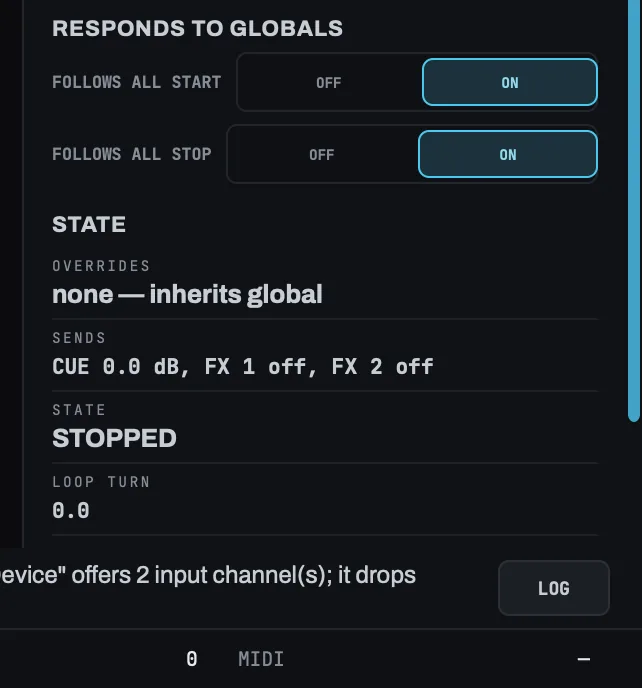
Six readouts, none of them a tab stop.
| Readout | Value |
|---|---|
OVERRIDES |
Which of this track's settings differ from the song's default, as words (stop, rec action), or none — inherits global. |
SENDS |
This track's level to each bus, in the same decibels the faders show (CUE -6.0 dB, FX 1 off (on faders), FX 2 off), or none. The bus the faders currently address is marked (on faders). |
STATE |
The ring's own state word: PLAY, DUB, STOPPED, WAIT STOP, … |
LOOP TURN |
The turn count and tenth, 2.3. |
CONTENT |
holds a loop or no content. |
IN BLOCK |
yes or no: whether the audio thread processes this track at all. |
OVERRIDES names the settings rather than counting them, including settings that have no chip in the panel, so a song someone else set up shows you the whole list. The strip's * and this line show the same fact.
SENDS is the only place where all three buses are visible at once. The faders address one bus at a time, so this line shows what a track sends to the other two without leaving the page you are working on. A send at the bottom of its range reads off rather than a very quiet number.
Two of the settings OVERRIDES can name have no chip anywhere, and neither has any effect in this build: a sub-cycle divisor, which would govern a sub-cycle quantize that nothing in LOOM reaches, and a phase lock. A song that sets either one still lists it here, because an override is a fact about the track whether or not this build draws a control for it. If OVERRIDES names either one, there is no control to find and nothing you can hear is affected.
For someone who cannot see the strip, these readouts are the only accessible view of track state.
How the panel's controls take keys
A chip is a standard combo box: Return opens the list, and the arrow keys move through it.
A segmented row is one tab stop, with the arrow keys moving inside it, like a chip. Its keys are listed in Keyboard shortcuts.
Every chip and row is named by its caption, and each cell of a segmented row carries its setting in its own name (LAUNCH QUANTIZE: NEXT BAR), so a screen reader can say NEXT BAR, selected instead of reading four anonymous buttons. Every setting also carries a sentence that says what it means, because a stage caption is only an abbreviation and does not define the setting.
On the TRACK panel, these sentences name the track they describe. The names do not, because one panel moves between tracks.
LAUNCH QUANTIZE and STOP QUANTIZE appear on both panels: the GLOBAL one sets the song's default, and the TRACK one sets that track alone. The names of the GLOBAL pair end with the panel, so a screen reader says launch quantize in the GLOBAL panel and the two are never announced the same way. Their sentences say the same thing in full.
The selected cell of a segmented row is lit and has a 3 px rule under it, so the selection does not rely on colour alone. Every cell keeps the same size and position in every state.
Where the settings start
| Setting | Starts at |
|---|---|
LAUNCH QUANTIZE |
NEXT BAR |
STOP QUANTIZE |
END OF LOOP |
REC ACTION |
PLAY |
REC COUNT-IN |
OFF |
LENGTH |
FREE |
DUB MODE |
SUM |
ALL START Q |
NEXT BAR |
ALL STOP Q |
IMMEDIATE |
JUMP Q |
NEXT BAR |
FOLLOWS ALL START and FOLLOWS ALL STOP |
ON |
ON LAUNCH |
FROM THE TOP |